- Details
- Written by Nam Ha Minh
- Last Updated on 07 August 2019 | Print Email
In Java programming, we can use the
javadoc tool for generating API documentation from comments embedded in source code (Javadoc comments). However, it requires remembering various options of this tool, which is painful and time-consuming. Eclipse IDE can help to relieve this pain by providing the
Javadoc Generation wizard. So this tutorial is going to walk you through the steps of generating Javadoc for a Java project using Eclipse. But first, let’s see some sample Javadoc comments:
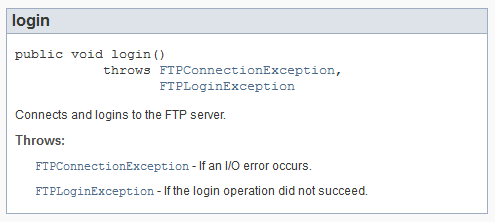
/**
 * Connects and logins to the FTP server.
 *
 * @throws FTPConnectionException If an I/O error occurs.
 * @throws FTPLoginException If the login operation did not succeed.
 */
public void login() throws FTPConnectionException, FTPLoginException {

	// method body

}
As we can see, the method
login() has some comments beginning with
/** and ending with
*/ - which make some Javadocs for the method (Javadoc comments). The generated documentation (in HTML format) for this method would look like the following screenshot:
Now, let’s see the steps in details.In Eclipse IDE, select
Generate Javadoc… from
Project menu. The
Javadoc Generation wizard appears as follows:
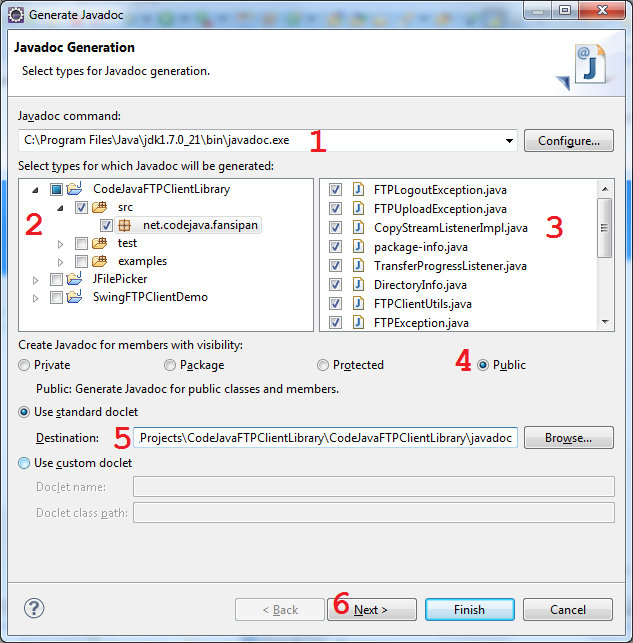
In this dialog, do the following steps (as marked by the red numbers in the above screenshot):
- Specify location of the javadocprogram on your computer. Typically, it is located under JAVA_HOME’s bin directory. For example, C:\Program Files\Java\jdk1.7.0_21\bin\javadoc.exe, on Windows platform.
- Select the project and packages for which you want to generate Javadoc.
- Narrow down the source files whose Javadocs will be generated (All files are selected by default).
- Limit what class members which will have Javadocs generated, by choosing the visibility (access modifier). For example: If Public is chosen, then only public methods will have Javadocs generated. If Protected is chosen, then only protected and public methods will have Javadocs generated, and so on.
- Specify the destination directory where the Javadocs will be put in.
- Click Next.
The next screen allows us to specify some arguments and options for the
javadoc tool, such as document title (1); document structure (2); documenting tags (3); JAR files and projects to which referenced links are generated (4); and stylesheet for the document (5):

At least you should specify the document title, leave others as default, and then click
Next.In the next screen, we can optionally specify the overview document (1); VM options (2); Extra
javadoc options (3):
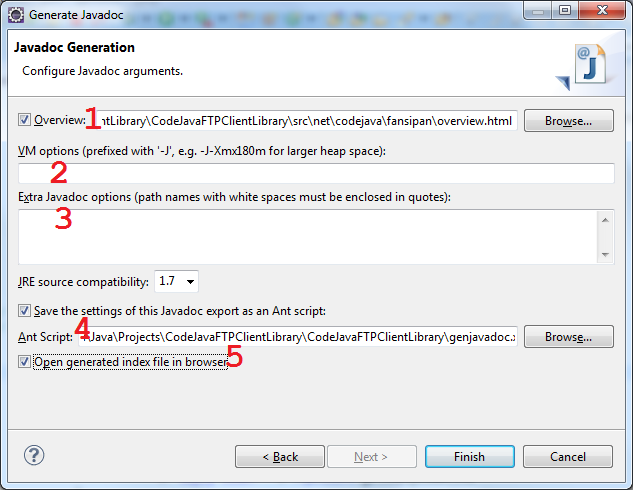
If you want to reuse the settings for future exports (recommended), check the option “
Save the settings of this Javadoc export as an Ant script” (4) and specify the location of the generated Ant build file. This option would be helpful as we tend to generate the Javadocs many times when the project evolves.If the option “
Open generated index file in browser” (5) is checked, then Eclipse will open the generated document in its internal web browser.Click
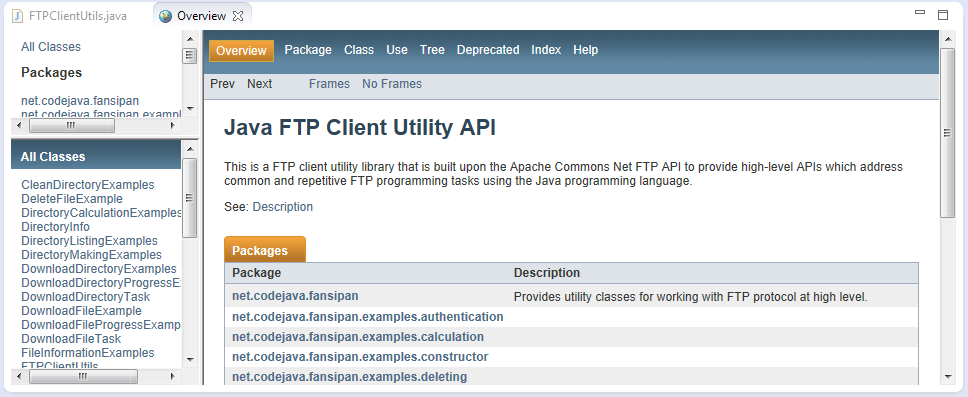
Finish, it may take a while for Eclipse to execute the
javadoc tool to parse the source files and generate all the necessary stuffs, and we end up with a nice documentation as follows (sample):
 NOTE:
NOTE: If an Ant build file is generated (when the option “
Open generated index file in browser” is checked), then you can execute this Ant file to re-generate the Javadoc without walking through the wizard again. It’s time-saving.
References:
Other Eclipse Tutorials:
About the Author:
 Nam Ha Minh
 is certified Java programmer (SCJP and SCWCD). He started programming with Java in the time of Java 1.4 and has been falling in love with Java since then. Make friend with him on
Facebook and watch
his Java videos you YouTube.