Download and Install OpenJDK 19 on macOS
- Details
- Written by Nam Ha Minh
- Last Updated on 31 December 2023 | Print Email
1. Download binary distribution of OpenJDK 19 for macOS
OpenJDK is distributed in form of compressed archive file (tar.gz for Linux/macOS). Head over to OpenJDK 19 official download page, you will see the following page: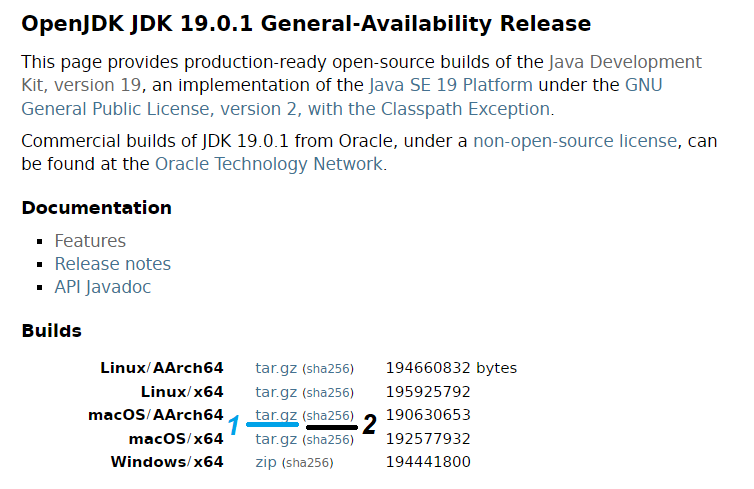 If you Mac running on Apple chip, click the link tar.gz next to macOS/AArch64 (link number 1in the screenshot above). Otherwise click the link tar.gz next to macOS/x64 if your Mac running on Intel CPU. It will download the archive file openjdk-19.0.1_macos-aarch64_bin.tar.gz onto your computer.And you should check the integrity of the downloaded file by comparing its SHA256 checksum against the value published (link number 2). So open a new Terminal window, change the current directory to location of the archive file, and type the following command:
shasum -a 256 openjdk-19.0.1_macos-aarch64_bin.tar.gz
If the SHA256 checksum printed by this command is equal to the one published on the download page, you can safely proceed next.
2. Install OpenJDK 19 on macOS
Next, you need to extract the archive file to a specific location, e.g. OpenJDK in your user home. In Terminal, you can type the following command:tar -xf openjdk-19.0.1_macos-aarch64_bin.tar.gz -C $HOME/OpenJDK
cat >> .zshrc
export JAVA_HOME=$HOME/OpenJDK/jdk-19.0.1.jdk/Contents/Home
export PATH=$JAVA_HOME/bin:$PATH
Enter a new line and press Ctrl + D to save the file. If you’re using Bash shell, update the .bash_profile file instead.Finally, to verify if OpenJDK installed properly or not, terminate the current Terminal window completely. Open a new one and type java -version and javac -version commands. You should see the following output: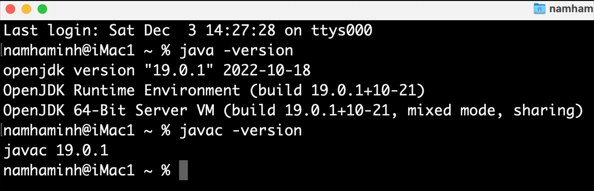 That means OpenJDK 19 has been installed successfully on macOS. I recommend you watch the following video to see the steps in action:
 Related Articles:
- How to set JAVA_HOME in macOS and Linux permanently
- How to set JAVA_HOME environment variable on Windows 10
- What are JVM, JRE and JDK
- How to write, compile and run a hello world Java program for beginners
- Java Core Language Tutorials
About the Author:
 Nam Ha Minh is certified Java programmer (SCJP and SCWCD). He began programming with Java back in the days of Java 1.4 and has been passionate about it ever since. You can connect with him on Facebook and watch his Java videos on YouTube.
Comments