JPanel basic tutorial and examples
- Details
- Written by Nam Ha Minh
- Last Updated on 06 July 2019 | Print Email
JPanel is a Swing’s lightweight container which is used to group a set of components together. JPanel is a pretty simple component which, normally, does not have a GUI (except when it is being set an opaque background or has a visual border).
In this article, we summarize the common practices when working with JPanel in Swing. At the end, we will create a sample program looks like this:
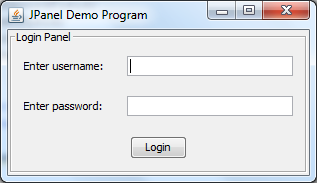
Table of content:
- Creating a new JPanel
- Setting a layout manager
- Adding components to the panel
- Adding the panel to a parent container
- Customizing appearance
- Sample application
1. Creating a new JPanel
The JPanel class resides in the package javax.swing and it’s a subclass of the javax.swing.JComponent class.
- Normally we create new JPanel object as simple as follows:
JPanel newPanel = new JPanel();
That creates a new JPanel with double enabled by default.
- Often, we create a class that extends from JPanel as follows:
public class UserDetail extends JPanel { // code to add components to the panel } - If we want to specify the double buffering strategy explicitly, use the constructor JPanel(boolean isDoubleBuffered):
JPanel newPanel = new JPanel(true);		// enable double buffering

JPanel newPanel = new JPanel(false);	// disable double buffering
- We also can specify a layout manager when creating the panel:
JPanel newPanel = new JPanel(new GridBagLayout());
JPanel newPanel = new JPanel(new BorderLayout());
By default, the panel has a flow layout manager.
- Another constructor allows us to specify both the double buffering strategy and a layout manager:
// use grid bag layout and no double buffering:
JPanel newPanel = new JPanel(new GridBagLayout(), false);
2. Setting a layout manager for JPanel
- We can call the method setLayout(LayoutManager)to specify a layout manager for the panel (after the panel is created):
JPanel newPanel = new JPanel();
newPanel.setLayout(new GridBagLayout());
- However it’s recommended to specify the layout manager when creating the panel to avoid creating the default FlowLayout object:
// NOT recommended:
JPanel newPanel = new JPanel(); // a FlowLayout manager is created by default
newPanel.setLayout(new GridBagLayout());

// RECOMMENDED:
JPanel newPanel = new JPanel(new GridBagLayout());
- One exception is the BoxLayout, whose constructor requires an existing container, so we cannot specify a BoxLayout when creating the panel. For example:
// exception:
JPanel newPanel = new JPanel();
newPanel.setLayout(new BoxLayout(newPanel, BoxLayout.X_AXIS));
3. Adding components to JPanel
To add GUI components such as JLabel, JTextField, JButton... to the panel, we use the add() method. There are different versions of the add() method, so which method to be used is depending on the layout manager of the panel.
- Use the add(Component) method for the following layout managers: FlowLayout, BoxLayout, GridLayout, or SpringLayout. For example:
JLabel label = new JLabel("Enter username:"); JTextField userName = new JTextField(20); newPanel.add(label); newPanel.add(userName); - Use the add(Component comp, Object constraints) method for the following layout managers: BorderLayout, CardLayout or GridBagLayout. For example:
JPanel newPanel = new JPanel(new BorderLayout()); JLabel label = new JLabel("Enter username:"); JTextField userName = new JTextField(20); newPanel.add(label, BorderLayout.NORTH); newPanel.add(userName, BorderLayout.SOUTH); - For GridBagLayout, we have to pass a GridBagConstraintsobject as the second argument. For example:
GridBagConstraints constraints = new GridBagConstraints();
constraints.anchor = GridBagConstraints.WEST;
constraints.insets = new Insets(10, 10, 10, 10);
constraints.gridx = 0;
constraints.gridy = 0;

newPanel.add(labelUsername, constraints);
- For CardLayout, use the add(String name, Component comp) method with the first argument is name of a card. For example:
JPanel wizardPanel = new JPanel(new CardLayout());
wizardPanel.add("Step1", step1Panel);
wizardPanel.add("Step2", step2Panel);
4. Adding JPanel to a parent container
The panel cannot stand alone. It must be added to a parent container such as a JFrame or another JPanel. For example:
frame.add(newPanel);
anotherPanel.add(newPanel);
5. Customizing appearance for JPanel
Normally, a JPanel does not render its own GUI. However we can set its background color, transparent background or border when necessary.
- Set background color:
newPanel.setBackground(Color.CYAN);
- Set transparent background:
newPanel.setOpaque(false); // make transparent background
By default, the panel’s background is opaque. - Set a raised bevel border:
newPanel.setBorder(BorderFactory.createBevelBorder(BevelBorder.RAISED));
- Set an etched border:
newPanel.setBorder(BorderFactory.createEtchedBorder());
- Set a line border:
newPanel.setBorder(BorderFactory.createLineBorder(Color.RED));
- Set a titled and etched border:
newPanel.setBorder(BorderFactory.createTitledBorder(
		BorderFactory.createEtchedBorder(), "Login Panel"));
6. JPanel Sample application
We created the following program to demonstrate the typical usages of JPanel in a Swing application. The program uses a JPanel to group some labels, textfields and a button to form a login panel as follows:

As you can notice, the panel used in this program has a titled border “Login Panel”. Here is complete source code of the program:
package net.codejava.swing.jpanel;

import java.awt.GridBagConstraints;
import java.awt.GridBagLayout;
import java.awt.Insets;

import javax.swing.BorderFactory;
import javax.swing.JButton;
import javax.swing.JFrame;
import javax.swing.JLabel;
import javax.swing.JPanel;
import javax.swing.JPasswordField;
import javax.swing.JTextField;
import javax.swing.SwingUtilities;
import javax.swing.UIManager;

/**
 * This program demonstrates how to use JPanel in Swing.
 * @author www.codejava.net
 */
public class SwingJPanelDemo extends JFrame {

	private JLabel labelUsername = new JLabel("Enter username: ");
	private JLabel labelPassword = new JLabel("Enter password: ");
	private JTextField textUsername = new JTextField(20);
	private JPasswordField fieldPassword = new JPasswordField(20);
	private JButton buttonLogin = new JButton("Login");

	public SwingJPanelDemo() {
		super("JPanel Demo Program");

		// create a new panel with GridBagLayout manager
		JPanel newPanel = new JPanel(new GridBagLayout());

		GridBagConstraints constraints = new GridBagConstraints();
		constraints.anchor = GridBagConstraints.WEST;
		constraints.insets = new Insets(10, 10, 10, 10);

		// add components to the panel
		constraints.gridx = 0;
		constraints.gridy = 0;
		newPanel.add(labelUsername, constraints);

		constraints.gridx = 1;
		newPanel.add(textUsername, constraints);

		constraints.gridx = 0;
		constraints.gridy = 1;
		newPanel.add(labelPassword, constraints);

		constraints.gridx = 1;
		newPanel.add(fieldPassword, constraints);

		constraints.gridx = 0;
		constraints.gridy = 2;
		constraints.gridwidth = 2;
		constraints.anchor = GridBagConstraints.CENTER;
		newPanel.add(buttonLogin, constraints);

		// set border for the panel
		newPanel.setBorder(BorderFactory.createTitledBorder(
				BorderFactory.createEtchedBorder(), "Login Panel"));

		// add the panel to this frame
		add(newPanel);

		pack();
		setLocationRelativeTo(null);
	}

	public static void main(String[] args) {
		// set look and feel to the system look and feel
		try {
			UIManager.setLookAndFeel(UIManager.getSystemLookAndFeelClassName());
		} catch (Exception ex) {
			ex.printStackTrace();
		}

		SwingUtilities.invokeLater(new Runnable() {
			@Override
			public void run() {
				new SwingJPanelDemo().setVisible(true);
			}
		});
	}
}
You can download the code as well as an executable jar file of this program in the attachments section.
Other Java Swing Tutorials:
- Java Swing Hello World Tutorial for Beginners Using Text Editor
- JFrame basic tutorial and examples
- JLabel basic tutorial and examples
- JTextField basic tutorial and examples
- JButton basic tutorial and examples
- JComboBox basic tutorial and examples
- JCheckBox basic tutorial and examples
- JList basic tutorial and examples
- JTree basic tutorial and examples
About the Author:
 Nam Ha Minh is certified Java programmer (SCJP and SCWCD). He began programming with Java back in the days of Java 1.4 and has been passionate about it ever since. You can connect with him on Facebook and watch his Java videos on YouTube.
| [Source code and runnable jar file] | 7 kB |