4 Ways to Change JRE for Tomcat
- Details
- Written by Nam Ha Minh
- Last Updated on 05 August 2019 | Print Email
localhost:8080/manager/status
And look at the JVM Version column: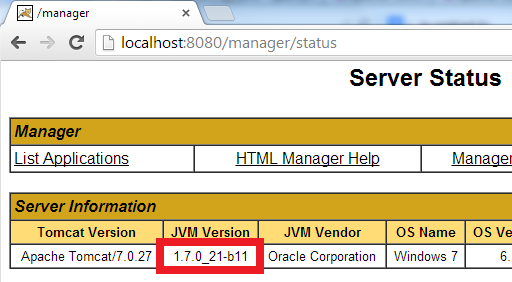
1. Changing JRE by updating JAVA_HOME or JRE_HOME
This way is very simple to implement but it works only for Tomcat installed from a zip distribution (in contrast to Tomcat installed as a service).- If only the JAVA_HOME environment variable is set, Tomcat will run under the JRE as part of the JDK specified by the JAVA_HOME variable. Therefore, we change JRE for Tomcat by updating this variable.
- If both the JAVA_HOME and JRE_HOME environment variables are set, the JRE_HOME is preferred. Here’s an example of a valid value for the JRE_HOME variable (path on Windows):
JRE_HOME=C:\Program Files\Java\jre7
Notice that updating the JAVA_HOME or JRE_HOME environment variables will affect all the applications that depend on them, so if you want to look for a more independent approach, see the second way as described below.2. Changing JRE by using “setenv” script
We can change the JRE for Tomcat by setting the JRE_HOME variable in a script file called setenv.bat (on Windows) or setenv.sh (on *nix). This file does not exist by default, so create such file and place it under CATALINA_BASE\bin directory (CATALINA_BASE is the Tomcat installation directory).set "JRE_HOME=C:\Program Files\Java\jdk1.7.0_03\jre" exit /b 0On *nix, create the setenv.sh file with the following content:
JRE_HOME=/usr/java/jdk1.7.0_03/jre
CATALINA_PID="$CATALINA_BASE/tomcat.pid"
Note that this way only works with Tomcat installed from a zip distribution. It doesn’t apply for Tomcat installed as a service. Behind the scenes, the Tomcat’s start up script (startup.bat/startup.sh) will invoke the “setenv” script if it is present. One advantage of this way is that it doesn’t affect the system environment variables.
3. Changing JRE in Tomcat service manager
For a Tomcat installation which is installed as a service (on Windows), we can change the version of JRE that runs Tomcat by configuring the Java Virtual Machine setting in the Tomcat service manager program (e.g. Tomcat7w.exe), as shown in the following screenshot: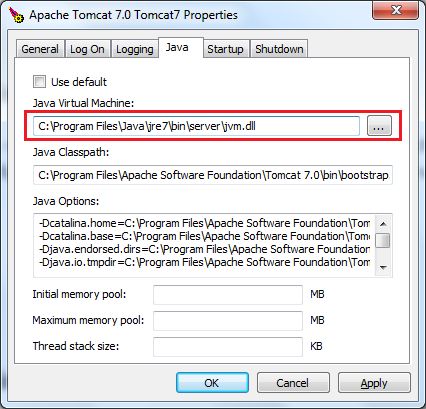 This way is very simple to perform, and it does not depend on the system environment variables JAVA_HOME or JRE_HOME.
 4. Changing JRE in Eclipse IDE
If you are using Tomcat inside Eclipse IDE, changing the JRE version for Tomcat is also pretty easy. By default, Tomcat is running under the same JRE as Eclipse (Workbench default JRE). To change JRE version for a Tomcat runtime in Eclipse, go to the menu Window > Preferences. In the Preferences dialog, open the Server > Runtime Environments node, select a Tomcat version in the list, and then click the Edit button: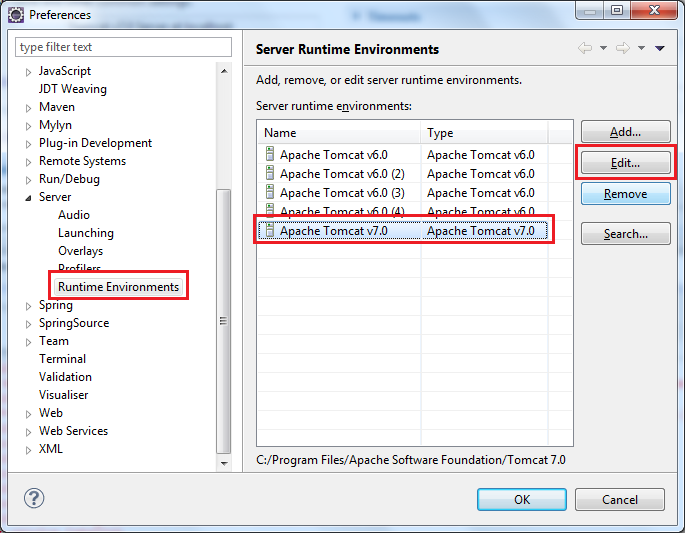 The Edit Server Runtime Environment dialog appears, select the targeted JRE version under the JRE list:
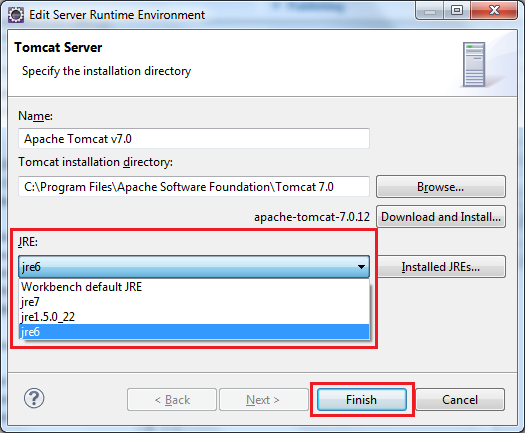 Click Finish to close this dialog, and click OK to close the Preferences dialog. Now restart Tomcat to see the effect. Note that we can spot the JRE version by looking at the Console view as shown below:
Other Tomcat Tutorials:
- How to deploy a Java web application on Tomcat
- How to Embed Tomcat Server into Java Web Applications
- How to Use Virtual Hosts in Tomcat
- Configuring JNDI DataSource for Database Connection Pooling in Tomcat
- How to set web application context path as server root in Tomcat
- How to configure session timeout in Tomcat
- Change Tomcat port numbers in server.xml file
- How to add Tomcat server in Eclipse IDE
- How to change server location and deploy path for Tomcat in Eclipse
About the Author:
 Nam Ha Minh is certified Java programmer (SCJP and SCWCD). He started programming with Java in the time of Java 1.4 and has been falling in love with Java since then. Make friend with him on Facebook and watch his Java videos you YouTube.