Create Docker Image for Spring Boot Application
- Details
- Written by Nam Ha Minh
- Last Updated on 02 June 2022 | Print Email
- Docker Desktop (for Windows or macOS) or Docker Engine for Linux
- An account on Docker Hub
- An existing Spring Boot project without database server (I’ll share how to create Docker image for Spring boot app with database in a separate article). Also you need to have JDK and Maven installed.
1. What is Docker?
Let’s understand briefly about Docker. You know, Docker enables you to separate your applications from infrastructure so you can deliver software quickly. It provides the ability to package and run application in a container - a loosely isolated Linux environment.Compared to virtual machines, containers are more lightweight and faster as they share the same operating system. Whereas each virtual machine needs to run on its own OS. Docker engine is the software that manages containers running on a computer.You can use Docker for the following purposes (not limited to):- Deploy your application as a container
- Share your app as a Docker image so everyone can get the same container that works in the same way
- Test different versions of your app in separate containers, without affecting development and production environment
- Streamline development with Continuous Integration and Continuous Delivery (CI/CD) workflows.
2. Package Spring Boot Project
Open a new command prompt (Windows) or terminal (macOS/Linux). Change the current directory to the project’s root directory. For example:cd SpringBootFormExample
Then type the following commands to clean and package the project:mvn clean
mvn package
Depending on the packaging type specified in the project’s pom.xml file, a WAR or JAR file will be created under the target directory. As you can see in the Maven’s ouput:[INFO] Processing war project [INFO] Copying webapp resources [f:\SpringBoot\SpringBootFormExample\src\main\webapp] [INFO] Webapp assembled in [303 msecs] [INFO] Building war: f:\SpringBoot\SpringBootFormExample\target\SpringBootFormExample-1.0.war
3. Create Dockerfile
To create a Docker image for the Spring Boot application packaged in the previous step, you need to create a text file called Dockerfile under the project’s root (Note: no extension, just Dockerfile). And specify the following content:FROM openjdk:11 COPY target/SpringBootFormExample-1.0.war SpringBootFormExample-1.0.war ENTRYPOINT ["java", "-jar", "/SpringBootFormExample-1.0.war"]The first line uses the command FROM that specifies an image name which can be found on Docker Hub registry. The image name openjdk:11 is an official image created by Docker. It contains a Linux operating system with OpenJDK version 11 installed.The second line (COPY) copies the WAR file from the project’s target directory to the root directory of the operating system in the created image.The third line (ENTRYPOINT) specifies the command that will launch the Spring Boot application when a container started from the image.
4. Build Docker Image for Spring Boot Application
Next, type the following command to build a Docker image for the current Spring Boot project:docker build -t form-example .
Note that there is a dot (.) at the end, denoting the current directory. You’ll see the following output: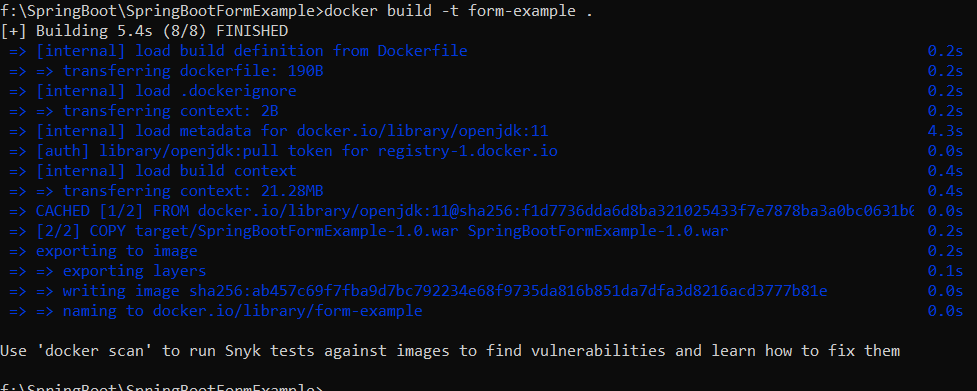 You can see it pulls the image openjdk:11 from registry-1.docker.io, copies the WAR file and creates the image. Then type docker images to verify:
 You can see the image created with the name form-example with the size is about 681MB.
 5. Run Spring Boot Application as a Docker Container
With the Docker image built in the previous step, you can now run it as a container. Docker allows you to run a container in either detached mode or attached mode.Run Docker image in attached mode:
In attached mode, the Docker command-line client’s console is attached to the output of the application running in the container. Type the following command to run the image form-example:docker run -p 8080:8080 form-example
Here, the -p flag specifies port bind between the port number on the host OS with the port number in the container. You’ll the familiar startup logs of a Spring Boot application: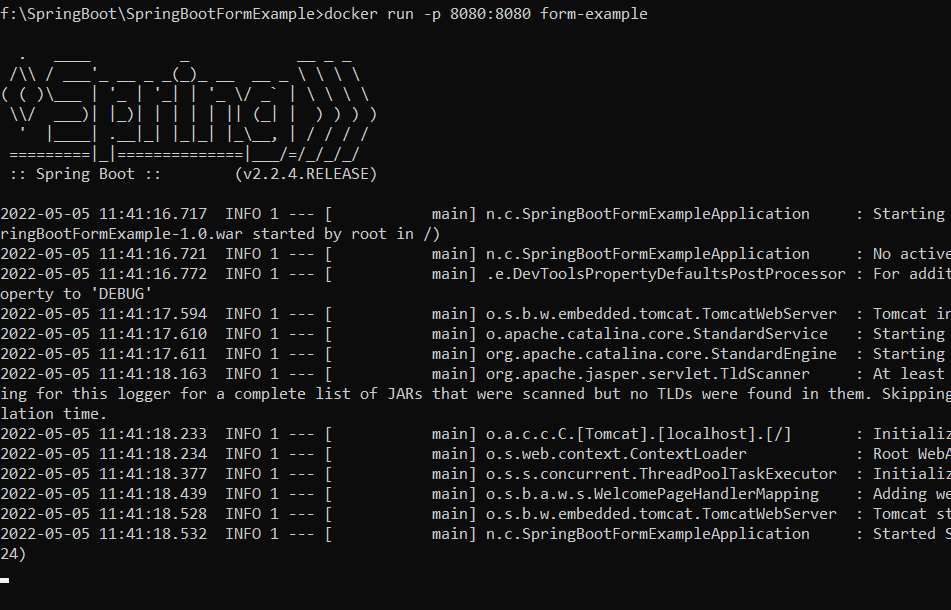 If you see this, it means the Spring Boot application is running inside a Docker container, ready to accept incoming requests via port 8080. You can now type http://localhost:8080 in your browser to access the Spring Boot application deployed as a Docker container.Note that the current command prompt/terminal is attached to the application’s output. So open a new command prompt and type docker ps to see a list of running containers:
 You see, there’s one container running from the image form-example. And the container is assigned a random, friendly name brave_lamport.To stop the container, type docker stopcommand as below:
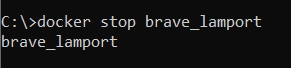 You can specify the container’s assigned name or container ID as seen by the docker ps command.
 Run Docker image in detached mode:
Type the following command to run a container from the image form-example in detached mode:docker run -dp 80:8080 form-example
Here, the -d flag is for detached mode. The command starts a new container and returns immediately, resulting the container running in background. That means you won’t see the output of your Spring Boot application: Now, type docker ps command, you’ll see another container created and running:
 You see, this time it binds the port 80 in host machine with the port 8080 in the container, which means you should access your Spring Boot application via URL http://localhost.
 6. Share Docker Image on Docker Hub
You can share your Docker image on Docker Hub (a public registry managed by Docker) so everyone can get the same container that works in the same way.Sign in to https://hub.docker.com and click Create Repository button to create a new repository (choose the visibility is public). For example, I created the repository namhm/form-example.Then in the command line, type the following command to update tag name of the image according to the repository name:docker tag form-example namhm/form-example
Then type the following command to log into Docker Hub in command line:docker login -u your_user_name
You need to provide password. Then type this command to share the image:docker push namhm/form-example
Done. Wait a while for the image being uploaded to Docker registry. Then you can switch to your Docker Hub account to verify the image pushed successfully.That’s my tutorial about Creating Docker image for Spring Boot application. You also learn how to run Docker image and share the image on Docker Hub. To see the steps in action, I recommend you watch the following video: Reference Links:Related Articles:
You might be also interested in these articles:- Deploy Simple Spring Boot Project to Heroku using Git and Heroku CLI
- Deploy Spring Boot App with MySQL Database on Heroku
About the Author:
 Nam Ha Minh is certified Java programmer (SCJP and SCWCD). He began programming with Java back in the days of Java 1.4 and has been passionate about it ever since. You can connect with him on Facebook and watch his Java videos on YouTube.