In this Java Spring tutorial, you will learn how to implement a simple dependency injection example in Spring framework with XML configuration. To understand the core concepts of dependency injection, please refer to the article What is Dependency Injection with Java Code Example.You know, dependency injection is the corner-stone of Spring framework, so having a good understanding about dependency injection is the first step to get started with Spring - one of the most popular frameworks for building enterprise Java applications.
1. Create Maven Project in Eclipse
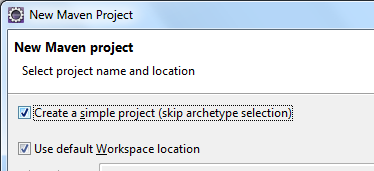
In Eclipse, click menu File > New > Maven Project. In the New Maven Project dialog, check the option Create a simple project (skip archetype selection): Click Next. Then enter Group Id and Artifact Id for the project like this:
Click Finish, and wait for few seconds while Eclipse is generating the structure for the project.Open the pom.xmlfile, and copy - paste the following XML code just before the </project> closing tag:
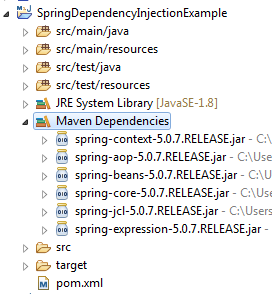
This spring-context is the minimum dependency for using Spring framework so you can work with its dependency injection feature. Save the file, and you will see Maven automatically downloads the required JAR files as shown below: Next, create a Java package called net.codejavaunder src/main/java folder. And create some Java classes as described in the What is Dependency Injection with Java Code Example tutorial.The interface Client:
package net.codejava;

public interface Client {
	void doSomething();
}
The class ClientA - an implementation of Client:
package net.codejava;

public class ClientA implements Client {

	Service service;

	public ClientA(Service service) {
		this.service = service;
	}

	@Override
	public void doSomething() {

		String info = service.getInfo();
		System.out.println(info);
	}

	public void setService(Service service) {
		this.service = service;
	}
}
The interface Service - which is used by ClientA:
package net.codejava;

public interface Service {
	String getInfo();
}
The class ServiceB - an implementation of Service:
package net.codejava;

public class ServiceB implements Service {

	@Override
	public String getInfo() {
		return "ServiceB's Info";
	}
}
You see, the ClientA and ServiceB classes are independent of each other. ClientA is not aware the existence of ServiceB, as it works with only an implementation of Service. Then the job of Spring framework is to inject an instance of ServiceB to ClientA via XML configuration as you will do below.
2. Configure Dependency Injection using XML
Spring framework allows you to configure the dependency among classes using a XML file called application context file. Under the src/main/resources folder, create a XML file named applicationContext.xml with the following content:
This is called constructor injection.You see, the wiring of dependencies is done via XML so the client and service classes are very loosely coupled.The following example shows how to inject the dependency using setter injection:
ClientA remains unchanged and is not aware of this change, thus increase the flexibility, independence and reusability of code.
3. Test Spring Dependency Injection
To test what have created so far, create a Java class with main method named SpringDependencyExample with the following code:
package net.codejava;

import org.springframework.context.ApplicationContext;
import org.springframework.context.support.ClassPathXmlApplicationContext;

public class SpringDependencyExample {

	public static void main(String[] args) {
		ApplicationContext appContext
			= new ClassPathXmlApplicationContext("classpath:applicationContext.xml");

		Client client = (Client) appContext.getBean("client1");
		client.doSomething();
	}

}
In this program, we load the Spring’s application context from the specified XML file applicationContext.xml, get a bean named service1 from the context, cast it to Client type and invoke its method:
The getBean() method of the ApplicationContext class is used to retrieve the reference of an instance managed by Spring’s IoC (Inversion of Control) container.That’s basically how to use dependency injection with Spring framework. You use the <bean> tags to declare the dependencies in a XML file, use the ClassPathXmlApplicationContext class to load the configuration from the XML file, and call getBean() method to retrieve a bean instance from the container.We hope you found this tutorial helpful to get started with Spring framework from its core concept - dependency injection.
Nam Ha Minh is certified Java programmer (SCJP and SCWCD). He started programming with Java in the time of Java 1.4 and has been falling in love with Java since then. Make friend with him on Facebook and watch his Java videos you YouTube.
 Click Next. Then enter Group Id and Artifact Id for the project like this:
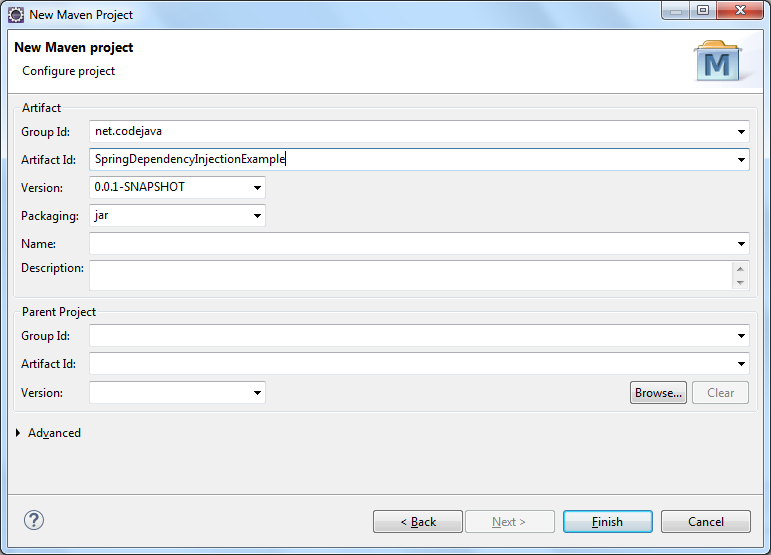
 Next, create a Java package called net.codejavaunder src/main/java folder. And create some Java classes as described in the What is Dependency Injection with Java Code Example tutorial.The interface Client:
 Nam Ha Minh is certified Java programmer (SCJP and SCWCD). He started programming with Java in the time of Java 1.4 and has been falling in love with Java since then. Make friend with him on Facebook and watch his Java videos you YouTube.
Comments