Spring MVC beginner tutorial with Spring Tool Suite IDE
- Details
- Written by Nam Ha Minh
- Last Updated on 11 March 2020 | Print Email
- Spring framework 3.2.2
- Spring Tool Suite IDE 3.2.0 (based on Eclipse Juno 4.2.2).
- vFabric tc Server Developer Edition v2.8 (based on Apache Tomcat and optimized for Spring applications).
1. About Spring Tool Suite IDE
2. A brief overview about Spring MVC
3. Creating a Spring MVC project in Spring Tool Suite IDE
3.1.Maven dependencies configuration
3.3.Web deployment descriptor (web.xml)
3.4.The example controller: HomeController.java
3.5.The example JSP view: home.jsp
4. Deploying and running the application
Watch this tutorial in video:1. About Spring Tool Suite IDE
Spring Tool Suite (STS) is an Eclipse-based IDE which is dedicated for developing Spring-based projects. It is actively developed and maintained by the SpringSource community. STS facilitates and simplifies Spring-based applications development by providing robust project templates such as Spring Batch, Spring Integration, Spring Persistence (Hibernate + JPA), Spring MVC, etc. In addition, with Maven integration, STS releases developers from manually managing Spring jar files in their projects. You always get the latest update of Spring artifacts from Maven repository.You can choose to download and install STS in one of three ways:- Download and install STS from an installer program.
- Install STS through Eclipse update.
- Download and extract zip archive.
2. A brief overview about Spring MVC
Let’s take a look at how Spring MVC works. The following diagram depicts the architecture of Spring MVC framework: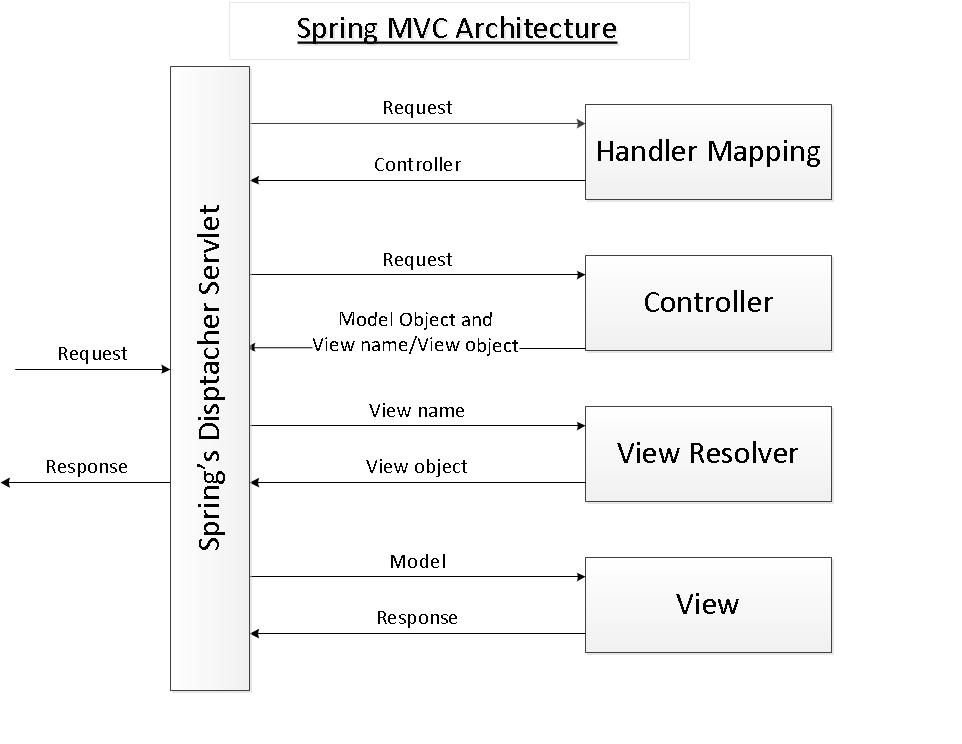 As its name says, the Spring MVC framework is based on the Model - View - Controller (MVC) design pattern which separates the application’s logic into the three layers Mode, View and Controller. MVC is implemented in Spring by the following components:
- Spring’s dispatcher servlet: acts as a front controller between the Spring application and its clients. The dispatcher servlet intercepts all requests coming to the application and consults the Handler Mapping for which controller to be invoked to handle the requests.
- Handler Mapping: is responsible to find appropriate controllers that handle specific requests. The mapping between request URLs and controller classes is done via XML configuration or annotations.
- Controller:is responsible to process the requests by calling other business/service classes. The output can be attached to model objects which will be sent to the view. To know which view will be rendered, the controller consults the View Resolver.
- View Resolver: finds the physical view files from the logical names.
- View:physical view files which can be JSP, HTML, XML, Velocity template, etc.
3. Creating a Spring MVC project in Spring Tool Suite IDE
Now let’s play with the Spring Tool Suite IDE to see how it leverages Spring application development.Start STS in your own workspace and make sure the current perspective is Spring (default). From main menu, select File > New > Spring Template Project: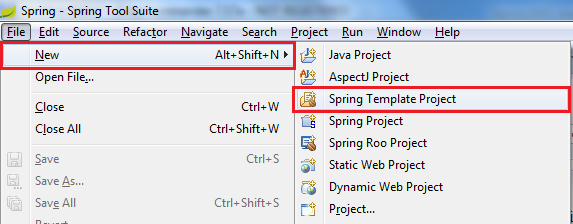 In the New Template Project dialog, select Spring MVC Project:
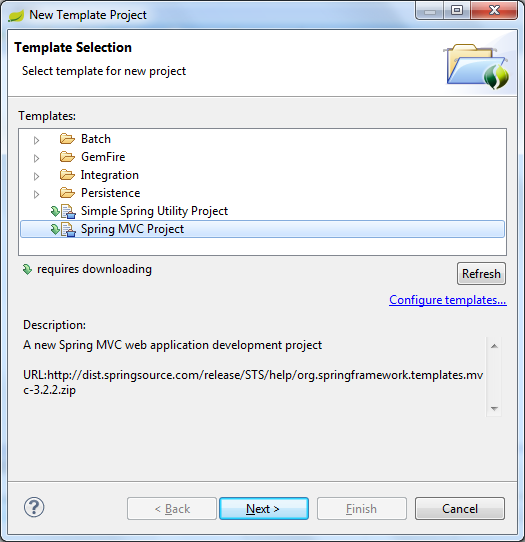 Click Next, it requires downloading an update of the template (for the first time you use this template or whenever an update available):
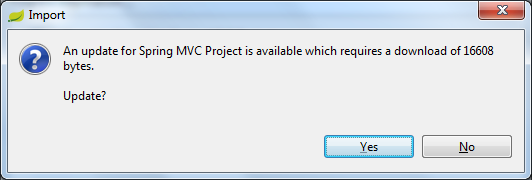 Click Yes to download the update, it should process quickly and then bring the New Spring MVC Project:
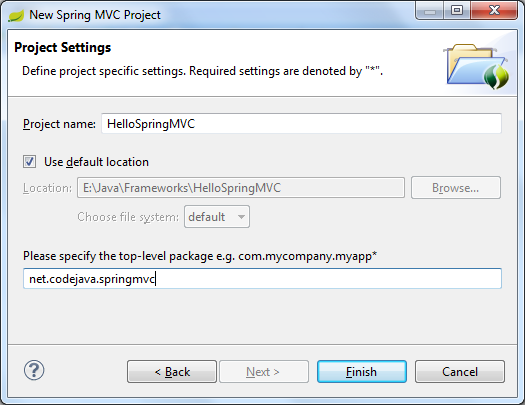 In this dialog, enter the following information:
- Project name: HelloSpringMVC
- Top-level package: net.codejava.springmvc
 And errors in the Markers views like this:
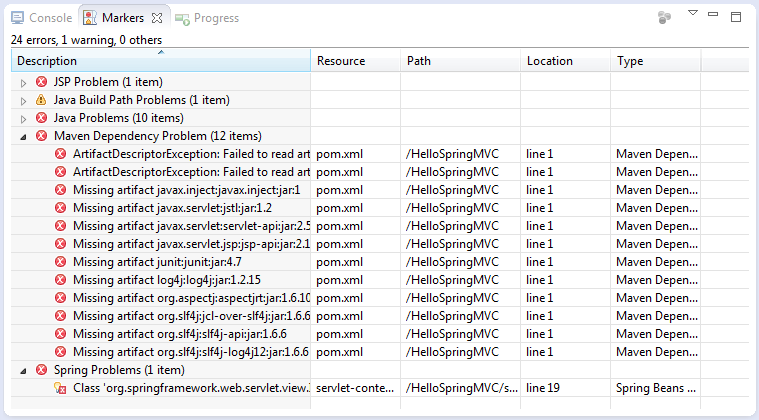 Don’t worry, that’s because Maven hasn’t update some dependencies yet. We are going to fix these errors right now. Right click on project name in the Project Explorer view, select Maven > Update Project… from the context menu:
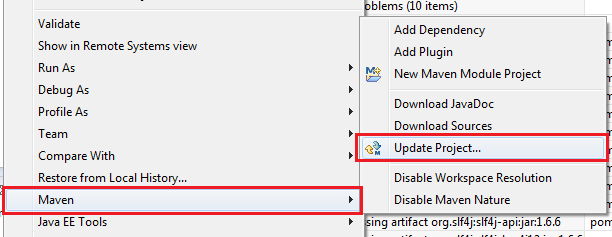 In the Update Maven Project dialog, select the checkbox Force Update of Snapshots/Releases:
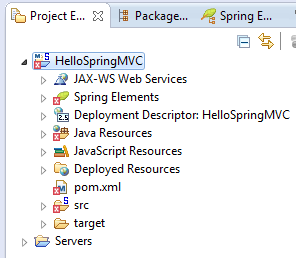
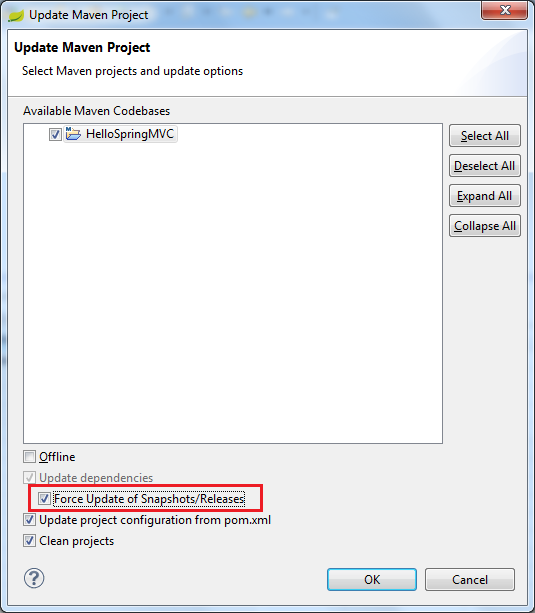 Click Finish, wait a while for Maven downloading the required dependencies then the errors will be gone away.Now let’s explore what has been created by the Spring MVC Project template. Expand the branches in the Project Explorer view, we would see the project is structured like this:
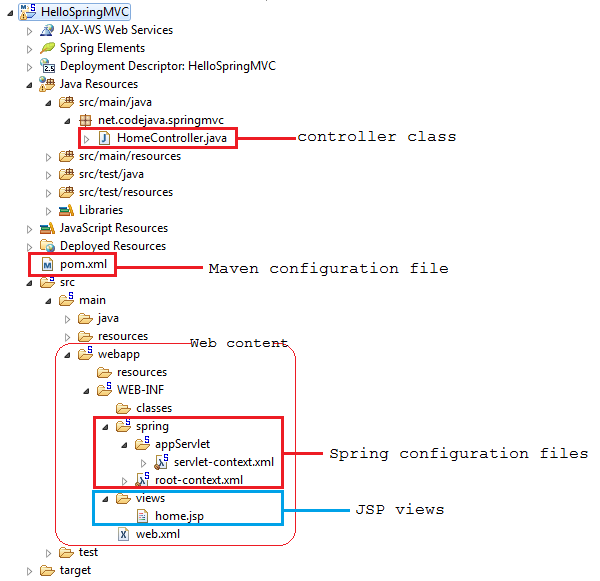 As we can see, STS created all the nuts and bolts for a typical Spring MVC application: XML configuration, jar dependencies, an example controller, and an example JSP view. Let’s look at these pieces in more details.
 3.1. Maven dependencies configuration
Here’s a partial content of the pom.xml file: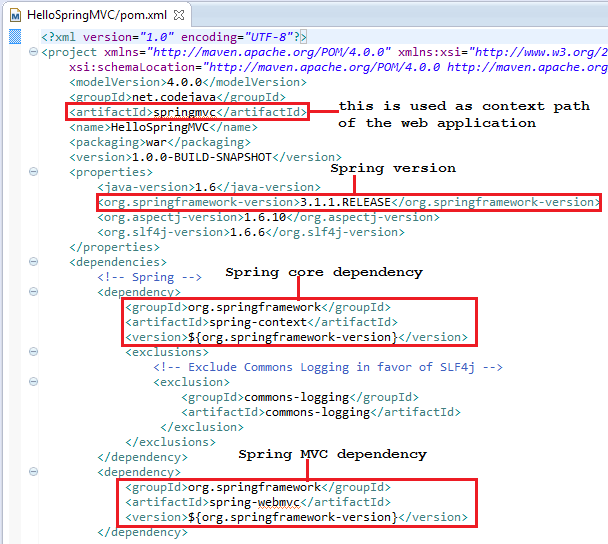 The generated pom.xml file includes all necessary dependencies for Spring core and Spring MVC, as well as servlet API, logging, etc. The noteworthy points are marked by red rectangles in the screenshot above.Value of the artifactId element will be used as context path of the web application when deploying the project on a server running within the IDE. That means we will access this application in the following form:
http://localhost:port/springmvc
If we want to change version of Spring framework, just updating value of the org.springframework-version element. Because the version 3.1.1.RELEASE is not the latest, change it to the latest release 3.2.2.RELEASE (at writing time) as follows:<org.springframework-version>3.2.2.RELEASE</org.springframework-version>
Just by saving the pom.xml file, Maven will detect the change and updates all the related dependencies immediately.3.2. Spring MVC configuration
STS created two Spring configuration files: root-context.xml and servlet-context.xml.root-context.xml: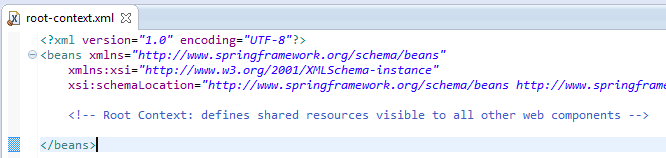 This specifies configuration for root Spring container which are shared by all servlets and filters. The root-context.xml file is loaded by the Spring’s ContextLoaderListener upon application’s startup. This file is empty by default.servlet-context.xml:
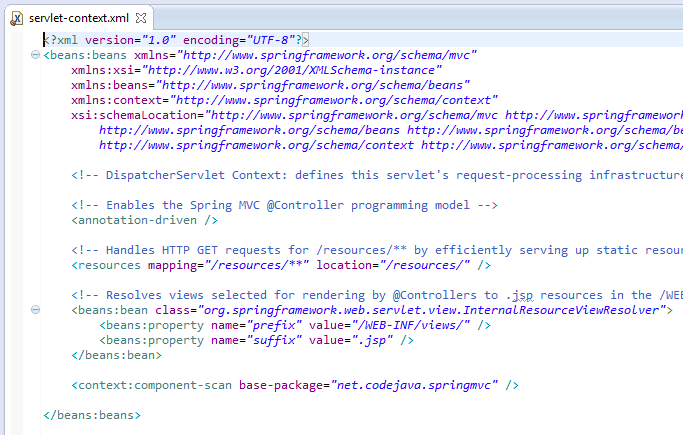 This file is loaded by the Spring’s DispatcherServlet which receives all requests coming into the application and dispatches processing for controllers, based on the configuration specified in this servlet-context.xml file. Let’s look at some default configurations:
- <annotation-driven />: tells the framework to use annotations-based approach to scan files in the specified packages. Thus we can use the @Controller annotation for the controller class, instead of declaring XML elements.
- <resources mapping=…/>: maps static resources directly with HTTP GET requests. For example images, javascript, CSS,.. resources do not have to go through controllers.
- Bean InternalResourceViewResolver: this bean declaration tells the framework how to find physical JSP files according to logical view names returned by the controllers, by attaching the prefix and the suffix to a view name. For example, if a controller’s method returns “home” as logical view name, then the framework will find a physical file “home.jsp” under the /WEB-INF/views directory.
- <context:component-scan …/>: tell the framework which packages to be scanned when using annotation-based strategy. Here the framework will scan all classes under the package net.codejava.springmvc.
3.3. Web deployment descriptor (web.xml)
Here is content of the generated web.xml file: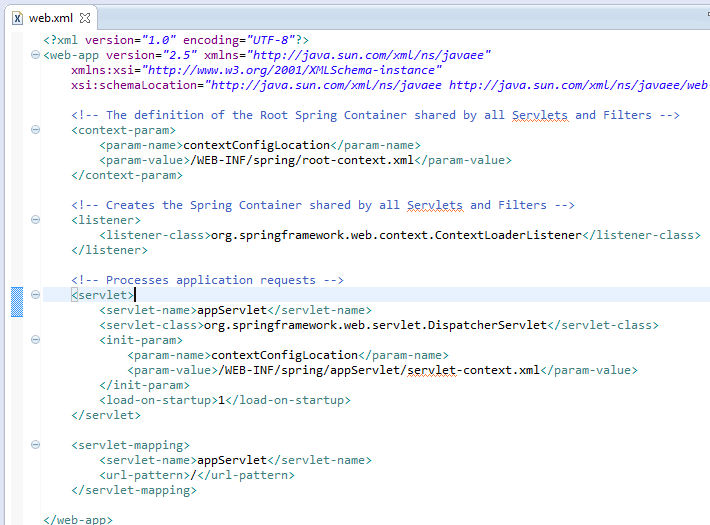 This is the typical configuration for a Spring MVC-based application with declaration for Spring’s ContextLoaderListener and DispatcherServlet along with the Spring configuration files root-context.xml and servlet-context.xml. Finally, it specifies the URL mapping for Spring’s DispatcherServlet to handle all requests.
 3.4. The example controller: HomeController.java
Following is the generated code of the controller class: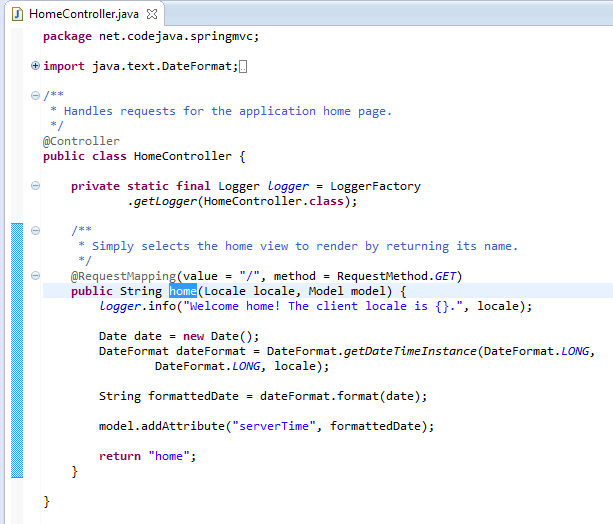 As we can see, the @Controller annotation is used to specify this class is a Spring controller, and the @RequestMapping annotation specifies that the home() method will handle a GET request with the URL / (default page of the application). In one controller class we can write many methods to handle different URLs.Inside the home() method, it creates a String object to hold the current date based on the current locale, and adds this object to the model with the name “serverTime”:
model.addAttribute("serverTime", formattedDate);
And finally the method returns a view named “home”, which will be resolved by the view resolver specified in the servlet-context.xml file, to find the actual view file.
3.5. The example JSP view: home.jsp
The home.jsp file is generated under /WEB-INF/views directory with the following content: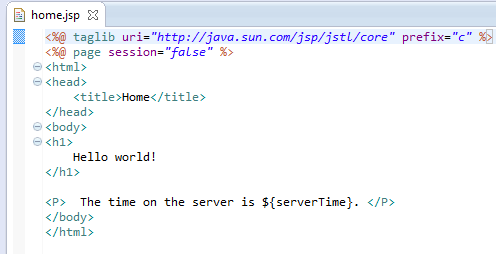 This code is very simple, it just prints out value of the variable “serverTime” which is passed by the controller, using an EL expression:
The time on the server is ${serverTime}.
So far we have gone through all the stuffs generated by the Spring MVC Project template. Notice we haven’t written any line of code yet, but the application is ready to be deployed and tested now. Let’s go!4. Deploying and running the application
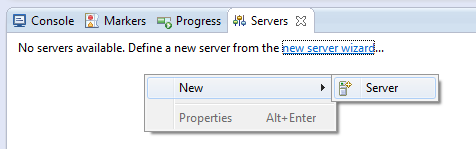
In Spring Tool Suite IDE, switch to the Servers view. Probably you should see the VMWare vFabric tc Server like this: If you don’t see any server, follow these steps to add one:
- Right click inside the Servers view then select New > Server from the context menu (Or click on the link new server wizard, if this link available):
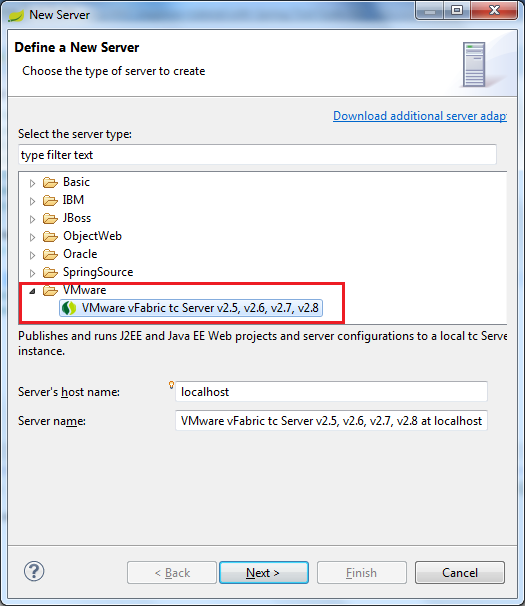
- In the New Server dialog, select VMware > VMware vFabric tc Server…as follows:
- Click Next, you may have to select installation directory for the server:
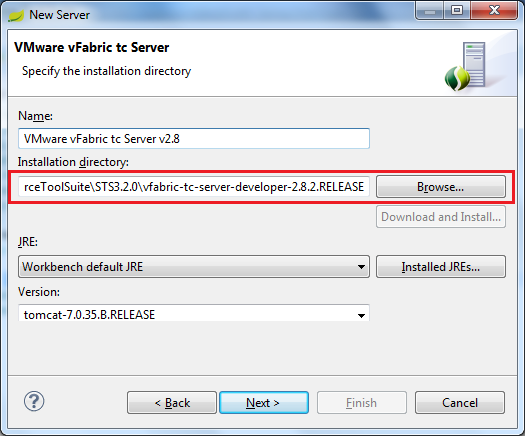 For a STS installation, the server usually installed in the following directory:
STS_HOME\vfabric-tc-server-developer-VERSION
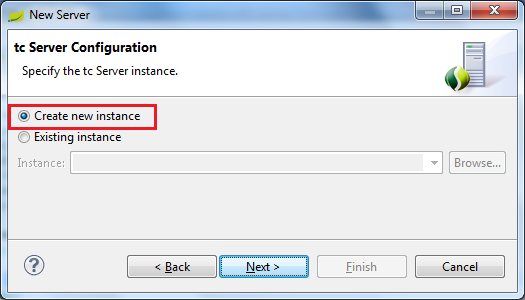
- Click Next. In the next screen, keep the option Create a new instanceselected:
- Click Next. In the next screen, type tcServer as name for the new instance and select base as the template:
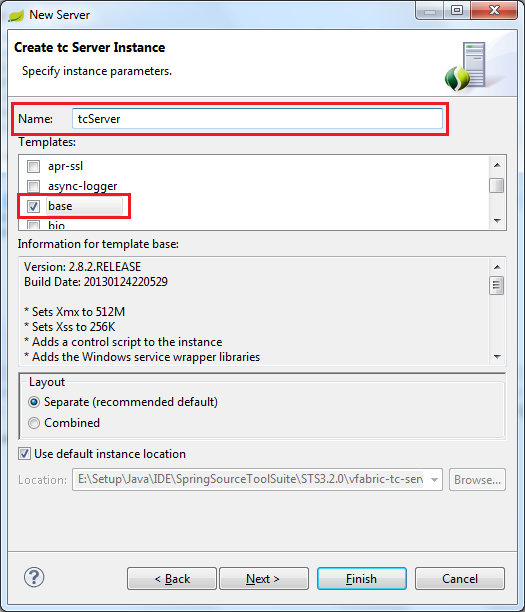
- Click Finish, to complete the server setup and you should see the server appears in the Servers view.
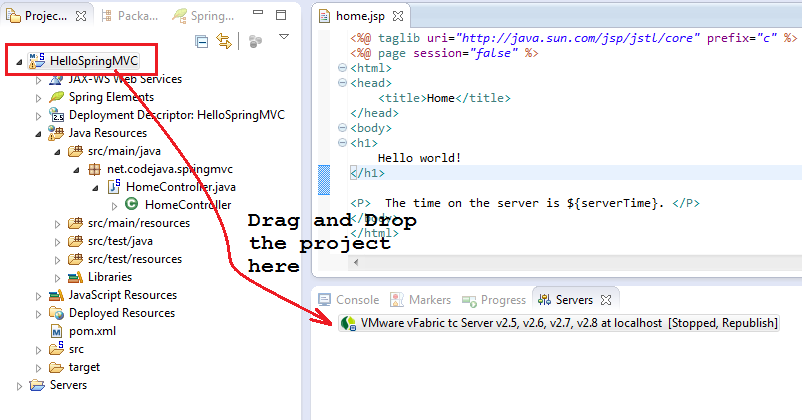 The application is deployed on the server if we see it beneath the server name like this:
 Start the server by right clicking on the server name then select Start from the context menu (or click on the start icon). Wait for seconds while the server is starting, you should see some verbose output in the Console view:
 Notice the last line indicates the server has been started without any problem. Open a web browser window and type the following URL into its address bar:
http://localhost:8080/springmvc
If everything is going well (of course), we would see following screen: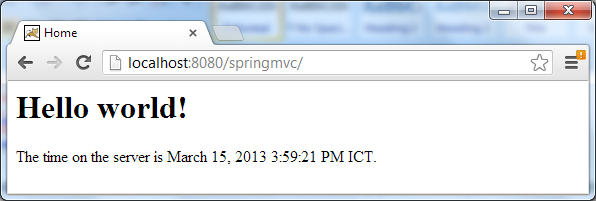 Congratulations! We have got our first Spring MVC application running, it prints the current date time on the server. If you refresh the page, you should see the time changes.
5. Modifying the project
So far we have tested and seen the generated application running. Now let’s add some changes to the project for further understanding Spring MVC.Add the following method into the HomeController.java class:@RequestMapping(value = "/test", method = RequestMethod.GET)
public String test(Model model) {
String greetings = "Greetings, Spring MVC!";
model.addAttribute("message", greetings);
return "test";
}This method will handle requests having the URL pattern /testand does the following chore:- Adds a String object as an attribute into the model with name “message” and value is “Greetings, Spring MVC!”.
- Returns a logical view named “test”.
<%@ taglib uri="http://java.sun.com/jsp/jstl/core" prefix="c" %>
<%@ page session="false" %>
<html>
<head>
	<title>Test page</title>
</head>
<body>
<h1>
	${message}
</h1>
</body>
</html>
This page is deadly simple, as it prints out value of the variable “message” which will be passed by the controller. Now get back to the browser window, change the URL to:http://localhost:8080/springmvc/test
Hit Enter, we should be welcomed by the following screen: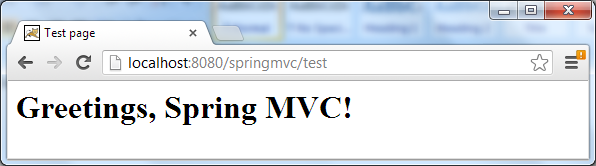 Hurrah! We have finished walking through a quite long journey with Spring Tool Suite IDE and our first Spring MVC application. We hope this tutorial would be useful for those who want to be leveraged by Spring Tool Suite in Spring applications development. It’s time to break!
 Other Spring Tutorials:
- Spring Dependency Injection Example (XML)
- Understand the core of Spring framework
- Understand Spring MVC
- Understand Spring AOP
- Spring MVC Form Handling Tutorial
- Spring MVC Form Validation Tutorial
- 14 Tips for Writing Spring MVC Controller
- Spring Web MVC Security Basic Example (XML Configuration)
- Understand Spring Data JPA with Simple Example
About the Author:
 Nam Ha Minh is certified Java programmer (SCJP and SCWCD). He began programming with Java back in the days of Java 1.4 and has been passionate about it ever since. You can connect with him on Facebook and watch his Java videos on YouTube.