Download and Install OpenJDK 25 on macOS
- Details
- Written by Nam Ha Minh
- Last Updated on 18 October 2026 | Print Email
Java 25 was officially released in September 2025 as a Long-Term Support (LTS) version. It introduces new features, performance improvements, and enhancements that make Java development more productive.Having worked with Java for many years, I prefer installing the JDK manually because it gives me complete control over where Java is installed. It's also convenient when I need to maintain multiple JDK versions on the same computer for testing and development.
In this guide, I'll walk you through the steps to download and install OpenJDK 25 on macOS from the official binary archive, configure the JAVA_HOME and PATH environment variables, and verify that everything works correctly. The instructions apply to both Apple Silicon and Intel-based Macs.
1. Download OpenJDK 25 for macOS
First, let's download the official OpenJDK 25 binary distribution. You can find Java 25’s original binary distribution in the OpenJDK archive.You'll see OpenJDK builds for several operating systems, including Windows, Linux, and macOS:
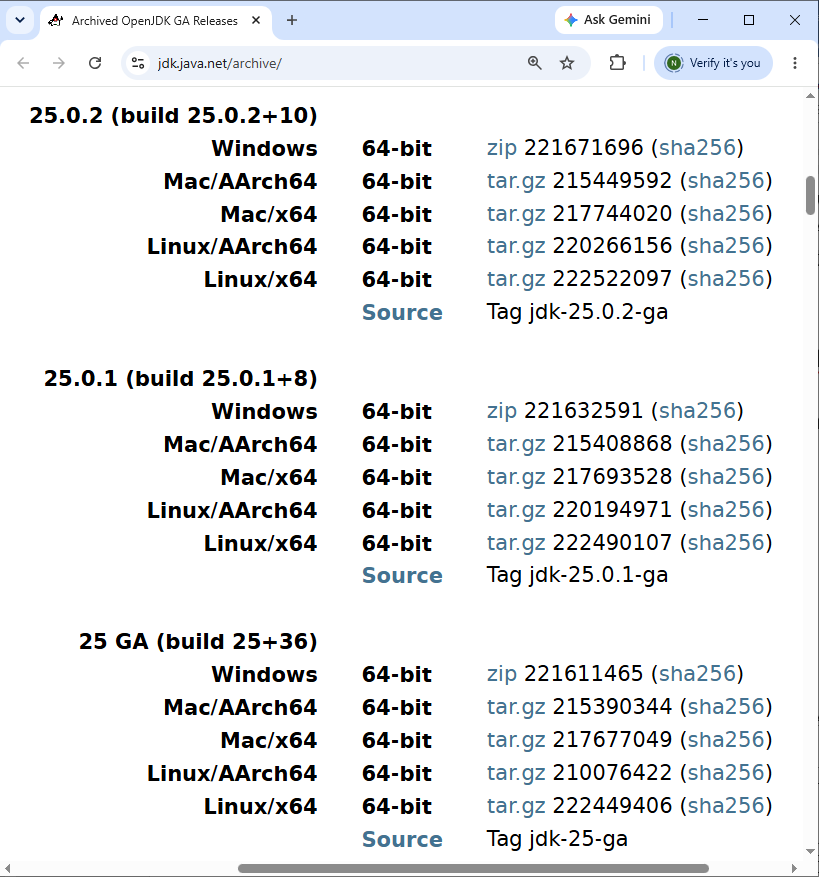 For macOS, there are two options:
- Mac/AArch64: For Macs powered by Apple Silicon chips, such as M1, M2, M3, M4, or newer generations.
- Mac/x64: For Macs equipped with Intel processors.
For example, my Mac uses an Apple M1 chip, so I'll choose the Mac/AArch64 build.
Click the corresponding tar.gz link to download the compressed archive.
If you're using an Intel-based Mac, the archive filename is: openjdk-25_macos-x64_bin.tar.gz.Before installing the JDK, I recommend verifying the integrity of the downloaded file. On the OpenJDK download page, you'll find a sha256 link next to each archive.Open Terminal and navigate to the Downloads directory:
cd $HOME/DownloadsThen run the following command:
shasum -a 256 openjdk-25_macos-aarch64_bin.tar.gzCompare the resulting hash value against the SHA-256 checksum published on the OpenJDK website.
If they match, the archive has been downloaded correctly.
Now we're ready to install OpenJDK 25.
2. Install OpenJDK 25 on macOS
Unlike some other JDK distributions, the official OpenJDK binary comes as a compressed archive rather than a graphical installer.That means we can install it simply by extracting the archive into a directory of our choice.Personally, I like keeping my JDK installations under a dedicated directory named OpenJDK in my user home directory. It makes things easier to organize, especially when working with multiple Java versions.First, create the directory by executing this command in Terminal:
mkdir -p $HOME/OpenJDKNext, extract the downloaded OpenJDK 25 archive into that directory:
tar -xf openjdk-25_macos-aarch64_bin.tar.gz -C $HOME/OpenJDKThe tar command extracts the contents of the archive, while the -C option specifies the destination directory.If you've downloaded the Intel version, replace the archive filename accordingly.Once extraction finishes, type the following command to list the contents of the installation directory:
ls $HOME/OpenJDKYou should see a directory named: jdk-25.0.1.jdkOne thing worth noting is that the directory structure of a JDK on macOS is slightly different from that on Windows and Linux.On macOS, the actual JDK home directory is located inside the .jdk bundle, under Contents/Home.So the complete JDK home directory in our example is:
$HOME/OpenJDK/jdk-25.0.1.jdk/Contents/HomeYou can list its contents using:
ls $HOME/OpenJDK/jdk-25.0.1.jdk/Contents/HomeYou'll find several directories, including bin, conf, include, jmods, and lib.The bin directory contains important Java development tools, such as the Java launcher (java) and Java compiler (javac).
Next, let's configure macOS to use this JDK.
3. Configure JAVA_HOME and PATH on macOS
Now that OpenJDK 25 has been installed, we need to configure two environment variables: JAVA_HOME and PATH.As you may already know, the JAVA_HOME environment variable points to the JDK installation directory. Many Java development tools, such as Maven and Gradle, use it to locate the Java installation.The PATH environment variable, on the other hand, tells the operating system where to look for executable commands. By including the JDK's bin directory in PATH, we can execute Java commands from anywhere in Terminal.On recent versions of macOS, Z-Shell (Zsh) is the default command-line shell. We can make these configurations permanent by adding them to the .zshrc file under our user home directory.Instead of opening the file with a text editor, we can use the cat command to append the required environment variable definitions directly.Open Terminal and execute the following command:cat >> ~/.zshrcexport JAVA_HOME="$HOME/OpenJDK/jdk-25.0.1.jdk/Contents/Home"
export PATH="$JAVA_HOME/bin:$PATH"Hit Enter and press Ctrl + D to persist the changes. The >> operator appends the new configuration to the end of the file, preserving its existing contents.Next, reload the .zshrc file to make the changes effective in your current Terminal session:
source ~/.zshrcNow check the value of the JAVA_HOME environment variable:
echo $JAVA_HOMEYou should see a path similar to: /Users/nam/OpenJDK/jdk-25.0.1.jdk/Contents/HomeOf course, your username will be different.
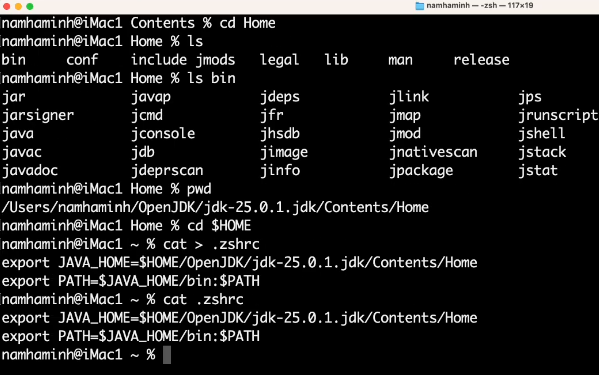
We've now completed the Java environment configuration.
4. Verify OpenJDK 25 Installation on macOS
Although OpenJDK 25 is installed and the environment variables are configured, I always recommend performing a few simple checks before starting Java development.This is particularly important if you have multiple JDK versions installed on your computer.First, close the current Terminal window and open a new one. Then type the following command: java -versionFor the initial OpenJDK 25 release, you should see output similar to this:
openjdk version "25" 2025-09-16
OpenJDK Runtime Environment (build 25+36-3489)
OpenJDK 64-Bit Server VM (build 25+36-3489, mixed mode, sharing)
The exact build number may differ depending on the OpenJDK 25 distribution you've downloaded.Next, check the version of the Java compiler: javac -versionThe output should be:
javac 25If both commands report Java 25, that's a good sign.However, I usually perform one more check to make sure the Java executable comes from the correct installation directory.Execute: which javaYou should see a path similar to:
/Users/nam/OpenJDK/jdk-25.0.1.jdk/Contents/Home/bin/javaThis confirms that Terminal is using the Java executable from the OpenJDK 25 installation we've just configured.
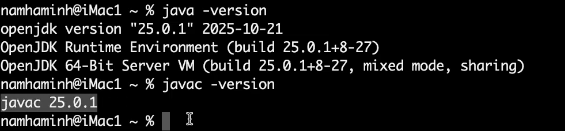
If the output still shows an older Java version, double-check the JAVA_HOME and PATH variables in your .zshrc file.
You may also have another Java installation whose configuration takes precedence over the new settings.
If everything looks correct, congratulations! You've successfully installed OpenJDK 25 on your Mac computer.
Conclusion
As you can see, installing OpenJDK 25 on macOS from the official binary archive is quite straightforward. All we need to do is download the appropriate archive, extract it into a directory, and configure the JAVA_HOME and PATH environment variables.Personally, I prefer this installation method because it gives me full control over the JDK installation location and makes it easier to manage different Java versions for development and testing.I hope this guide helps you set up OpenJDK 25 on your Mac smoothly. Now you're ready to explore Java 25 and start building Java applications.
Related Articles:
- How to set JAVA_HOME in macOS and Linux permanently
- How to set JAVA_HOME environment variable on Windows 10
- What are JVM, JRE and JDK
- How to write, compile and run a hello world Java program for beginners
- Java Core Language Tutorials
About the Author:
 Nam Ha Minh is certified Java programmer (SCJP and SCWCD). He began programming with Java back in the days of Java 1.4 and has been passionate about it ever since. You can connect with him on Facebook and watch his Java videos on YouTube.
Comments