- Details
- Written by Nam Ha Minh
- Last Updated on 05 August 2019 | Print Email
Tomcat is a popular web server and Java servlet container, and Eclipse is the most widely used IDE for Java development. Therefore, these two programs are usually used together in Java EE development. Though Eclipse has great support for working with Tomcat, it does not include this server in its installation package, so we have to add Tomcat manually. In this article, we describe the steps to bring Tomcat to Eclipse IDE.Basically, there are two ways to add an installation of Tomcat in Eclipse:
- Way #1: You already installed Tomcat on your computer, and just add it in Eclipse.
- Way #2: There is no Tomcat installation exists, so you can download and install Tomcat from within the IDE.
Now, let’s go through each way in details.
1. Adding an existing installation of Tomcat
In Eclipse IDE, go to menu
Window > Preferences. Then expand the
Server > Runtime Environments node in the
Preferences dialog:
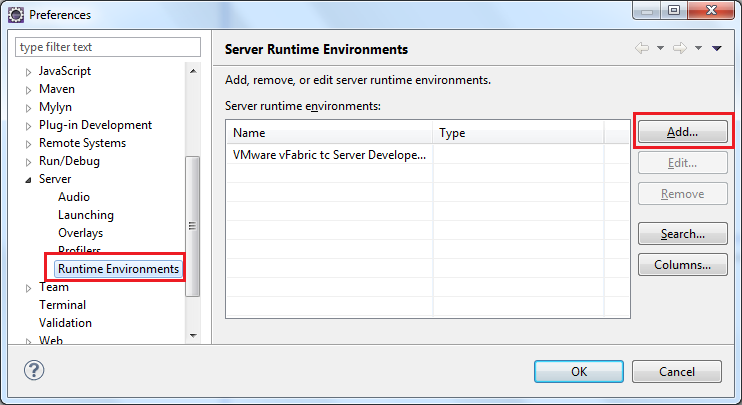
Click
Add… to add a new server runtime environment. In the
New Server Runtime Environment dialog, select
Apache > Apache Tomcat v7.0 (the latest version of Tomcat to date) and check the option
Create a new local server:
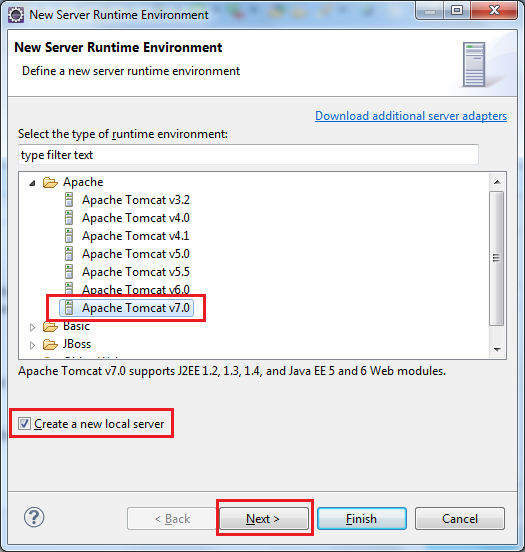
Click
Next. In the next screen, click the
Browse button to specify the existing installation directory of Tomcat on your computer:
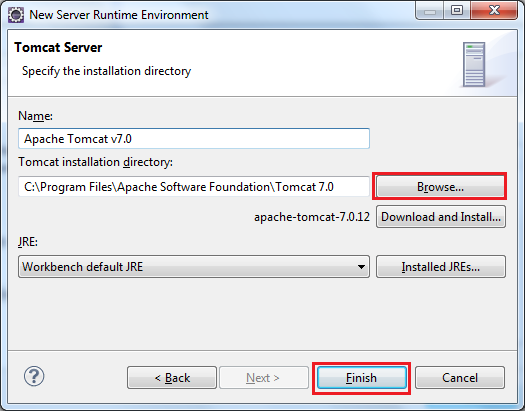
Click
Finish, the selected Tomcat installation is added to the list of server runtime environments, as shown below:

Click
OK to close the
Preferences dialog, the new server runtime is added to the
Servers view:

You can now drag and drop a project into this server in order to deploy and run the project.
NOTE: If you don’t see the
Servers view, you can show it by go to the menu
Window > Show View > Others…, then look for
Servers.
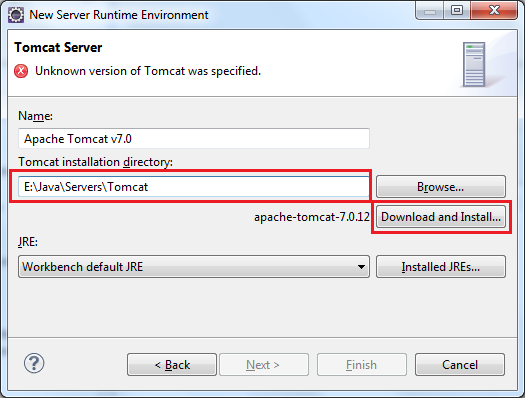
2. Download and install Tomcat within Eclipse
In this way, we can choose to download and install a specific version of Tomcat if one does not exist on local computer. Follow the first two steps as above. Then, instead of specifying an existing installation directory of Tomcat, type the path of the installation directory in the
Tomcat installation directory field, and click the
Download and Install… button:
The
Download and Install dialog appears:
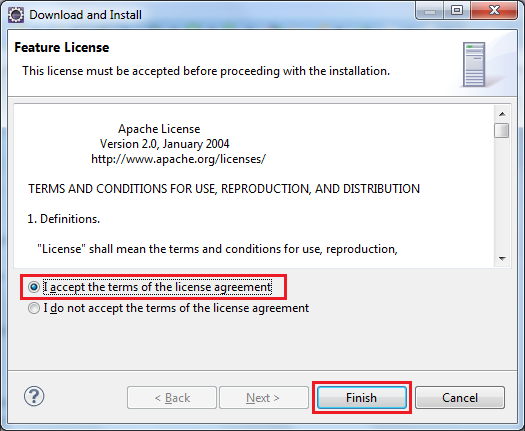
Make sure the option “
I accept the terms of the license agreement” is selected, and click
Finish. Then Eclipse asks to select Tomcat installation directory (the specified path is selected by default), click
OK.Wait for some minutes while Eclipse is downloading and installing Tomcat (you can notice the progress in Eclipse’s status bar), and then click
Finish.
Other Tomcat Tutorials:
About the Author:
 Nam Ha Minh
 is certified Java programmer (SCJP and SCWCD). He started programming with Java in the time of Java 1.4 and has been falling in love with Java since then. Make friend with him on
Facebook and watch
his Java videos you YouTube.