JUnit Tutorial for beginner with Eclipse
- Details
- Written by Nam Ha Minh
- Last Updated on 05 August 2019 | Print Email
1. Why using JUnit?
Unit testing is an important part in Test Driven Development (TDD) as it helps finding problems in the code as early as possible, especially when you make changes to the existing code you can run unit tests again to make sure that the changes do not break the application (regression). You as a programmer - should write and run unit tests to ensure that your code meets its design and behaves as intended.And JUnit is one of the most popular unit testing frameworks for Java development. JUnit is supported by almost any Java IDEs and build tools, thus it is the default choice of programmers to test their code.Eclipse has very good support for JUnit - the IDE is shipped with JUnit as its default testing library. Thus writing and running unit tests with JUnit in Eclipse is quick, easy and productive.2. Structure of a Test Class
In TDD, the smallest unit can be tested is a method. Typically you write a test class to test a specific class, and the test class contains some test methods that test the functionalities of the class being tested. Suppose that we have a class looks like this:public class Calculator {
public int add(int a, int b) {
return a + b;
}
public int subtract(int a, int b) {
return a - b;
}
}This Calculator class has two methods add() and subtract(). Now we want to write a test class to ensure that these methods are working correctly. With JUnit, the test class can have the following structure:import org.junit.*;
public class CalculatorTest {
@BeforeClass
public static void setUpClass() {
// code executed before all test methods
}
@Before
public void setUp() {
// code executed before each test method
}
@Test
public void testAdd() {
// test method
}
@Test
public void testSubtract() {
// test method
}
@After
public void tearDown() {
// code executed after each test method
}
@AfterClass
public static void tearDownClass() {
// code executed after all test methods
}
}Code in this method is executed only once, before all test methods in the test class. Typically you put code that prepares test environment here, e.g. initializing resources such as opening a database connection. The method marked with this annotation must be static.
@Before:Code in this method is executed before every test method in the test class. So typically you put repeated code that must be executed before each test method here.
@Test:This annotation specifies the annotated method is a test method. You can notice the naming convention for test method is the method name starts with test, followed by the name of the method in the class being tested. This Calculator class has two methods add() and subtract(), hence the test methods are testAdd() and testSubtract(). @After:Code in this method is executed after every test method in the test class. So typically you put repeated code that must be executed after each test method here.
@AfterClass:Code in this method is executed only once, after all test methods in the test class. Due to this behavior, you can put code to clean up test environment here, e.g. closing the database connection. Note that this kind of method must be static.
Except the test methods, the other kinds of method are optional. So you implement them in the test class only if it is necessary. NOTE: The above-mentioned annotations are in JUnit 4. From JUnit 5, @BeforeClass changes to @BeforeAll; @Before changes to @BeforeEach; @After changes to @AfterEach; and @AfterClass changes to @AfterAll. This change in JUnit 5 reflects better meaning of the annotations. So with JUnit 5, the structure of a test class looks like this:import org.junit.jupiter.api.*;
public class CalculatorTest {
@BeforeAll
public static void setUpClass() {
// code executed before all test methods
}
@BeforeEach
public void setUp() {
// code executed before each test method
}
@Test
public void testAdd() {
// test method
}
@Test
public void testSubtract() {
// test method
}
@AfterEach
public void tearDown() {
// code executed after each test method
}
@AfterAll
public static void tearDownClass() {
// code executed after all test methods
}
}Also note that in JUnit 4, you need to import the annotations from the org.junit package, but in JUnit 5 you need to import them from the org.junit.jupiter.api package. 3. Using Assert Statement in Test Methods
In a test method, we use an assert statement to verify whether the code under test produces the result as expected or not. If the result is as expected, the tested code passes the test case. Otherwise the tested code fails the test case.For example, write code for the testAdd() method as below:@Test
public void testAdd() {
Calculator calculator = new Calculator();
int a = 1234;
int b = 5678;
int actual = calculator.add(a, b);
int expected = 6912;
assertEquals(expected, actual);
}Here, we use the assertEquals() method from the class org.junit.Assert via static import:import static org.junit.Assert.assertEquals;The assertEquals() method compares two values: the expected result and the actual value returned from the tested code.If the two values are equal, the method returns normally indicating the tested code passes the test case.If the two values are not equal, the method throws java.lang.AssertionError indicating the tested code fails the test case. And programmers must fix the code until it passes the test case.You can also specify a message which will be printed in the exception if the code fails, for example:
assertEquals("Sum is not correct", expected, actual);JUnit provides many assertXXX() methods, and here are some commonly used ones:- assertEquals(expected, actual): asserts that two values are equal. The values can be of any primitive types or Objects.
- assertNotEquals(expected, actual): asserts that two arguments are not equal. The values can be of any primitive types or Object.
- assertTrue(boolean condition): asserts that a condition is true.
- assertFalse(boolean condition): asserts that a condition is false.
- assertNull(Object): asserts that an object is null.
- assertNotNull(Object): asserts that an object is not null.
- assertSame(Object expected, Object actual): asserts that two objects refer to the same object.
- assertNotSame(Object unexpected, Object actual): asserts that two objects do not refer to the same object.
assertTrue(String message, boolean condition):
Also you can use the fail() method to fail the test immediately, for example:@Test
public void testSubtract() {
fail("Not yet implemented");
}Use the fail() method to indicate that a method is not yet implemented so when the test class is executed, it will fail. 4. How to Create and Run JUnit Test Case in Eclipse
Eclipse supports both JUnit 4 and JUnit 5 (JUnit Jupiter). You don’t have to download JUnit JAR files as Eclipse is shipped with JUnit library. Suppose that the current project in Eclipse has the Calculator class like this:public class Calculator {
public int add(int a, int b) {
return a + b;
}
public int subtract(int a, int b) {
return a - b;
}
}Now let’s create a test class for this class. In the Project Explorer/Package Explorer view, right click on the class and click New > Other…In the New dialog, choose Java > JUnit > JUnit Test Case: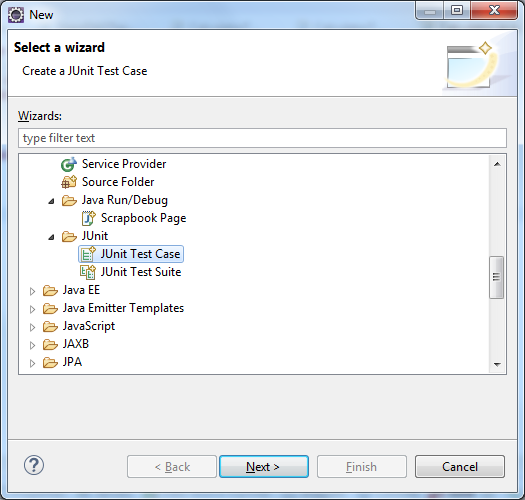 Click Next to proceed to the next screen which is shown as below:
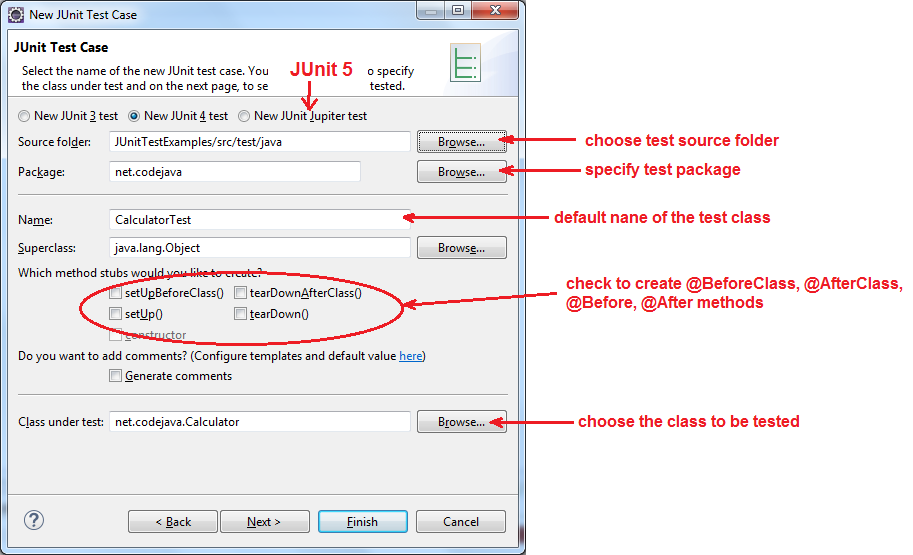 Here, you can choose the version of JUnit to use: New JUnit 3 test, New JUnit 4 test or New Junit Jupiter test (JUnit 5). You should choose the source folder for the test class different than the main source folder to separate test classes from normal classes.
- The name of the test class is suggested by the naming convention, but you can change if you want.
- Check the checkbox setUpBeforeClass() to create the method annotated with @BeforeClass / @BeforeAll annotation.
- Check the checkbox tearDownAfterClass() to create the method annotated with @AfterClass / @AfterAll annotation.
- Check the checkbox setUp() to create the method annotated with @Before / @BeforeEach annotation.
- Check the checkbox tearDown() to create the method annotated with @After / @AfterEach annotation.
- And the class under test is the class you have right clicked on, but you can choose another class if you want.
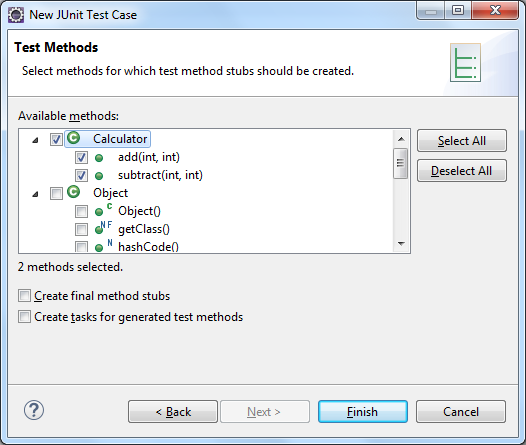 Click Finish. Eclipse generates code for the test class as follows:
package net.codejava;
import static org.junit.Assert.*;
import org.junit.Test;
public class CalculatorTest {
@Test
public void testAdd() {
fail("Not yet implemented");
}
@Test
public void testSubtract() {
	fail("Not yet implemented");
}
}As you can see, the test methods fail by default. Write code for the testAdd() method like this:@Test
public void testAdd() {
Calculator calculator = new Calculator();
int a = 1234;
int b = 5678;
int actual = calculator.add(a, b);
int expected = 6912;
assertEquals(expected, actual);
} To run this test method, open the Outline view (Window > Show View > Outline), right click on the testAdd() method and click Run As > JUnit Test: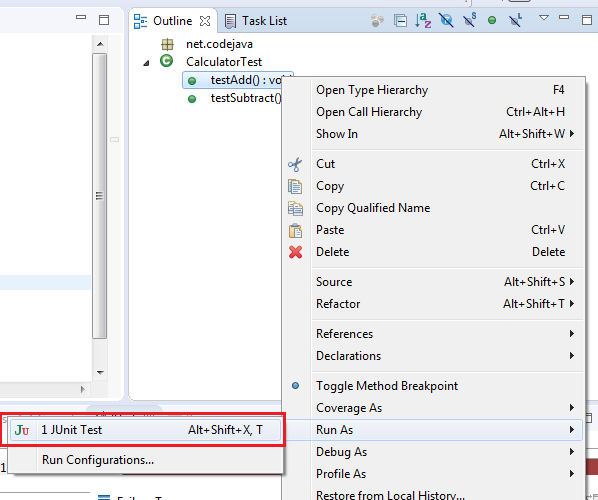 The test result appears in JUnit view like this:
 You can see the green indicator bar in the upper-right corner indicating that the test case has been executed successfully - the code under test passes the test case.If the test fails, the status indicator becomes red and the failure trace is printed:
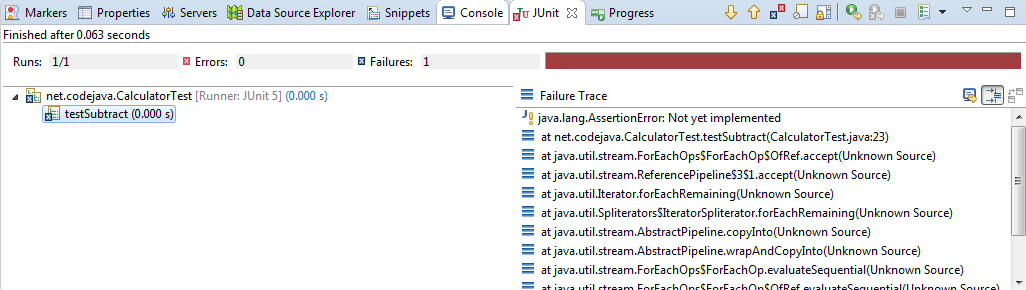 This is the result of running the testSubtract() method, it fails because of the fail() method. Now implement code for this method like this:
@Test
public void testSubtract() {
	Calculator calculator = new Calculator();
	int a = 1234;
	int b = 5678;
	int actual = calculator.subtract(b, a);

	int expected = 4444;

	assertEquals(expected, actual);
}
Now run this test method again and you see it passes. To run the whole test class, right click on the class name or anywhere in the class code editor, and click Run As > JUnit Test. All test methods in the class will be executed. Here’s the result of running the CalculatorTest class: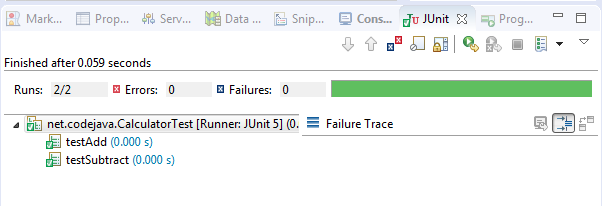 You see, the class Calculator passes two test methods in the CalculatorTest class.The JUnit view in Eclipse allows you to run test class or test methods again, by right clicking on the test class or a test method, and click Run.In case of failure, you can copy the exception stack trace by right click on the test class or a test method, and click Copy Failure List:
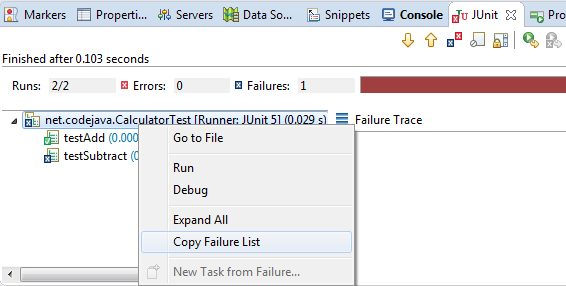 That’s how to get started with JUnit in Eclipse. You can also watch the video version of this tutorial below:
 Other JUnit Tutorials:
- How to compile and run JUnit tests in command line
- JUnit Test Suite Example - How to create and run test suite in command line and Eclipse
- JUnit Test Exception Examples - How to assert an exception is thrown
About the Author:
 Nam Ha Minh is certified Java programmer (SCJP and SCWCD). He started programming with Java in the time of Java 1.4 and has been falling in love with Java since then. Make friend with him on Facebook and watch his Java videos you YouTube.