Getting Started With Hibernate Annotations
- Details
- Written by Nam Ha Minh
- Last Updated on 15 July 2019 | Print Email
1. What’s in this tutorial?
We’ll setup a sample Hibernate application here which demonstrates the usage of annotations.- Create a database connection configuration using XML
- Create model classes Person and Address and establish a many-to-many relationship between them and map them with database using annotations
- Obtain connection using Configuration object and build a SessionFactory object
- Obtain Session objects to perform a save operation using Hibernate APIs
2. When to use annotations?
Use annotations to provide metadata configuration along with the Java code. That way the code is easy to understand. Annotations are less powerful than XML configuration. XML also gives you the ability to change the configuration without building the project. So use annotations only for table and column mappings, not for frequently changing stuff like database connection and other properties. Annotations are preconfigured with sensible default values, which reduce the amount of coding required, e.g. class name defaults to table name and field names defaults to column names.3. Quick reference on Hibernate annotations used
Annotation | Modifier | Description |
@Entity | Marks a class as a Hibernate Entity (Mapped class) | |
@Table | Name | Maps this class with a database table specified by name modifier. If name is not supplied it maps the class with a table having same name as the class |
@Id |
| Marks this class field as a primary key column |
@GeneratedValue |
| Instructs database to generate a value for this field automatically |
@Column | Name | Maps this field with table column specified by name and uses the field name if name modifier is absent |
@ManyToMany | Cascade | Marks this field as the owning side of the many-to-many relationship and cascade modifier specifies which operations should cascade to the inverse side of relationship |
mappedBy | This modifier holds the field which specifies the inverse side of the relationship | |
@JoinTable | Name | For holding this many-to-many relationship, maps this field with an intermediary database join table specified by name modifier |
joinColumns | Identifies the owning side of columns which are necessary to identify a unique owning object | |
inverseJoinColumns | Identifies the inverse (target) side of columns which are necessary to identify a unique target object | |
@JoinColumn | Name | Maps a join column specified by the name identifier to the relationship table specified by @JoinTable |
4. Tools needed in this tutorial
- Download latest version of Eclipse: http://www.eclipse.org/downloads
- Download latest JDK: http://www.oracle.com/technetwork/java/javase/downloads/index.html
- Download latest MySQL: http://dev.mysql.com/downloads/mysql
- Download latest Hibernate distribution zip: http://sourceforge.net/projects/hibernate/files/hibernate4 (Hibernate 4.1.9 as of writing)
- Let’s presume you’ve unzipped the Hibernate distribution zip to a directory called Hibernate. You would need all the jar files under Hibernate\lib\required and Hibernate\lib\jpa directories
- MySQL Java Connector Jar: http://dev.mysql.com/downloads/connector/j
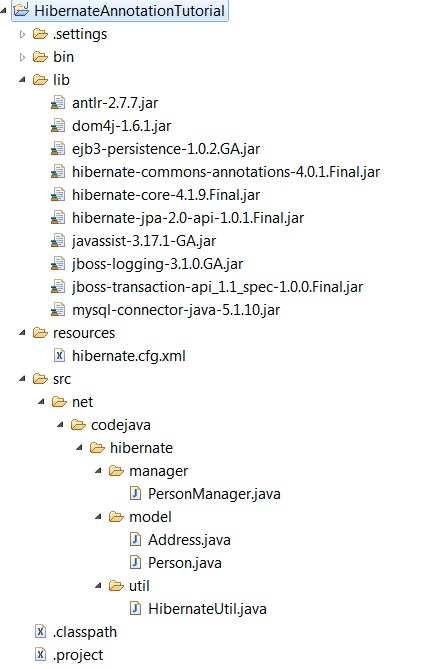
5. Project Structure
6. Setup Database Configuration
Create hibernate.cfg.xml file as shown in above figure and configure the database connection and mapping classes. Here is the XML configuration:<?xml version='1.0' encoding='utf-8'?>
<!DOCTYPE hibernate-configuration PUBLIC
"-//Hibernate/Hibernate Configuration DTD 3.0//EN"
"http://hibernate.sourceforge.net/hibernate-configuration-3.0.dtd">
<hibernate-configuration>
<session-factory>
<property name="hibernate.show_sql">false</property>
<property name="hibernate.format_sql">true</property>
<property name="use_sql_comments">false</property>
<property name="hibernate.dialect">org.hibernate.dialect.MySQLDialect</property>
<property name="hibernate.connection.driver_class">com.mysql.jdbc.Driver</property>
<property name="hibernate.connection.url">jdbc:mysql://127.0.0.1:3306/hibernateTutorial</property>
<property name="hibernate.connection.username">root</property>
<property name="hibernate.connection.password">secret</property>
<!-- add classes to map from here -->
<mapping class="net.codejava.hibernate.model.Person" />
<mapping class="net.codejava.hibernate.model.Address" />
</session-factory>
</hibernate-configuration>7. Create annotated model classes
Create model classes Person.java and map it to the database using annotations as follows:package net.codejava.hibernate.model;
import java.util.HashSet;
import java.util.Set;
import javax.persistence.CascadeType;
import javax.persistence.Column;
import javax.persistence.Entity;
import javax.persistence.GeneratedValue;
import javax.persistence.Id;
import javax.persistence.JoinColumn;
import javax.persistence.JoinTable;
import javax.persistence.ManyToMany;
import javax.persistence.Table;
@Entity
@Table(name = "person")
public class Person {
long id;
String firstName;
String lastName;
Set<Address> addresses;
public Person() {
}
public Person(String firstName, String lastName) {
this.firstName = firstName;
this.lastName = lastName;
this.addresses = new HashSet<Address>();
}
@Id
@GeneratedValue
@Column(name = "person_id")
public long getId() {
return id;
}
public void setId(long id) {
this.id = id;
}
@Column
public String getFirstName() {
return firstName;
}
public void setFirstName(String firstName) {
this.firstName = firstName;
}
@Column
public String getLastName() {
return lastName;
}
public void setLastName(String lastName) {
this.lastName = lastName;
}
@ManyToMany(cascade = { CascadeType.ALL })
@JoinTable(name = "person_address", joinColumns = { @JoinColumn(name = "person_id") }, inverseJoinColumns = { @JoinColumn(name = "address_id") })
public Set<Address> getAddresses() {
return addresses;
}
public void setAddresses(Set<Address> addresses) {
this.addresses = addresses;
}
}Create model classes Address.java and map it to the database using annotations as follows: package net.codejava.hibernate.model;
import java.util.Set;
import javax.persistence.Column;
import javax.persistence.Entity;
import javax.persistence.GeneratedValue;
import javax.persistence.Id;
import javax.persistence.ManyToMany;
import javax.persistence.Table;
@Entity
@Table(name = "address")
public class Address {
long id;
String buildingName;
String town;
String postCode;
Set<Person> persons;
public Address() {
}
public Address(String buildingName, String town, String postCode) {
this.buildingName = buildingName;
this.town = town;
this.postCode = postCode;
}
@Id
@GeneratedValue
@Column(name = "address_id")
public long getId() {
return id;
}
public void setId(long id) {
this.id = id;
}
@Column
public String getBuildingName() {
return buildingName;
}
public void setBuildingName(String buildingName) {
this.buildingName = buildingName;
}
@Column
public String getTown() {
return town;
}
public void setTown(String town) {
this.town = town;
}
@Column
public String getPostCode() {
return postCode;
}
public void setPostCode(String postCode) {
this.postCode = postCode;
}
@ManyToMany(mappedBy = "addresses")
public Set<Person> getPersons() {
return persons;
}
public void setPersons(Set<Person> persons) {
this.persons = persons;
}
} 8. Create Database
Now go to any MySQL query tool (Preferably SQLYog)Create a database called hibernatetutorial with utf8 encoding:CREATE DATABASE hibernatetutorial CHARACTER SET = utf8 COLLATE = utf8_bin;Create person, address and person_address tables as follows:
create table address (
        address_id bigint not null auto_increment,
        buildingName varchar(255),
        postCode varchar(255),
        town varchar(255),
        primary key (address_id)
    );

create table person (
        person_id bigint not null auto_increment,
        firstName varchar(255),
        lastName varchar(255),
        primary key (person_id)
    );

create table person_address (
        person_id bigint not null,
        address_id bigint not null,
        primary key (person_id, address_id)
);
Here’s the table relationship diagram: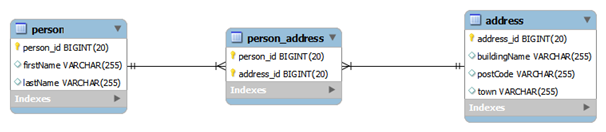 As you can see, there is a one-to-many relationship between person and person_address, one-to-many relationship between address and person_address and as a result of that, many-to-many relationship between person and address tables.
 9. Writing Hibernate Test Program
Create a HibernateUtil class to read XML database configuration we did earlier and create a Configuration object to obtain a SessionFactory object. Please make sure that hibernate.cfg.xml file is on the classpath. Following is code of the HibernateUtil.java class:package net.codejava.hibernate.util;
import org.hibernate.SessionFactory;
import org.hibernate.cfg.Configuration;
import org.hibernate.service.ServiceRegistry;
import org.hibernate.service.ServiceRegistryBuilder;
public class HibernateUtil {
private static final SessionFactory sessionFactory = buildSessionFactory();
private static SessionFactory buildSessionFactory() {
try {
// Create the SessionFactory from hibernate.cfg.xml
Configuration configuration = new Configuration();
configuration.configure("hibernate.cfg.xml");
ServiceRegistry serviceRegistry = new ServiceRegistryBuilder()
.applySettings(configuration.getProperties())
.buildServiceRegistry();
return configuration.buildSessionFactory(serviceRegistry);
} catch (Throwable ex) {
System.err.println("Initial SessionFactory creation failed." + ex);
throw new ExceptionInInitializerError(ex);
}
}
public static SessionFactory getSessionFactory() {
return sessionFactory;
}
}Ideally, it’s a good practice to create one SessionFactory object per data store at global application level scope. Hence here we are creating just one static SessionFactory object when the class is first loaded and then we access the same via getSessionFactory() static method. This is the safest implementation of a singleton object.Now let’s create a PersonManager class which creates 2 person and 3 address objects and persists them to the database. Note that all the addresses have been persisted using Hibernate cascade functionality. Here is code of the PersonManager.java class: package net.codejava.hibernate.manager;
import net.codejava.hibernate.model.Address;
import net.codejava.hibernate.model.Person;
import net.codejava.hibernate.util.HibernateUtil;
import org.hibernate.Session;
import org.hibernate.SessionFactory;
public class PersonManager {
public static void main(String[] args) {
SessionFactory sf = HibernateUtil.getSessionFactory();
Session session = sf.openSession();
session.beginTransaction();
Person steve = new Person("Steve", "Jobs");
Person donald = new Person("Donald", "Trump");
Address valley = new Address("Steve P Jobs", "San Francisco", "11111");
Address newyork = new Address("Trump Tower", "New York", "22222");
Address chicago = new Address("Trump Tower", "Chicago", "33333");
steve.getAddresses().add(valley);
donald.getAddresses().add(newyork);
donald.getAddresses().add(chicago);
System.out.println("Creating Person: " + steve.getFirstName());
session.persist(steve);
System.out.println("Creating Person: " + donald.getFirstName());
session.persist(donald);
session.getTransaction().commit();
session.close();
}
} Just right click in the editor window and run the project as Java application. You should see following output in the console… Creating Person: Steve Creating Person: DonaldHere’s the final database presentation you should see:
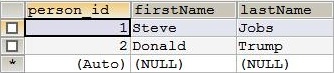
Person table

Address table
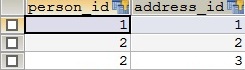
Person_Address table
Above you can see that in person table, persons Steve and Donald have been saved with auto generated ids 1 and 2 respectively. In address table, addresses San Francisco, Chicago and New York have been saved with auto generated ids 1, 2 and 3 respectively. Also in person_address table person_id 1 is associated with address_id 1 and person_id 2 is associated with address_ids 2 and 3 respectively.This tutorial shows how easily you can configure session factory connection details using XML and entities using annotation configuration respectively in Hibernate and access the database. By using XML, database connection properties can be easily changed without changing the Java source files which is an added advantage. By using annotations, Java entity classes are more expressive and you don’t have to refer to another XML file for figuring out the Hibernate-Database mapping.Above shown code snippets can be downloaded as a full Eclipse project along with the accompanying jar files from the attachment section.Other Hibernate Tutorials:
- Hibernate Hello World Tutorial for Beginners with Eclipse and MySQL
- Java Hibernate JPA Annotations Tutorial for Beginners
- Hibernate One-to-One Association on Primary Key Annotations Example
- Hibernate One-to-Many Association Annotations Example
- Hibernate Many-to-Many Association Annotations Example
- Hibernate Enum Type Mapping Example
- Hibernate Binary Data and BLOB Mapping Example
- Hibernate Query Language (HQL) Example
- Java Hibernate Reverse Engineering Tutorial with Eclipse and MySQL
About the Author:
 Nam Ha Minh is certified Java programmer (SCJP and SCWCD). He began programming with Java back in the days of Java 1.4 and has been passionate about it ever since. You can connect with him on Facebook and watch his Java videos on YouTube.
| [ ] | 6267 kB |
Comments
This is exactly what you need: codejava.net/.../...
I find this tutorial very helpful, thank very much indeed.
I wanted to know if you have a tutorial explaining how to install Hibernate-JPA annotations in Eclipse using JDK 8?
Thank you.
DC
It works for me only by applying configuration property settings to ServiceRegistryBuilder.
like here:
ServiceRegistry serviceRegistry = new ServiceRegistryBuilder()
.applySettings(configuration.getProperties())
.buildServiceRegistry();
I'm very happy that you found this tutorial helpful. Also your link for dependencies is great. Thank you so much!