How to code a basic Java Hibernate program using Eclipse
- Details
- Written by Nam Ha Minh
- Last Updated on 16 July 2019 | Print Email
What is Hibernate framework?
Hibernate is a Java-based framework that aims at relieving developers from common database programming tasks such as writing SQL queries manually with JDBC. Thus developers can focus more on business logic of the application. Hibernate encapsulates common database operations (CRUD – create, retrieve, update and delete) via a set of useful APIs.Hibernate is also an Object/Relational Mapping (ORM) framework which maps tables from database with Java objects, allows developers to build database relationship and access data easily through its mapping, configuration and APIs . It is widely used by Java developers for Java applications ranging from desktop to enterprise.If you are new to Hibernate and can’t wait to learn it, this tutorial is to you. We will get you familiar with Hibernate through a hand-on exercise which involves in developing a simple Java application to manage data of a table in database (IDE to use is Eclipse). You will see how simple Hibernate makes to database development.About the sample Hibernate application:
In this tutorial, we will develop a console application that manages a list of contacts in MySQL database. Hibernate will be used to perform the CRUD operations: create, read, update, and delete. Let's start!Download Hibernate and MySQL JDBC driver:
You can obtain the latest distribution of Hibernate framework at:http://hibernate.org/downloads
You are redirected to SourceForge download page:http://sourceforge.net/projects/hibernate/files/hibernate4/
At the time of writing this tutorial, the latest version of Hibernate is 4.1.5.SP1. Download the zip archive hibernate-release-4.1.5.SP1.zip and extract it to a desired location on your computer. The distribution has a lot of stuff but we are interested in only the required JAR files which are under lib\required directory: Those JAR files are minimum requirement for getting started with Hibernate.In addition, we need to download JDBC driver library for MySQL, called Connector/J at: http://www.mysql.com/downloads/connector/j/Extract the mysql-connector-java-5.1.21.zip file and pick up the JAR file mysql-connector-java-5.1.21-bin.jar.Notes: For more information about downloading and using MySQL JDBC driver, see the tutorial: Connect to MySQL via JDBC.
 1. Setup database
Suppose that you have MySQL server installed on your computer. Execute the following SQL script to create a table called contact in database contactdb:create database contactdb; use contactdb; CREATE TABLE `contact` ( `contact_id` INT NOT NULL , `name` VARCHAR(45) NOT NULL , `email` VARCHAR(45) NOT NULL , `address` VARCHAR(45) NOT NULL , `telephone` VARCHAR(45) NOT NULL , PRIMARY KEY (`contact_id`) ) DEFAULT CHARACTER SET = utf8 COLLATE = utf8_general_ci;From the above script, we can see that a contact has following information:
- contact_id: primary key of the table
- name
- address
- telephone.
2. Setup Eclipse project
Create a new Java project in Eclipse entitled ContactManager.Select Project > Properties from main menu.The dialog Properties for ContactManager appears, select Java Build Path on the left. Under Libraries tab on the right, click Add External JARs.In the dialog Jar Selection, select all JAR files under the directory {Hibernate_Home}\lib\required where {Hibernate_Home} is the directory where you extracted Hibernate distribution previously.Click Open to add these JAR files to project’s classpath, as shown in the following screen-shot: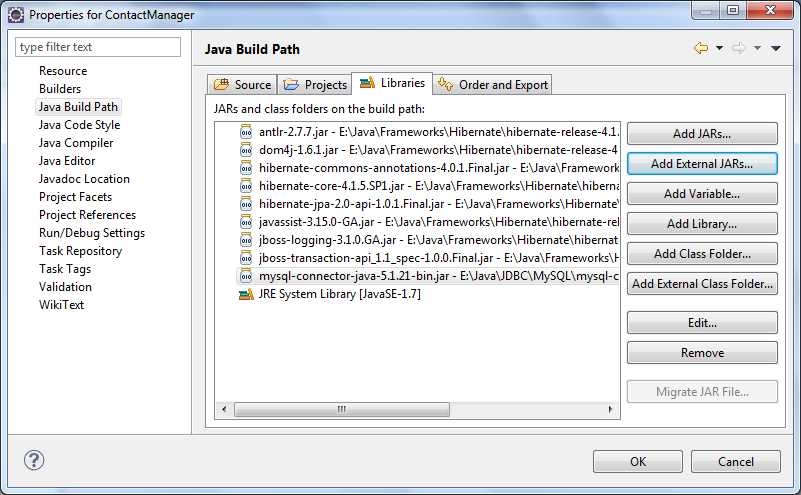 In addition, since we use MySQL database, it’s necessary to include a MySQL JDBC driver library to the project as well. See this article for how to download and extract MySQL JDBC driver JAR file.Under srcdirectory, create a new Java package called com.mycompany
 3. Create Hibernate configuration file
First of all, you need to tell Hibernate some information regarding the database system you intend to use, such as host name, port number, JDBC driver class name, database connection URL… via some kind of configuration. Flexibly, Hibernate provides several ways for supplying database configuration:- via properties file.
- via XML file.
- via JNDI data source.
- Programmatic configuration.
- Setting system properties.
<?xml version='1.0' encoding='utf-8'?>
<!DOCTYPE hibernate-configuration PUBLIC
        "-//Hibernate/Hibernate Configuration DTD 3.0//EN"
        "http://www.hibernate.org/dtd/hibernate-configuration-3.0.dtd">
<hibernate-configuration>
  <session-factory>
    <!-- Database connection settings -->
    <property name="connection.driver_class">com.mysql.jdbc.Driver</property>
    <property name="connection.url">jdbc:mysql://localhost:3306/contactdb</property>
    <property name="connection.username">root</property>
    <property name="connection.password">P@ssw0rd</property>

  </session-factory>
</hibernate-configuration>
We specify JDBC class driver name (for MySQL), connection URL (which also specifies host name, port number, and database name), user name and password to connect to the database.The class org.hibernate.cfg.Configuration is used to load the configuration file:Configuration conf = new Configuration().configure();The configure() method reads configuration from hibernate.cfg.xml file under program’s classpath.There are also some overloaded versions of configure() method which allow you to load configuration file in different ways.The above configuration is only for necessary information. In addition, Hibernate provides a variety of settings such as connection pooling, transaction, debugging… however we don’t cover all of them in this simple tutorial. Just add this line to the hibernate.cfg.xml file:
<property name="show_sql">true</property>which tells Hibernate to show all SQL statements to the standard output.
4. Create Java entity class
Next, we will create a plain old java object (POJO) class which represents a table in the database. Since we created a table called Contact, we also create a new Java class with the same name, Contact.java, under package com.mycompany. Write code for the Contact class as following:package com.mycompany;
public class Contact {
private int id;
private String name;
private String email;
private String address;
private String telephone;
public Contact() {
}
public Contact(int id, String name, String email, String address,
String telephone) {
this.id = id;
this.name = name;
this.email = email;
this.address = address;
this.telephone = telephone;
}
public Contact(String name, String email, String address, String telephone) {
this.name = name;
this.email = email;
this.address = address;
this.telephone = telephone;
}
public int getId() {
return id;
}
public void setId(int id) {
this.id = id;
}
public String getName() {
return name;
}
public void setName(String name) {
this.name = name;
}
public String getEmail() {
return email;
}
public void setEmail(String email) {
this.email = email;
}
public String getAddress() {
return address;
}
public void setAddress(String address) {
this.address = address;
}
public String getTelephone() {
return telephone;
}
public void setTelephone(String telephone) {
this.telephone = telephone;
}
}It’s just a simple class following JavaBean naming convention. 5. Create Hibernate mapping file
Hibernate can detect Java classes which map with tables in the database via some kind of mappings. A mapping tells Hibernate how to map between a Java class and a table in the database. For example, the class maps with which table, which class’ member maps with which field in that table, what kind of data types, etc.Hibernate allows developer to specify mapping through XML file or annotations embedded right in the Java source file. We go with the XML mapping.In Eclipse, create a new XML file called Contact.hbm.xml under package com.mycompany, with the following content:<?xml version="1.0"?>
<!DOCTYPE hibernate-mapping PUBLIC
"-//Hibernate/Hibernate Mapping DTD 3.0//EN"
"http://www.hibernate.org/dtd/hibernate-mapping-3.0.dtd">
<hibernate-mapping package="com.mycompany">
<class name="Contact" table="CONTACT">
<id name="id" column="CONTACT_ID">
<generator class="increment"/>
</id>
<property name="name" type="string" column="NAME"/>
<property name="email"/>
<property name="address"/>
<property name="telephone"/>
</class>
</hibernate-mapping>As you can see:- The package property of the root element <hibernate-mapping> specifies under which package Hibernate finds Java classes.
- The class element specifies which Java class (via property name) maps with which table (via property table) in the database.
- The id element specifies which property in the Java class map to primary key column in the database. The generator element tells Hibernate how the primary key’s value is created, and we specify increment which means the value is incremented automatically.
- The propertyelement specifies how a property in the Java class maps with a column in the database:
- the name property specifies name of a property in Java class.
- the column property specifies mapping column in database.
- the type property specifies data type of the mapping column. By default, Hibernate can detect and create mapping automatically based on property name and the JavaBean class, so you can see, we do not specify type and column for the last three properties.
<mapping resource="com/mycompany/Contact.hbm.xml"/>The hibernate.cfg.xml file should look like this till now:
<?xml version='1.0' encoding='utf-8'?>
<!DOCTYPE hibernate-configuration PUBLIC
        "-//Hibernate/Hibernate Configuration DTD 3.0//EN"
        "http://www.hibernate.org/dtd/hibernate-configuration-3.0.dtd">
<hibernate-configuration>
  <session-factory>
    <!-- Database connection settings -->
    <property name="connection.driver_class">com.mysql.jdbc.Driver</property>
    <property name="connection.url">jdbc:mysql://localhost:3306/contactdb</property>
    <property name="connection.username">root</property>
    <property name="connection.password">P@ssw0rd</property>

    <property name="show_sql">true</property>

    <mapping resource="com/mycompany/Contact.hbm.xml"/>

  </session-factory>
</hibernate-configuration>
6. Working with Hibernate session
Hibernate provides its database services via a session. In other words, all database operations are executed under context of a Hibernate session. The session manages mapped objects and offers database’s CRUD (create, read, update, delete) operations. Working with Hibernate’s API involves in working with its Session and Session’s relevant methods.The following code obtains a new session from a session factory:Configuration configuration = new Configuration().configure(); ServiceRegistryBuilder registry = new ServiceRegistryBuilder(); registry.applySettings(configuration.getProperties()); ServiceRegistry serviceRegistry = registry.buildServiceRegistry(); SessionFactory sessionFactory = configuration.buildSessionFactory(serviceRegistry); Session session = sessionFactory.openSession();The Sessioninterface defines a number of methods for executing CRUD operations with mapped objects. The following table lists the most common methods provided by the session:
# | Method name | Return | Description | Issued SQL statement |
1 | beginTransaction() | Transaction | Creates a Transaction object or returns an existing one, for working under context of a transaction. | |
2 | getTransaction() | Transaction | Returns the current transaction. | |
3 | get(Class class, Serializable id) | Object | Loads a persistent instance of the given class with the given id, into the session. | SELECT |
4 | load(Class class, Serializable id) | Object | Does same thing as get() method, but throws an ObjectNotFound error if no row with the given id exists. | SELECT |
5 | persist(Object) | void | saves a mapped object as a row in database | INSERT |
6 | save(Object) | Serializable | Does same thing as persist() method, plus returning a generated identifier. | INSERT |
7 | update(Object) | void | Updates a detached instance of the given object and the underlying row in database. | UPDATE |
8 | saveOrUpdate(Object) | void | Saves the given object if it does not exist, otherwise updates it. | INSERT or UPDATE |
9 | delete(Object) | void | Removes a persistent object and the underlying row in database. | DELETE |
10 | close() | void | Ends the current session. | |
11 | flush() | void | Flushes the current session. This method should be called before committing the transaction and closing the session. | |
12 | disconnect() | void | Disconnects the session from current JDBC connection. |
7. Working with Hibernate transaction
Multiple database operations should be executed inside a transaction in order to protect consistence of data in the database in case of exceptions or errors occurred. The following skeleton code illustrates working with a transaction in Hibernate:session.beginTransaction();
try {
session.persist(Object);
session.update(Object);
session.delete(Object);
} catch (Exception ex) {
session.getTransaction().rollback();
}
session.getTransaction().commit();
session.close(); When working with transaction, it requires committing the transaction to make permanent changes to the database, and finally, close the session. 8. Perform CRUD operations with Hibernate
Create:To persist an object into the session (equivalent to inserting a record into the database), either persist()or save() method can be used. For example:
Contact contact1 = new Contact("Nam", "hainatuatgmail.com", "Vietnam", "0904277091");
session.persist(contact1);
Contact contact2 = new Contact("Bill", "billatgmail.com", "USA", "18001900");
Serializable id = session.save(contact2);
System.out.println("created id: " + id);
The save method returns id of the new record inserted in the database.
Read:To retrieve a persistent object from the database into the session (equivalent to selecting a record from the database), use the get() method. For example:
Contact contact = (Contact) session.get(Contact.class, new Integer(2));
if (contact == null) {
    System.out.println("There is no Contact object with id=2");
} else {
    System.out.println("Contact3's name: " + contact.getName());
}
The get()method returns null if there is no row with the given id exists in the database, whereas the load() method throws an ObjectNotFound error. Therefore, use the load() method only when the object is assumed exists.
Update:To update a persistent object which is already loaded in the session (attached instance), simply update the mapped object. Hibernate will update changes to the database then the session is flushed. For example:
Contact contact = (Contact) session.load(Contact.class, new Integer(5));
contact.setEmail("infoatcompany.com");
contact.setTelephone("1234567890");
You can call the update() method explicitly (but not required):
session.update(contact);
To update a detached instance, call either the update() or saveOrUpdate() method, for example:
Contact contact = new Contact("Jobs", "jobsatapplet.com", "Cupertino", "0123456789");
session.update(contact);
Both the update() or saveOrUpdate() methods throws a NonUniqueObjectException exception if there is a different object with the same identifier value was already associated with the session. For example, the update() statement in the following code throws such exception:
Contact contact = (Contact) session.load(Contact.class, new Integer(3));
Contact contactUpdate = new Contact(3, "Jobs", "jobsatapplet.com", "Cupertino", "0123456789");
session.update(contactUpdate);    // will throw NonUniqueObjectException
Delete: To delete an object with a given identifier, use the delete() method, for example:
Contact contactToDelete = new Contact();
contactToDelete.setId(4);
session.delete(contactToDelete);
or delete a loaded instance:
Contact contactToDelete = (Contact) session.load(Contact.class, new Integer(4));
session.delete(contactToDelete);
The delete() method throws a StaleStateException exception if there is no row with the given identifier exists in the database, and a NonUniqueObjectException exception if there is a different object with the same identifier value was already associated with the session.
9. Code Hibernate sample program
Finally, we write the sample program to demonstrate how to perform CRUD operations with Hibernate. In Eclipse IDE, create a new class called ContactManagerunder package com.mycompany with the following code:package com.mycompany;
import java.io.Serializable;
import org.hibernate.Session;
import org.hibernate.SessionFactory;
import org.hibernate.cfg.Configuration;
import org.hibernate.service.ServiceRegistry;
import org.hibernate.service.ServiceRegistryBuilder;
/**
* A sample program that demonstrates how to perform simple CRUD operations
* with Hibernate framework.
* @author www.codejava.net
*
*/
public class ContactManager {
public static void main(String[] args) {
// loads configuration and creates a session factory
Configuration configuration = new Configuration().configure();
ServiceRegistryBuilder registry = new ServiceRegistryBuilder();
registry.applySettings(configuration.getProperties());
ServiceRegistry serviceRegistry = registry.buildServiceRegistry();
SessionFactory sessionFactory = configuration.buildSessionFactory(serviceRegistry);
// opens a new session from the session factory
Session session = sessionFactory.openSession();
session.beginTransaction();
// persists two new Contact objects
Contact contact1 = new Contact("Nam", "hainatuatgmail.com", "Vietnam", "0904277091");
session.persist(contact1);
Contact contact2 = new Contact("Bill", "billatgmail.com", "USA", "18001900");
Serializable id = session.save(contact2);
System.out.println("created id: " + id);
// loads a new object from database
Contact contact3 = (Contact) session.get(Contact.class, new Integer(1));
if (contact3 == null) {
System.out.println("There is no Contact object with id=1");
} else {
System.out.println("Contact3's name: " + contact3.getName());
}
// loads an object which is assumed exists
Contact contact4 = (Contact) session.load(Contact.class, new Integer(4));
System.out.println("Contact4's name: " + contact4.getName());
// updates a loaded instance of a Contact object
Contact contact5 = (Contact) session.load(Contact.class, new Integer(5));
contact5.setEmail("info1atcompany.com");
contact5.setTelephone("1234567890");
session.update(contact5);
// updates a detached instance of a Contact object
Contact contact6 = new Contact(3, "Jobs", "jobsatapplet.com", "Cupertino", "0123456789");
session.update(contact6);
// deletes an object
Contact contact7 = new Contact();
contact7.setId(7);
session.delete(contact7);
// deletes a loaded instance of an object
Contact contact8 = (Contact) session.load(Contact.class, new Integer(8));
session.delete(contact8);
// commits the transaction and closes the session
session.getTransaction().commit();
session.close();
}
}As you can see, there are no SQL statements have to be written to interact with the database, because Hibernate hides all the complex details and exposes its simple and intuitive API. Thus you are free of writing repetitive SQL queries and check their syntax. Working with Hibernate will involve mainly with defining the entities, the mapping, and the association among entities in your application.The project’s structure looks like the following screenshot: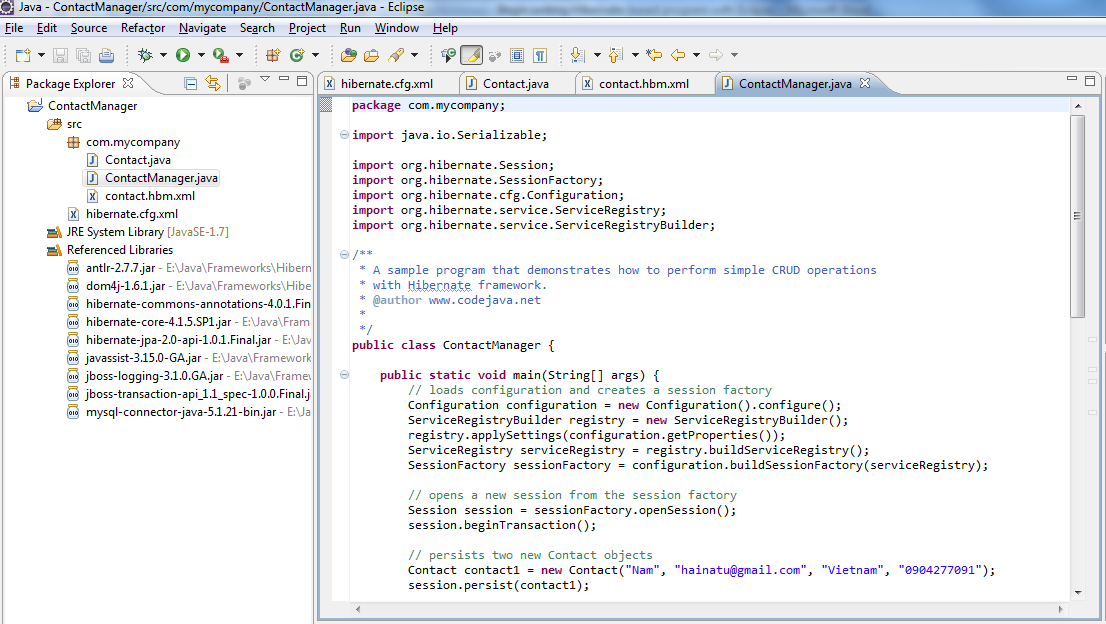 Run the program:Right click on the ContactManager.java file, select Run As > Java Application. The program produces some output in Eclipse’s Console view, as in the following screenshot:
 As you can see, the text in red is the debugging information of Hibernate, the text in black is the program’s output, and we can see Hibernate issues these SQL statements: select, insert, update and delete.You can download the sample application as an Eclipse project in the attachment section at the end of this tutorial.
Other Hibernate Tutorials:
- Java Hibernate JPA Annotations Tutorial for Beginners
- Hibernate Hello World Tutorial for Beginners with Eclipse and MySQL
- Hibernate One-to-One Association on Primary Key Annotations Example
- Hibernate One-to-Many Using Join Table XML Mapping Example
- Hibernate Many-to-Many Association with Extra Columns in Join Table Example
- Hibernate Enum Type Mapping Example
- Hibernate Binary Data and BLOB Mapping Example
- Java Hibernate Reverse Engineering Tutorial with Eclipse and MySQL
- Hibernate Basics - 3 ways to delete an entity from the datastore
About the Author:
 Nam Ha Minh is certified Java programmer (SCJP and SCWCD). He began programming with Java back in the days of Java 1.4 and has been passionate about it ever since. You can connect with him on Facebook and watch his Java videos on YouTube.
| [Eclipse project for sample application] | 9 kB |
Comments