Struts Form Handling Tutorial
- Details
- Written by Nam Ha Minh
- Last Updated on 31 July 2019 | Print Email
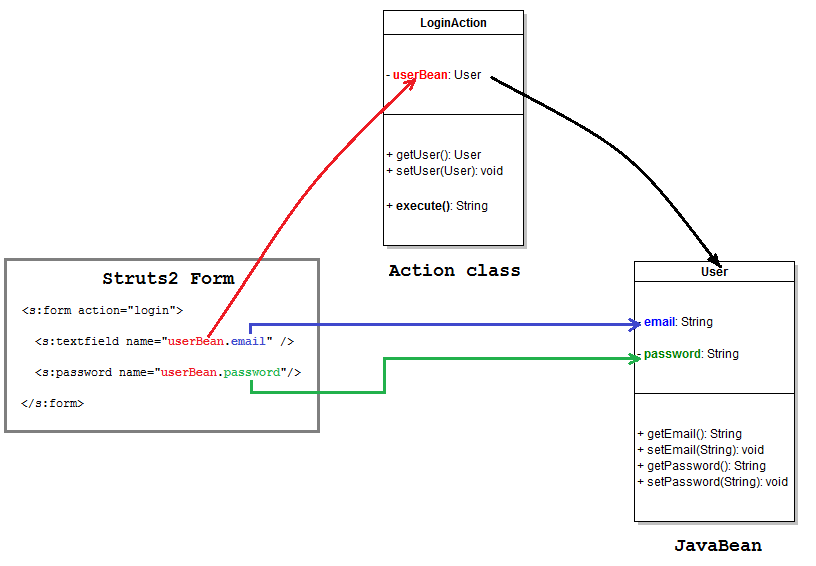 As we can see, there are three components that involve in handling form in Struts application: Struts form, JavaBean and Action class. The relationship between these components is clearly described in the above picture: Fields in the form are mapped to properties of a JavaBean which is an attribute of the action class that handles the form submission. In Struts, we don’t have to read values of the form’s fields through a HTTP request object like in traditional JSP/Servlet. Instead, Struts will automatically fetch values of form’s fields into the mapped JavaBean object. Then in the action class, we can access the form’s fields just like accessing JavaBean properties. Thus this approach simplifies form handling.Now let’s walk through each in details.
 1. Understand Form Handling in Struts
Struts provides its own form tags to render the HTML form. These tags are almost equivalent to HTML ones, but provide mapping and relationship with the action class and JavaBean class. To use Struts tag, it requires putting a taglib directive at the top of the JSP page like this:<%@ taglib prefix="s" uri="/struts-tags" %>
The <s:form> tagThis tag will create a HTML-equivalent <form> tag. Typically we would use this tag as follows:<s:form action="relative URL of action" method="post">
<s:form action="login" method="post">
The field tagsInside the <s:form> tag we put tags to create HTML form fields in the following form:<s:tagName name="beanName.propertyName" label="Field label" />
In the above syntax, beanName must be name of a member variable declared in the action class (with appropriate getter and setter methods); tagName is one of the following form tags provided by Struts: textfield, checkbox, radio, password, textarea, combobox… (See full list of Struts form tags here). For example:<s:textfield name="userBean.email" label="E-mail" />
<s:password name="userBean.password" label="Password" />
The <s:submit> tagThe <s:submit> tag simply create a submit button. For example:- Default submit button: <s:submit />
- Submit button with custom label: <s:submit label="Login" />
<%@ page language="java" contentType="text/html; charset=UTF-8"
    pageEncoding="UTF-8"%>
<%@ taglib prefix="s" uri="/struts-tags" %>
<!DOCTYPE html PUBLIC "-//W3C//DTD HTML 4.01 Transitional//EN"
    "http://www.w3.org/TR/html4/loose.dtd">
<html>
<head>
<meta http-equiv="Content-Type" content="text/html; charset=UTF-8">
<title>Login</title>
</head>
<body>
    <div align="center">
        <h2>Please login</h2>
        <s:form action="login" method="post">
            <s:textfield name="userBean.email" label="E-mail" />
            <s:password name="userBean.password" label="Password" />
            <s:submit value="Login" />
        </s:form>
    </div>
</body>
</html>
2. Code the JavaBean class
After the form, we need to create a JavaBean class which simply models the form with properties mapped to the form’s fields. For the login form above, we should create the following JavaBean class (User.java):package net.codejava.struts;
public class User {
private String email;
private String password;
public String getEmail() {
return email;
}
public void setEmail(String email) {
this.email = email;
}
public String getPassword() {
return password;
}
public void setPassword(String password) {
this.password = password;
}
}The properties email and password must match the properties defined in the login form: userBean.email and userBean.password, respectively.When the form is submitted, Struts will create an instance of this JavaBean class using the default, no-arguments constructor. So make sure there’s always a no-arguments constructor in the class:- If there’s no explicit constructor, then the compiler will generate a default, no-argument constructor. In this case, we don’t have to do anything.
- If we declare a constructor has an argument like this:
public User(String email) {
    this.email = email;
}
Then we have to write a non-argument constructor explicitly like this:
public User() {
}
Otherwise a NullpointerException will be thrown when the form is submitted.
3. Code the Struts Action class
Create the action class (LoginAction.java) with the following code:package net.codejava.struts;
import com.opensymphony.xwork2.ActionSupport;
public class LoginAction extends ActionSupport {
private User userBean;
public String execute() {
System.out.println("email: " + userBean.getEmail());
System.out.println("pass: " + userBean.getPassword());
// add your login procedure here...
return SUCCESS;
}
public User getUserBean() {
return userBean;
}
public void setUserBean(User userBean) {
this.userBean = userBean;
}
} Here we have to declare a member variable of type User called userBean to match with the userBean name defined in the login form, with appropriate getter and setter methods.Then in the action method execute(), we can access the email and password of the login form just like reading properties of the userBean. Because before executing the action method, Struts creates an instance of the User class and passes values of form’s fields into the appropriate setter methods.Inside the execute() method, we simply print out the email and password to the server’s console. In reality, you may validate the email and password against a database, depending on how the login function would be implemented.Finally the action method returns SUCCESS view as usual. 4. Code the success page
Create a login-success.html file under WEB-INF\content directory of the application, with the following content:<!DOCTYPE html PUBLIC "-//W3C//DTD HTML 4.01 Transitional//EN"
"http://www.w3.org/TR/html4/loose.dtd">
<html>
<head>
<meta http-equiv="Content-Type" content="text/html; charset=UTF-8">
<title>Login Success</title>
</head>
<body>
<h2 align="center">Welcome, you have logged in successfully!</h2>
</body>
</html>This is a simple HTML page that displays a welcome message to the user. By convention, the framework will show up this page when the action class returns SUCCESS view. 5. Configure Struts in web.xml
To enable Struts processing requests, configure it in the web.xml file as follows:
<?xml version="1.0" encoding="UTF-8"?>
<web-app xmlns:xsi="http://www.w3.org/2001/XMLSchema-instance"
    xmlns="http://java.sun.com/xml/ns/javaee"
    xmlns:web="http://java.sun.com/xml/ns/javaee/web-app_2_5.xsd"
    xsi:schemaLocation="http://java.sun.com/xml/ns/javaee
        http://java.sun.com/xml/ns/javaee/web-app_3_0.xsd"
    id="WebApp_ID" version="3.0">

      <display-name>Struts2FormHandling</display-name>

    <filter>
      <filter-name>struts2</filter-name>
      <filter-class>
          org.apache.struts2.dispatcher.ng.filter.StrutsPrepareAndExecuteFilter
      </filter-class>
    </filter>

    <filter-mapping>
      <filter-name>struts2</filter-name>
       <url-pattern>/*</url-pattern>
    </filter-mapping>
</web-app>
ATTENTION: We don’t use struts.xmlWe don’t use the struts.xml file in this application. Instead, we use the default naming convention implied by Struts. The following table shows how the framework will interpret the action URL and view file:Action class | URL mapping | Success view |
LoginAction.java | /login | WEB-INF/content/login-success.html |
6. Testing the Struts From Handling application
Let’s deploy the application on Tomcat server with the context path /Struts2FormHandling. Type the following URL into browser to show the login page:http://localhost:8080/Struts2FormHandling/LoginForm.jsp
The login form appears: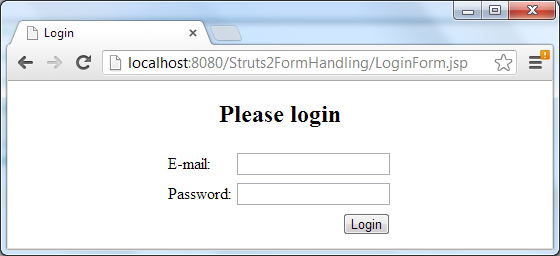 Enter e-mail and password then hit Login button, the welcome page appears:
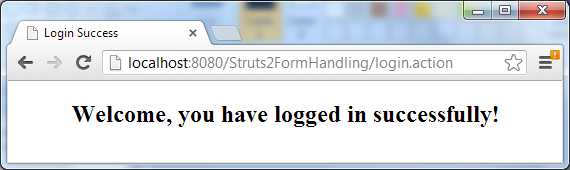 Look at the server’s console, we’ll see the entered e-mail and password are printed out.
 Related Struts Form Tutorials:
- Struts Form Validation Basic Example (Using XML)
- Struts Form Validation Basic Example (Using Annotations)
Other Struts Tutorials:
- Introduction to Struts 2 framework
- Struts beginner tutorial (Eclipse + Tomcat + XML)
- Struts Beginner Tutorial with Annotations
- Struts beginner tutorial with Convention Plugin (zero-configuration)
- How to handle exceptions in Struts
- Send e-mail with attachments in Struts
- Struts File Upload Tutorial
- Struts - Spring - Hibernate Integration Tutorial
About the Author:
 Nam Ha Minh is certified Java programmer (SCJP and SCWCD). He began programming with Java back in the days of Java 1.4 and has been passionate about it ever since. You can connect with him on Facebook and watch his Java videos on YouTube.
| [Deployable WAR file] | 3563 kB | |
| [Eclipse project] | 3566 kB |
Comments
you are master.
very easy way explanation.