How to Create Executable JAR file with resources and dependencies using Maven in Eclipse
- Details
- Written by Nam Ha Minh
- Last Updated on 02 July 2019 | Print Email
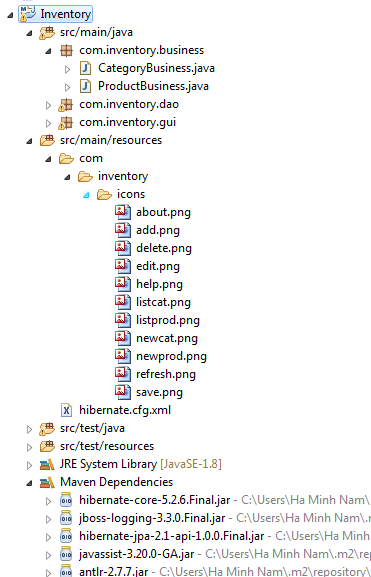 As you can see, this Java project contains resource files like images and XML, and dependencies for Hibernate framework. So what we are going to show you is how to generate the executable JAR file of this project in a manner that the JAR file contains all the resources and dependencies (uber-JAR or fat JAR file).And you know, creating such JAR file is not possible with Eclipse’s Export function (File > Export > Java > Runnable JAR file). But the good news is that Maven provides a great plugin that is dedicated for creating executable JAR files with resources and dependencies. This plugin is called Maven Assembly Plugin.To use the Maven Assembly Plugin, declare the following XML code in the <plugins> section which is under the <build>section of the pom.xml file:
<plugin>
	<artifactId>maven-assembly-plugin</artifactId>
	<configuration>
		<archive>
			<manifest>
				<mainClass>com.inventory.gui.InventoryApp</mainClass>
			</manifest>
		</archive>
		<descriptorRefs>
			<descriptorRef>jar-with-dependencies</descriptorRef>
		</descriptorRefs>
	</configuration>
</plugin>
That makes the pom.xml file looks like the following:
<project ....>
	<modelVersion>4.0.0</modelVersion>
	<groupId>com.inventory</groupId>
	<artifactId>Inventory</artifactId>
	<packaging>jar</packaging>
	<version>0.0.1-SNAPSHOT</version>
	<name>Inventory Management</name>


	<dependencies>
		....

	</dependencies>

	<build>
		<plugins>
			<plugin>
				<artifactId>maven-assembly-plugin</artifactId>
				<configuration>
					<archive>
						<manifest>
							<mainClass>com.inventory.gui.InventoryApp</mainClass>
						</manifest>
					</archive>
					<descriptorRefs>
						<descriptorRef>jar-with-dependencies</descriptorRef>
					</descriptorRefs>
				</configuration>
			</plugin>
		</plugins>
	</build>
</project>
Here, there are two noteworthy points:
- The packaging type of the project must be jar: <packaging>jar</packaging>
- The <mainClass> element specifies the main class of your application in form of fully qualified name. For example, in the above XML we specify the main class is com.inventory.gui.InventoryApp
mvn clean install assembly:single
In Eclipse, right click on the project and select Run As > Maven build, and specify the goal assembly:single in the dialog, then click Run: Wait a moment for the build to complete, and then check the JAR file generated under the project’s target directory. Note that the JAR file contains all the resources and dependencies (fat JAR or uber-JAR).
References:
Related Tutorials:
Other Java Coding Tutorials:
- 10 Common Mistakes Every Beginner Java Programmer Makes
- 10 Java Core Best Practices Every Java Programmer Should Know
- How to become a good programmer? 13 tasks you should practice now
- How to calculate MD5 and SHA hash values in Java
- How to generate random numbers in Java
About the Author:
 Nam Ha Minh is certified Java programmer (SCJP and SCWCD). He began programming with Java back in the days of Java 1.4 and has been passionate about it ever since. You can connect with him on Facebook and watch his Java videos on YouTube.
Comments