Payment is a crucial part of an e-commerce website, and PayPal is, perhaps, the world’s most popular and trusted online payment gateway. It allows customers to purchase goods or services either by using their credit/debit cards, or their PayPal balance. PayPal also provides a mature SDK that helps programmers integrating PayPal payment solution into a website.In this Java tutorial, I will help you write code to integrate PayPal payment into a Java web application, step by step.NOTE: The code examples below are well tested in a real world e-commerce application, which you can learn in this course.
1. Understand a typical Checkout – Payment workflow
Let’s take a look at the following picture to understand the standard workflow of the checkout – payment process on an e-commerce website:From the shopping cart, a customer proceeds to checkout. The Checkout page displays the order details including tax, shipping fee, and the total amount.When the customer clicks Checkout button on the Checkout page, he will be redirected to a PayPal page which allows the customer to choose payment using his PayPal balance or his credit/debit card. Once approved, the Review page lets the customer reviews payer information, shipping address…When the customer clicks Pay button on the Review page, payment will be executed and the Receipt page gets displayed.
Throughout this tutorial, you will learn to implement PayPal payment integration that follows this workflow.
2. PayPal REST SDK
PayPal provides a Software Development Kit (SDK) that helps programmers writing code to integrate PayPal payment into an existing application. PayPal SDK supports many programming languages, including Java. It communicates with PayPal server via Restful web services (hence the name PayPal REST SDK), but it’s a high-level API which means you don’t have to deal with web services directly.
3. Create PayPal Sandbox Account
A sandbox account is used to test making payment during development. You need to login into PayPal Developer portal with your PayPal business account. And under the My Apps & Credentials section, make sure you are in Sandbox tab, and click Create App button:Enter the App Name and click Create App. Then you will see your Client ID and Secret code as shown below:The Client ID and Secret code will be used in your Java code to communicate with PayPal server. It is actually access token in OAuth 2.0.
4. Add PayPal REST SDK dependency
To use PayPal REST SDK, you must add the following dependency into your Java project’s pom.xmlfile:
Maven will put 3 JAR files to the project: rest-api-sdk-version.jar, slf4j-api-version.jar and gson-version.jar.You can check the latest version of PayPal REST SDK on Maven Repository here.
5. Code Order Detail Model Class
You know, the information required for each payment is product/service name, subtotal, tax, shipping fee and total – so create a Java model class to convey such information, as below:
This page will look like this in a web browser:In a real e-commerce website, the checkout page usually summarizes the items contained in shopping cart, in addition to the above information. When the customer clicks Checkout button, a Java servlet will handle the request, which is described below.
7. Code Authorize Payment Servlet class
Before payment is executed, PayPal needs to verity the details of the transaction. So we need to send the order details to PayPal server to get an approval link if the transaction information is valid.Create the AuthorizePaymentServletclass with the following code:
/**
 * AuthorizePaymentServlet class - requests PayPal for payment.
 * @author Nam Ha Minh
 * @copyright https://codeJava.net
 */
package net.codejava;

import java.io.IOException;
import javax.servlet.ServletException;
import javax.servlet.annotation.WebServlet;
import javax.servlet.http.*;

import com.paypal.base.rest.PayPalRESTException;

@WebServlet("/authorize_payment")
public class AuthorizePaymentServlet extends HttpServlet {
	private static final long serialVersionUID = 1L;

	public AuthorizePaymentServlet() {
	}

	protected void doPost(HttpServletRequest request, HttpServletResponse response)
			throws ServletException, IOException {
		String product = request.getParameter("product");
		String subtotal = request.getParameter("subtotal");
		String shipping = request.getParameter("shipping");
		String tax = request.getParameter("tax");
		String total = request.getParameter("total");

		OrderDetail orderDetail = new OrderDetail(product, subtotal, shipping, tax, total);

		try {
			PaymentServices paymentServices = new PaymentServices();
			String approvalLink = paymentServices.authorizePayment(orderDetail);

			response.sendRedirect(approvalLink);

		} catch (PayPalRESTException ex) {
			request.setAttribute("errorMessage", ex.getMessage());
			ex.printStackTrace();
			request.getRequestDispatcher("error.jsp").forward(request, response);
		}
	}

}
As you can see, this Java servlet reads order details from the Checkout page, and then calls the authorizePayment() method of the PaymentServices class, for verification.If the order details information is valid, PayPal will send back an approval URL – and we forward the customer to this URL, which is the PayPal’s login interface.In case the supplied information is invalid (e.g. invalid values, currency, format, etc) or any errors occurred, a PayPalRESTException is thrown. And we display the error page to the customer. Code of the error page (error.jsp) is as simple as below:
The PaymentServicesclass encapsulates API calls to PayPal SDK. It acts as a medium layer between Java servlets and PayPal server. Write the initial code as follows:
Replace the values of CLIENT_ID and CLIENT_SECRET by the actual code of your PayPal sandbox app you’ve created.The first information we need to send to PayPal for verification is the payer information. So code the getPayerInformation() as follows:
We need to specify two URLs to which PayPal will redirect during the checkout process. The customer will be redirected to the cancel URL if he chooses to cancel the payment (return to merchant). Or if the customer agrees to continue, he will be redirected to the return URL – which is the Review Payment page in this tutorial.Next, write code for the getTransactionInformation() method as follows:
private List<Transaction> getTransactionInformation(OrderDetail orderDetail) {
	Details details = new Details();
	details.setShipping(orderDetail.getShipping());
	details.setSubtotal(orderDetail.getSubtotal());
	details.setTax(orderDetail.getTax());

	Amount amount = new Amount();
	amount.setCurrency("USD");
	amount.setTotal(orderDetail.getTotal());
	amount.setDetails(details);

	Transaction transaction = new Transaction();
	transaction.setAmount(amount);
	transaction.setDescription(orderDetail.getProductName());

	ItemList itemList = new ItemList();
	List<Item> items = new ArrayList<>();

	Item item = new Item();
	item.setCurrency("USD");
	item.setName(orderDetail.getProductName());
	item.setPrice(orderDetail.getSubtotal());
	item.setTax(orderDetail.getTax());
	item.setQuantity("1");

	items.add(item);
	itemList.setItems(items);
	transaction.setItemList(itemList);

	List<Transaction> listTransaction = new ArrayList<>();
	listTransaction.add(transaction);

	return listTransaction;
}
As you can see in this method, we send the order details to PayPal in terms of its API (Details, Amount, Transaction, ItemList, Item..). The details will be displayed on PayPal payment page.And the getApprovalLink() method is coded as below:
This method parses the approved Payment object returned from PayPal to find the approval URL in JSON response. Thanks to PayPal Rest SDK, we don’t have to deal with JSON directly.Click the Checkout button on the Checkout page, login to PayPal using your PayPal developer account and you will see the transaction details appear as shown below:Note that you need to create a PayPal developer account to test in sandbox mode. It is different than PayPal’s normal account.
9. Code Review Payment Servlet
When the customer clicks Continue on PayPal’s page, we display the Review Payment page that lets the customer reviews payment information before actually paying. So create the ReviewPaymentServletclass with the following code:
As you can see, this code captures the values of PayerID and paymentId sent from PayPal. Then it invokes the getPaymentDetails() method of PaymentServices class to get the payment details stored by PayPal. Then it sets 3 objects as attributes in the request: PayerInfo, Transaction and ShippingAddress. This information will be shown on the Review Payment page, to which is forwarded by this servlet.Note that the URL to this servlet must match the return URL specified previously. And add the following method to the PaymentServices class:
public Payment getPaymentDetails(String paymentId) throws PayPalRESTException {
	APIContext apiContext = new APIContext(CLIENT_ID, CLIENT_SECRET, MODE);
	return Payment.get(apiContext, paymentId);
}
This method simply connects to PayPal server to get a Payment object based on the given paymentId.
10. Code Review Payment Page
Next, we need to write code for the Review Payment page. Create the review.jsp file with the following code:
After the customer logins to PayPal and click Continue, he is redirected to the Review Payment page which looks something like this:If the customer clicks Pay Now on this page, the ExecutePaymentServletis invoked, which is described below.
11. Code Execute Payment Servlet
Next, create the ExecutePaymentServlet with the following code:
This servlet captures paymentIdand PayerID passed from the Review Payment page, and invokes the executePayment() method of the PaymentServices class, which is coded as below:
public Payment executePayment(String paymentId, String payerId)
		throws PayPalRESTException {
	PaymentExecution paymentExecution = new PaymentExecution();
	paymentExecution.setPayerId(payerId);

	Payment payment = new Payment().setId(paymentId);

	APIContext apiContext = new APIContext(CLIENT_ID, CLIENT_SECRET, MODE);

	return payment.execute(apiContext, paymentExecution);
}
And finally, the servlet forwards the request to the Receipt page which is described below.
12. Code Payment Receipt Page
Create the receipt.jsp file and put the following code:
If the payment is executed successfully, the customer will see the receipt page as follows:And this page is the final step of the checkout – payment process.
13. Switch PayPal to Live Mode
After done testing the payment process, you need to change from sandbox mode to live mode so the customers can pay real money. Go to PayPal Developer’s Dashboard, and create a Live App:The replace the CLIENT_ID and CLIENT_SECRET in the PaymentServices class, by the values obtained from the Live App you’ve created:
public class PaymentServices {
	private static final String CLIENT_ID = "Client_ID_of_Live_App_Account";
	private static final String CLIENT_SECRET = "Client_Secret_of_Live_App_Account";
	private static final String MODE = "live";

	...
}
And remember to change the mode of PayPal SDK from sandbox to live. The you have PayPal payment integration ready for your e-commerce website.You can download the sample project under the Attachments section below.To learn more, e.g. integrating PayPal payment into a real e-commerce website, I strongly recommend you to learn this course: Build a Complete eCommerce Website with Java and PayPal
About the Author:
Nam Ha Minh is certified Java programmer (SCJP and SCWCD). He began programming with Java back in the days of Java 1.4 and has been passionate about it ever since. You can connect with him on Facebook and watch his Java videos on YouTube.
Hi, great tutorial. Thanks a lot. Transaction in live mode works for me, but remains in a pending state and then the collection must be authorized from the PayPal portal of the account. How do I avoid the pending status?
so I found the problem with the payment error. I using a DE netbeans envieroment. So the REST API use import lombok.Getter; import lombok.Setter;
-> all prices are now 120,00 grrr :( take a while to pick the problem. fixing strTemp = orderDetail.getSubtotal(); strTemp = strTemp.replace(",", "."); details.setSubtotal(strTemp);
Hi Wittenburg, In sandbox mode, you should use sandbox PayPal account, not real one. How to create PayPal sandbox account: www.youtube.com/watch?v=me1VFbSb7_Q
 From the shopping cart, a customer proceeds to checkout. The Checkout page displays the order details including tax, shipping fee, and the total amount.When the customer clicks Checkout button on the Checkout page, he will be redirected to a PayPal page which allows the customer to choose payment using his PayPal balance or his credit/debit card. Once approved, the Review page lets the customer reviews payer information, shipping address…When the customer clicks Pay button on the Review page, payment will be executed and the Receipt page gets displayed.
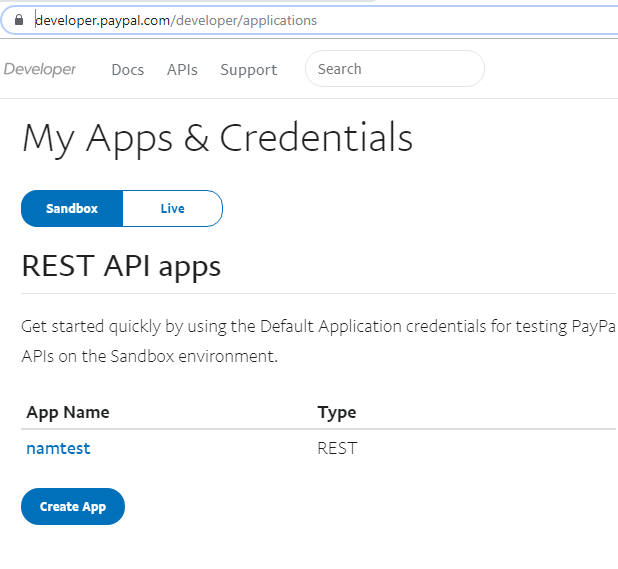 Enter the App Name and click Create App. Then you will see your Client ID and Secret code as shown below:
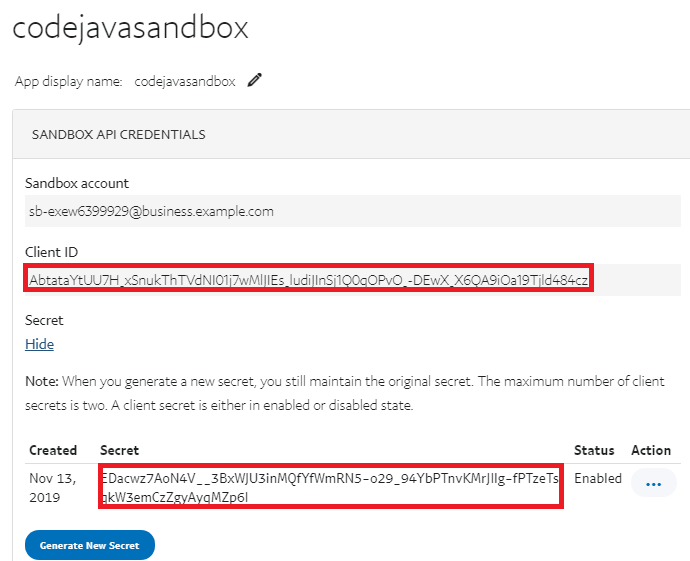 The Client ID and Secret code will be used in your Java code to communicate with PayPal server. It is actually access token in OAuth 2.0.
 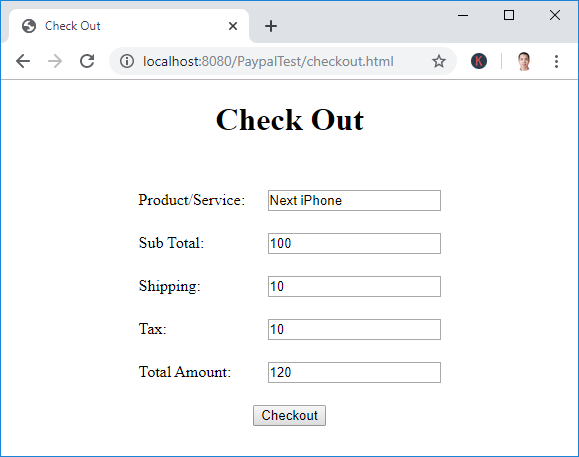 In a real e-commerce website, the checkout page usually summarizes the items contained in shopping cart, in addition to the above information. When the customer clicks Checkout button, a Java servlet will handle the request, which is described below.
 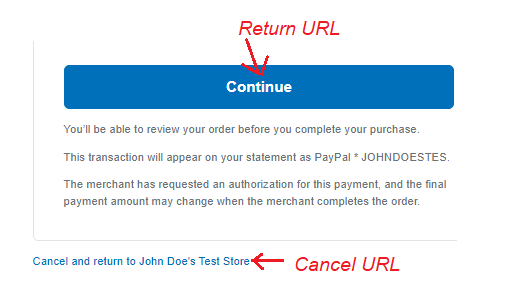 Next, write code for the getTransactionInformation() method as follows:
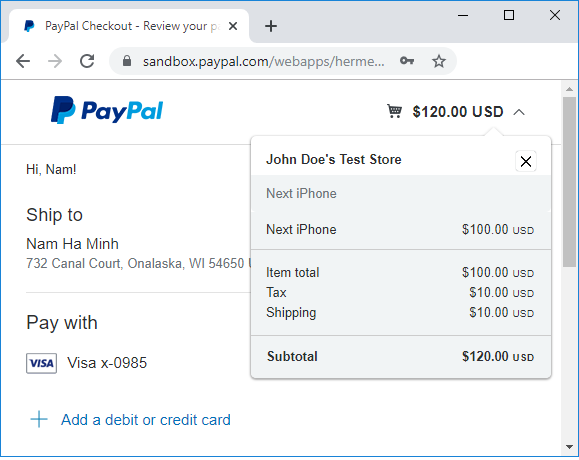 Note that you need to create a PayPal developer account to test in sandbox mode. It is different than PayPal’s normal account.
 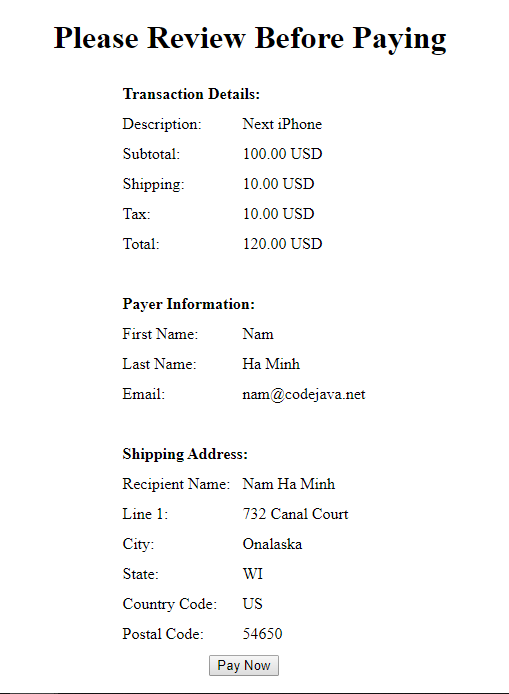 If the customer clicks Pay Now on this page, the ExecutePaymentServlet is invoked, which is described below.
  And this page is the final step of the checkout – payment process.
 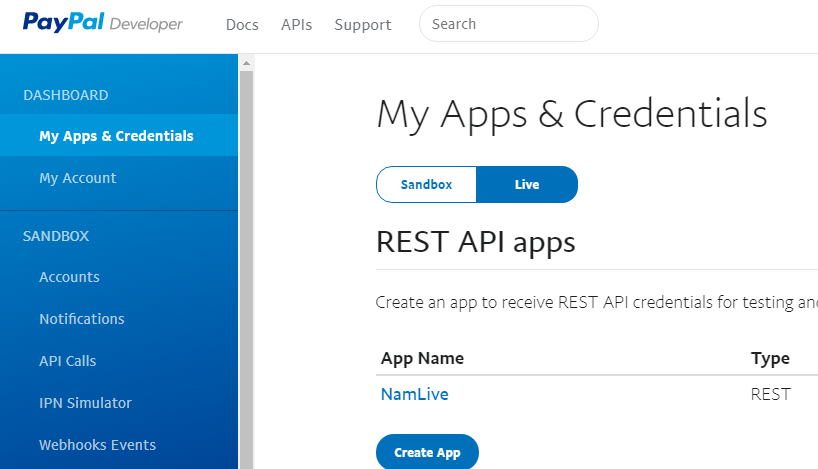 The replace the CLIENT_ID and CLIENT_SECRET in the PaymentServices class, by the values obtained from the Live App you’ve created:
 Nam Ha Minh is certified Java programmer (SCJP and SCWCD). He began programming with Java back in the days of Java 1.4 and has been passionate about it ever since. You can connect with him on Facebook and watch his Java videos on YouTube.
Comments
Transaction in live mode works for me, but remains in a pending state and then the collection must be authorized from the PayPal portal of the account. How do I avoid the pending status?
THANK YOU, SIR.
so I found the problem with the payment error.
I using a DE netbeans envieroment.
So the REST API use
import lombok.Getter;
import lombok.Setter;
-> all prices are now 120,00 grrr :(
take a while to pick the problem. fixing
strTemp = orderDetail.getSubtotal();
strTemp = strTemp.replace(",", ".");
details.setSubtotal(strTemp);
best regards Wolfgang
In sandbox mode, you should use sandbox PayPal account, not real one. How to create PayPal sandbox account: www.youtube.com/watch?v=me1VFbSb7_Q