This Java Hibernate tutorial helps you get started with Hibernate framework easily with Eclipse IDE and MySQL database: Coding your first Java program that uses Hibernate. Upon completing this tutorial, you will learn:
How to add Hibernate dependency in Maven’s project file.
How to create a Hibernate configuration file.
How to use JPA annotations for mapping a Java class to a table in database.
How to load Hibernate Session Factory.
How to perform CRUD (Create, Read, Update, and Delete) operations with Hibernate Session
The following software programs and technologies are used (of course you can use newer versions):
JDK 8
Eclipse Neon (4.6.0)
Hibernate ORM 5.2.6.Final
MySQL Server Community Edition 5.5
MySQL Connector J - JDBC driver library for MySQL
1. Why Hibernate?
In short, Hibernate is an Object-Relational Mapping (ORM) tool for the Java language. That means you can map Java classes to database tables and map Java data types to SQL data types. Hibernate framework saves you a lot of time for developing database-extensive applications as it does all the database hard work so you have more time to focus on implementing business logic. Imagine you can perform CRUD operations and much more without writing any SQL statements.In additional, the Hibernate Query Language (HQL) allows you to write object-oriented queries for advanced operations.Hibernate is an implementation of Java Persistence API (JPA) so your code has high interoperability with other Java EE applications.Having said that, Hibernate framework is an ideal choice for the persistence layer in Java EE development, and in fact, it is widely used and trusted by thousands of Java programmers.That’s was a short introduction about Hibernate. Now, let see how to build your first Hibernate-based Java application.
2. Setting up the MySQL Database
You will develop a Java application that manages a collection of books in database. Therefore, execute the following SQL script in MySQL Workbench tool (or MySQL Command Line Client program):
CREATE DATABASE 'bookstore';
USE 'bookstore';

CREATE TABLE `book` (
  `book_id` int(11) NOT NULL AUTO_INCREMENT,
  `title` varchar(128) NOT NULL,
  `author` varchar(45) NOT NULL,
  `price` float NOT NULL,
  PRIMARY KEY (`book_id`),
  UNIQUE KEY `book_id_UNIQUE` (`book_id`),
  UNIQUE KEY `title_UNIQUE` (`title`)
) ENGINE=InnoDB;
This creates a database named bookstore with a table named book. This table consists of 4 columns: book_id (auto-increment ID), title, author and price.
3. Creating the Project in Eclipse
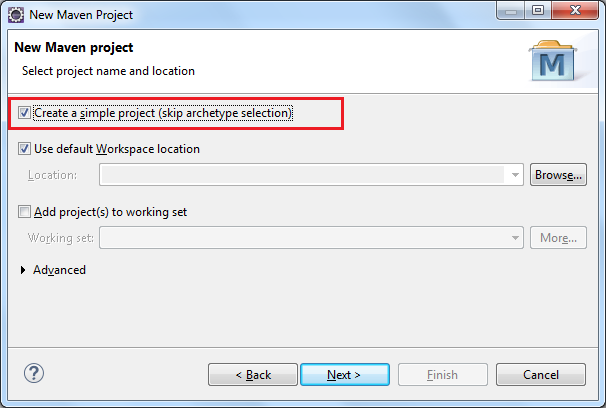
In this step, you will create a Maven project in Eclipse and add dependency for Hibernate in the Maven’s project configuration file (pom.xml).In Eclipse IDE, click menu File > New > Maven Project. If you don’t see this option, click File > New > Project… and select Maven Project from the New Project wizard, and then click Next.In the next screen, check the option Create a simple project (skip archetype selection):And click Next. In the next screen, enter information for the artifact as following:
Group Id: net.codejava.hibernate
Artifact Id: HibernateHelloExample
Name: Hibernate Hello World Program
Click Finish. Eclipse generates the structure for the project as shown below:You may see the JRE System Library points to the old Java SE 5 version. In this case, right click on it and select Properties to change to JDK 8.Create a new Java package net.codejava.hibernate under the src/main/java directory by right clicking on the project and select New > Package.Now, double click on the pom.xml file to add dependencies for Hibernate and MySQL Connector Java libraries. Add the following XML code right before the </project> element:
Click Save (Ctrl + S) and Maven automatically download the dependency JAR files of Hibernate core and MySQL Connector Java JDBC driver. You can see the JAR files added under the Maven Dependencies entry of the project.
4. Coding the Entity Class
In this step, you will write a Java class (entity class) to map the table book in the database, using annotations.Create the class Book under the package net.codejava.hibernate with 4 fields according to the columns in the database table book:
public class Book {
	private long id;
	private String title;
	private String author;
	private float price;
}
Then use Eclipse’s code generation features to generate getters and setters for these fields (Shortcut: Alt + Shift + S, then type r).Also generate an empty constructor for the Book class (shortcut: Alt + Shift + S, then type C). The Book class now looks like this:
public class Book {
	private long id;
	private String title;
	private String author;
	private float price;

	public Book() {
	}

	public long getId() {
		return id;
	}

	public void setId(long id) {
		this.id = id;
	}

	public String getTitle() {
		return title;
	}

	public void setTitle(String title) {
		this.title = title;
	}

	public String getAuthor() {
		return author;
	}

	public void setAuthor(String author) {
		this.author = author;
	}

	public float getPrice() {
		return price;
	}

	public void setPrice(float price) {
		this.price = price;
	}
}
Now, you need to use some annotations to map this class to the table book in database. These annotations come from JPA, so add this import statement first:
import javax.persistence.*;
Use the @Entity and @Table annotations before the class to map it to the table:
@Entity
@Table(name = "book")
public class Book {
Next, add the following annotations right before the getter of the id field:
@Id
@Column(name = "book_id")
@GeneratedValue(strategy = GenerationType.IDENTITY)
public long getId() {
	return id;
}
The @Id annotation tells Hibernate that this is the ID column of the table; the @Column annotation maps the field to a column in database table; and the @GeneratedValueannotation tell Hibernates that this ID column is auto-increment.You know, Hibernate is intelligent, as it can automatically map fields of a class to fields of a table if the fields have same name, and automatically maps Java data types to SQL data types. That means you don’t have to explicitly map the remaining fields title, author and price.And here’s the complete code of the Book class:
package net.codejava.hibernate;

import javax.persistence.*;

/**
 * Book.java
 * This class maps to a table in database.
 * @author www.codejava.net
 *
 */

@Entity
@Table(name = "book")
public class Book {
	private long id;
	private String title;
	private String author;
	private float price;

	public Book() {
	}

	@Id
	@Column(name = "book_id")
	@GeneratedValue(strategy = GenerationType.IDENTITY)
	public long getId() {
		return id;
	}

	public void setId(long id) {
		this.id = id;
	}

	public String getTitle() {
		return title;
	}

	public void setTitle(String title) {
		this.title = title;
	}

	public String getAuthor() {
		return author;
	}

	public void setAuthor(String author) {
		this.author = author;
	}

	public float getPrice() {
		return price;
	}

	public void setPrice(float price) {
		this.price = price;
	}

}
5. Creating Hibernate Configuration XML File
This step involves in creating Hibernate configuration file (hibernate.cfg.xml) to tell Hibernates how to connect to the database and which Java classes should be mapped to database tables.In Eclipse, create an XML file named hibernate.cfg.xml under the src/java/resources directory with the following code:
As you can see, this configuration file specifies the database connection information (JDBC driver class, URL, username and password). The <mapping> element specifies a Java entity class needs to be mapped. Here we specify the Book class under the net.codejava.hibernate package.The show_sql property is set to true to tell Hibernate print SQL statements for every query it made.
6. Loading Hibernate Session Factory
Now, let create the main class for this program. Create the BookManager class under the net.codejava.hibernate package with the following structure:
public class BookManager {
	protected SessionFactory sessionFactory;

	protected void setup() {
		// code to load Hibernate Session factory
	}

	protected void exit() {
		// code to close Hibernate Session factory
	}

	protected void create() {
		// code to save a book
	}

	protected void read() {
		// code to get a book
	}

	protected void update() {
		// code to modify a book
	}

	protected void delete() {
		// code to remove a book
	}

	public static void main(String[] args) {
		// code to run the program
	}
}
Add the following import statements before the class:
In Hibernate, you perform database operations via a Session which can be obtained from a SessionFactory. The SessionFactory loads Hibernate configuration file, analyzes the mapping and creates connection to the database. Write the following code in the setup() method to load Hibernate SessionFactory with settings loaded from hibernate.cfg.xml file:
final StandardServiceRegistry registry = new StandardServiceRegistryBuilder()
		.configure() // configures settings from hibernate.cfg.xml
		.build();
try {
	sessionFactory = new MetadataSources(registry).buildMetadata().buildSessionFactory();
} catch (Exception ex) {
	StandardServiceRegistryBuilder.destroy(registry);
}
Once the Hibernate SessionFactory is built, you can open a Session and begin a transaction like this:
Then you can call several methods on the session in order to perform database operations such as save(), get(), update() and delete(). And finally commit the transaction and close the session like this:
public static void main(String[] args) {
BookManager manager = new BookManager();
manager.setup();
manager.exit();
}
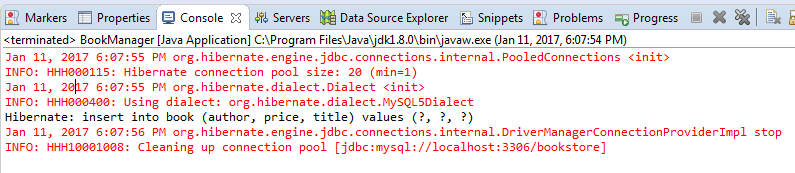
Then run this program (shortcut: Ctrl + F11) to check if the session factory is loaded successfully. If you see something like this in the Console view, that means the program loads the session factory successfully:
7. Performing CRUD Operations with Hibernate
Now, let’s see how Hibernate can save you a lot of time with regard to performing trivial database operations.
Performing CREATE operation:
Call the session.save(Object)method to persist a mapped object to the database. Update the create() method of the BookManager class as following:
protected void create() {
Book book = new Book();
book.setTitle("Effective Java");
book.setAuthor("Joshua Bloch");
book.setPrice(32.59f);
Session session = sessionFactory.openSession();
session.beginTransaction();
session.save(book);
session.getTransaction().commit();
session.close();
}
Then update the main() method:
public static void main(String[] args) {
	BookManager manager = new BookManager();
	manager.setup();

	manager.create();

	manager.exit();
}
Now run the program again. You should see Hibernate prints a SQL statement in the Console view like this:Using MySQL Workbench or MySQL Command Line Client to check data, you will see a new record is inserted to the book table:Similarly, repeat the same steps for other operations describe below.
Performing READ operation:
The session.get(Class, long)returns an object of the specified class that maps a row in the database table. Update the read() method of the BookManager class with the following code:
Call the session.update(Object)method to update a mapped object to the database. Add the following code to the update() method of the BookManager class:
protected void update() {
	Book book = new Book();
	book.setId(20);
	book.setTitle("Ultimate Java Programming");
	book.setAuthor("Nam Ha Minh");
	book.setPrice(19.99f);

	Session session = sessionFactory.openSession();
	session.beginTransaction();

	session.update(book);

	session.getTransaction().commit();
	session.close();
}
Performing DELETE operation:
Call the session.delete(Object)method to remove a mapped object from the database. Add the following code to the delete() method of the BookManager class:
protected void delete() {
	Book book = new Book();
	book.setId(20);

	Session session = sessionFactory.openSession();
	session.beginTransaction();

	session.delete(book);

	session.getTransaction().commit();
	session.close();
}
That’s an awesome Hibernate hello world tutorial using Eclipse IDE and MySQL database. You can download the sample project under the Attachments section. Happy learning Hibernate!Watch the video tutorial:
Nam Ha Minh is certified Java programmer (SCJP and SCWCD). He began programming with Java back in the days of Java 1.4 and has been passionate about it ever since. You can connect with him on Facebook and watch his Java videos on YouTube.
Sorry, in the below comment, I mentioned as correct version. That is current version (Sorry for the typo). If you update this teaching content as current version of JDK, Hibernate & MySQL, That would be grateful to you. Please consider. Thanks
Hi Nam, Thank you so much for your wonderful work. If you update the teaching content to the correct version of JDK, Hibernate & MySQL. That would be grateful to you. Because we are facing many issue, while we try (example - Caused by: java.lang.ClassNotFoundException: javax.xml.bind.JAXBException). Thanks a lot
 And click Next. In the next screen, enter information for the artifact as following:
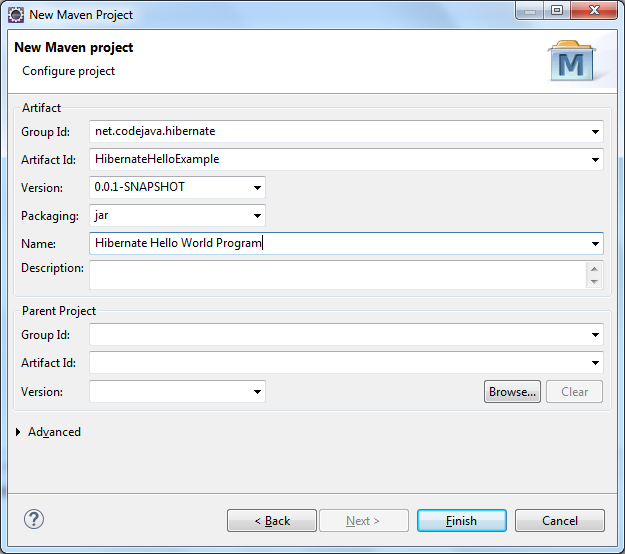 Click Finish. Eclipse generates the structure for the project as shown below:
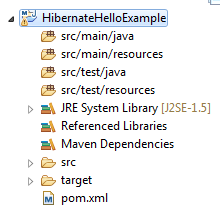 You may see the JRE System Library points to the old Java SE 5 version. In this case, right click on it and select Properties to change to JDK 8.Create a new Java package net.codejava.hibernate under the src/main/java directory by right clicking on the project and select New > Package.Now, double click on the pom.xml file to add dependencies for Hibernate and MySQL Connector Java libraries. Add the following XML code right before the </project> element:
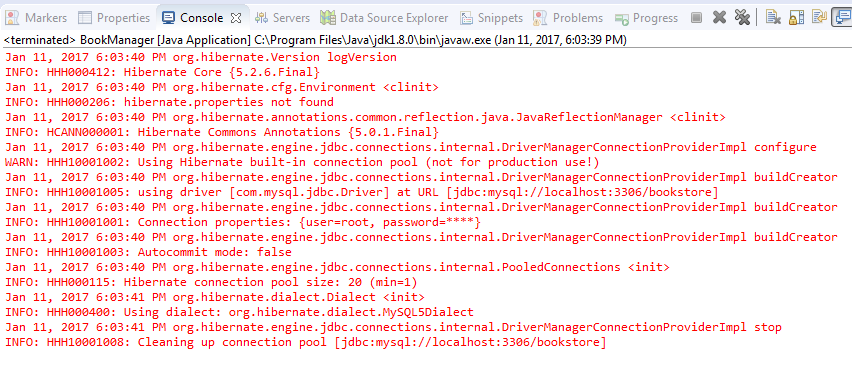
 Using MySQL Workbench or MySQL Command Line Client to check data, you will see a new record is inserted to the book table:
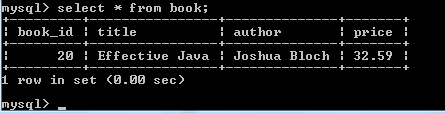 Similarly, repeat the same steps for other operations describe below.
  Nam Ha Minh is certified Java programmer (SCJP and SCWCD). He began programming with Java back in the days of Java 1.4 and has been passionate about it ever since. You can connect with him on Facebook and watch his Java videos on YouTube.
Comments
Sorry, in the below comment, I mentioned as correct version. That is current version (Sorry for the typo). If you update this teaching content as current version of JDK, Hibernate & MySQL, That would be grateful to you. Please consider. Thanks
Thank you so much for your wonderful work. If you update the teaching content to the correct version of JDK, Hibernate & MySQL. That would be grateful to you. Because we are facing many issue, while we try (example - Caused by: java.lang.ClassNotFoundException: javax.xml.bind.JAXBException). Thanks a lot