How to capture screenshot programmatically in Java
- Details
- Written by Nam Ha Minh
- Last Updated on 10 August 2019 | Print Email
1. About the Robot.createScreenCapture() and ImageIO.write() methods
The java.awt.Robot class provides a useful method for capturing a screenshot. Here’s the method signature:BufferedImage createScreenCapture(Rectangle screenRect)
We pass a screen region (in rectangle) to be captured as this method’s parameter. The captured graphic is returned as a BufferedImageobject which can be drawn onto a GUI component or saved to a file. And we use the ImageIO.write() static method to save the BufferedImage object to a file:boolean write(RenderedImage im, String formatName, File output)
where the formatName can be “jpg”, “png”, “bmp”, etc.NOTE: The captured image does not include the mouse cursor.2. Capture full screen Java example
To capture a screenshot of the whole screen, we need to know the screen size. The following statement obtains the screen size as a Rectangle object:Rectangle screenRect = new Rectangle(Toolkit.getDefaultToolkit().getScreenSize());And the following program captures a full screenshot and saves it to a JPG image file:
package net.codejava.graphics;

import java.awt.AWTException;
import java.awt.Rectangle;
import java.awt.Robot;
import java.awt.Toolkit;
import java.awt.image.BufferedImage;
import java.io.File;
import java.io.IOException;

import javax.imageio.ImageIO;

/**
 * This program demonstrates how to capture a screenshot (full screen)
 * as an image which will be saved into a file.
 * @author www.codejava.net
 *
 */
public class FullScreenCaptureExample {

	public static void main(String[] args) {
		try {
			Robot robot = new Robot();
			String format = "jpg";
			String fileName = "FullScreenshot." + format;

			Rectangle screenRect = new Rectangle(Toolkit.getDefaultToolkit().getScreenSize());
			BufferedImage screenFullImage = robot.createScreenCapture(screenRect);
			ImageIO.write(screenFullImage, format, new File(fileName));

			System.out.println("A full screenshot saved!");
		} catch (AWTException | IOException ex) {
			System.err.println(ex);
		}
	}
}3. Capture a portion of the screen Java example
To capture screenshot of a portion of the screen, we need to specify a rectangle region to be captured. For example, the following statements create a capture region which is the first quarter of the screen (suppose that the screen is divided into four parts):Dimension screenSize = Toolkit.getDefaultToolkit().getScreenSize(); Rectangle captureRect = new Rectangle(0, 0, screenSize.width / 2, screenSize.height / 2);And following code is for a complete program:
package net.codejava.graphics;
import java.awt.AWTException;
import java.awt.Dimension;
import java.awt.Rectangle;
import java.awt.Robot;
import java.awt.Toolkit;
import java.awt.image.BufferedImage;
import java.io.File;
import java.io.IOException;
import javax.imageio.ImageIO;
/**
* This program demonstrates how to capture screenshot of a portion of screen.
* @author www.codejava.net
*
*/
public class PartialScreenCaptureExample {
public static void main(String[] args) {
try {
Robot robot = new Robot();
String format = "jpg";
String fileName = "PartialScreenshot." + format;
Dimension screenSize = Toolkit.getDefaultToolkit().getScreenSize();
Rectangle captureRect = new Rectangle(0, 0, screenSize.width / 2, screenSize.height / 2);
BufferedImage screenFullImage = robot.createScreenCapture(captureRect);
ImageIO.write(screenFullImage, format, new File(fileName));
System.out.println("A partial screenshot saved!");
} catch (AWTException | IOException ex) {
System.err.println(ex);
}
}
}The image file (PartialScreenshot.jpg) is stored under the program’s current directory. 4. Capture a GUI component Java example
Capturing screenshot of a GUI component (e.g. buttons, text fields, windows, etc) is even easier as we don’t have to use the Robot class. Each Swing component has a paint() method which can be used to paint a Graphics object. The following method will capture image of an arbitrary component and save it to an image file:void captureComponent(Component component) {
Rectangle rect = component.getBounds();
try {
String format = "png";
String fileName = component.getName() + "." + format;
BufferedImage captureImage =
new BufferedImage(rect.width, rect.height,
BufferedImage.TYPE_INT_ARGB);
component.paint(captureImage.getGraphics());
ImageIO.write(captureImage, format, new File(fileName));
System.out.printf("The screenshot of %s was saved!", component.getName());
} catch (IOException ex) {
System.err.println(ex);
}
}Run the demo program (ComponentGUICaptureExample.java in the attachments section):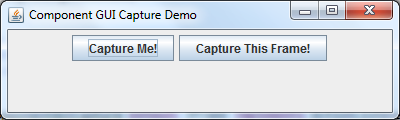 Click the Capture Me! button, its image will be saved as the button1.png file which looks like this:
 And click the Capture This Frame! button, image of the frame’s content will be saved as the frame0.png file which looks like this:
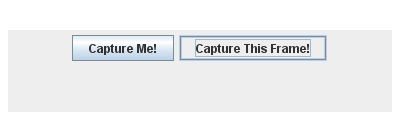
API References:
Other Java Graphics Tutorials:- How to add watermark for images using Java
- How to resize images using Java
- How to convert image format using Java
- How to draw image with automatic scaling in Java
- How to draw text vertically with Java Graphics2D
- How to Create Zoomable User Interface Java Programs with Piccolo2D Framework
- Drawing lines examples with Java Graphics2D
- Drawing Rectangles Examples with Java Graphics2D
- Using JFreechart to draw line chart with CategoryDataset
- Using JFreechart to draw XY line chart with XYDataset
About the Author:
 Nam Ha Minh is certified Java programmer (SCJP and SCWCD). He started programming with Java in the time of Java 1.4 and has been falling in love with Java since then. Make friend with him on Facebook and watch his Java videos you YouTube.
| [Java source files] | 3 kB |