How to Get Started with Apache Derby (JavaDB)
- Details
- Written by Nam Ha Minh
- Last Updated on 11 June 2019 | Print Email
1. What is Apache Derby, and why Use it?
Apache Derby is an open source relational database implemented entirely in Java. Derby is being developed by Apache Software Foundation - a non-profit organization which is very well known for its widely used open source products like Ant, Maven, Tomcat and many other Java libraries.Derby has the following advantages:- Small footprint: with only 5.7MB of all JAR files, Derby is very lightweight, consumes little memory and runs fast.
- Derby is written purely in Java. That means it is portable across different operating systems like Java.
- Derby is embeddable in Java applications, thanks to its embedded JDBC driver. You can also use network client/server mode with Derby.
- Derby is a full-featured RDBMS that support SQL standard, transactions, locking, security… despite of its small footprint.
- Derby is easy to install, deploy and use with minimum administration.
Therefore, Derby is very ideal for Java applications that require only small or medium database. Imagine you can embed an entire RDBMS with few megabytes into your application, without the need of installing and configuring the database at the end user’s machine.Unlike heavier RDBMSs like OracleDB, MySQL, Microsoft SQL Server… which needs different distributions for different operating systems, Derby is cross-platform independence as it is implemented entirely in Java. That means your Java applications are still “Write once, run everywhere” with Derby.Yet to mention, OracleDB, MySQL, Microsoft SQL Server… are all quite complex in installation, configuration and administration.
2. History of Apache Derby
In 1997, Cloudscape Inc. developed a Java database engine called JBMS. In 1999 Informix Software Inc. acquired Cloudscape. And in 2001, IBM acquired this database of Informix and re-branded it to IBM Cloudscape. In 2004, IBM contributed the code to Apache Software Foundation and it is renamed to Apache Derby till now.Derby was included in JDK from Java 6 under the name JavaDB. However from Java 9, Derby is no longer distributed with JDK, hence we use the brand name Apache Derby instead of JavaDB.
3. Download and Install Derby
- bin: contains script files (.bat files on Windows) for executing utilities and setting up the environment.
- demo: contains demonstration programs with Java code.
- docs: contains official Derby documentation (in both HTML and PDF).
- javadoc: contains API documentation of Derby.
- lib: contains Derby JAR files. You package those JAR files with your Java programs for delivery.
- test: contains a regression test program for Derby.
In this tutorial, we will use some JAR files in the lib directory.Next, let’s understand two deployment options provided by Derby.
4. Derby Deployment Options
You can use Derby in two modes: embedded or network client/server.In embedded mode, Derby is started and stopped by your Java application. In other words, Derby is integrated with your application as a whole, thus it is running in the same Java Virtual Machine (JVM) as the application. This deployment option is suitable for single-user application.In network client/server mode, Derby runs in a JVM that hosts the server. Client applications connect to the server from different JVMs to access the database. This is a typical client/server architecture just like MySQL or OracleDB. This deployment option is suitable for multi-user connectivity to Derby database across a network.In this tutorial, you will learn how to use Derby in both modes embedded and network client/server.
5. Running Derby in Embedded Mode
Derby provides the ijtool that allows you to work with Derby databases just like a client application. In this section, we use ij to create and connect to a database in embedded mode, and run some basic SQL statements.On Windows, open a command prompt window, and type the following command to start the ij tool:java -jar %DERBY_HOME%\lib\derbyrun.jar ijReplace %DERBY_HOME% by the actual path of the directory where you have extracted the Derby distribution. You can see the tool started by showing version number and ready to accept commands:
 Now, type the following command to create a database in embedded mode:Here’s the description of this command:
- CONNECTis an ij command that establishes a connection to a database. The database URL is enclosed in single quote marks. And the command ends with a semicolon.
- jdbc:derbyis the JDBC protocol specification for Derby driver.
- booksdbis the name of the database.
- create=true is an attribute of Derby that creates the database if it doesn’t exist in the current directory.
Hit Enter and wait a moment, if the command has terminated silently, that means the database has been created: Check the current directory and you see a directory created with the same name as the database (booksdb in this case). This directory stores data for the newly created database.Now you can type a SQL command to create a table like this:
CREATE TABLE book (book_id int primary key, title varchar(64));Press Enter and you see the output:
 That means the table has been created - its name is book and has two columns book_id and title.Next, type a SQL INSERT statement to insert some rows into the table:
INSERT INTO book VALUES (1, 'Core Java'), (2, 'Thinking in Java'), (3, 'Effective Java');This inserts 3 rows into the book table:
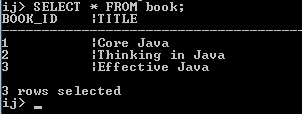
 Next, type a SQL SELECT command to select all records from the book table:
SELECT * FROM book;You can see the output like this:
 To exit the ij tool, type exit;You can run the tool again using the same CONNECT command, this time it shows this warning message:
 That means the database is actually stored on disk and the connection made to the existing database instead of creating a new one.
6. Running Derby in Network Client/Server Mode
In this mode, you must start the Derby server first, by typing the following command in a new command prompt window:java -jar %DERBY_HOME%\lib\derbyrun.jar server startThe server is started as shown below:
 By default, Derby server listens on the port number 1527.For the client application, we can use the ij tool to connect to the server, create a second database and run some basic SQL statements. Open another command window, and type the following command to start the ij tool:
java -jar %DERBY_HOME%\lib\derbyrun.jar ijType the following command in ij to connect to the server:
CONNECT 'jdbc:derby://localhost:1527/projects;create=true';Now you see, we use hostname and port number in the database URL to connect to the server. After the command completes, check the directory where you started the server to see a directory has been created for the projects database.Next, let’s create a table named project by using SQL CREATE TABLE command:
CREATE TABLE project (project_id int primary key, project_name varchar(32));Insert some rows into the table:
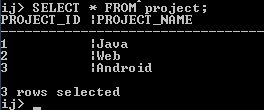
INSERT INTO project VALUES (1, 'Java'), (2, 'Web'), (3, 'Android');And type a SQL SELECT command to list all rows from the table:
SELECT * FROM project;The result looks like this:
 Type exit; to quit the ij tool.To stop Derby server, open another command window and type the following command:
java -jar %DERBY_HOME%\lib\derbyrun.jar server shutdownIn the server’s command window, you can see the shutdown message like this:
Sat Apr 07 16:16:00 ICT 2018 : Apache Derby Network Server - 10.14.1.0 - (1808820) shutdown
7. Other Commands of ij tool
Besides running SQL statements, the ij tool provides various commands to help you work with Derby database. Type help; to see the complete list of commands in ij. Commands can be in either lowercase or uppercase.Apart from the connect and exit commands you have used so far, here are some other useful ones:- show connections: lists all connections. ijallows you to connect to multiple databases in a session, e.g. you can connect to a network server and connect to an embedded database in the same session.
- show schemas: lists all schemas in the current database.
- show [ tables | views | procedures | functions | synonyms ] { in schema }: lists tables, views, procedures, functions or synonyms.
- describe name: lists columns in a named table.
- run ‘filename’: run commands stored in the named file. This command is useful when you want to run commands and SQL statements from an external file.
References:
Related Apache Derby Tutorials:
- How to work with Derby in Embedded Mode using JDBC
- How to work with Derby database in network client server mode
Other JDBC Tutorials:
- How to connect to a database with JDBC
- JDBC CRUD Tutorial
- JDBC Transaction Tutorial
- How to call stored procedure with JDBC
- How to read database metadata in JDBC
About the Author:
 Nam Ha Minh is certified Java programmer (SCJP and SCWCD). He began programming with Java back in the days of Java 1.4 and has been passionate about it ever since. You can connect with him on Facebook and watch his Java videos on YouTube.
Comments