Throughout this Ant tutorial, I will walk you through the process of developing a Java project using Ant build, step by step. After finishing this lesson, you will be able to wrote Ant script for a standard build of a Java project. And based on that, you will be able to modify Ant build script of an existing project and customize the build process when needed.To follow this tutorial, please use a text editor (Textpad or Sublime) with Command line prompt (on Windows) or Terminal (on Linux).
1. Download and setup Apache Ant
Go to https://ant.apache.org/bindownload.cgi to download the latest binary distribution of Apache Ant.When I’m writing this, the latest release is Ant 1.10.7 which requires minimum of Java 8 at runtime. Download the apache-ant-1.10.7-bin.zip file and extract it on your hard drive. Then update the system environment variable PATH to include a path to apache-ant-1.10.7\bin directory. On Windows, you can type the following command in a Command Prompt window launched with administrator privilege:
setx -m PATH "%PATH%;apache-ant-1.10.8\bin"
Then open another command prompt, type ant -version and hit Enter. You should see the following output:That means Apache Ant was installed successfully and ready to be used.
2. Code Java Project
We will code a Java program that inserts some contact information to a MySQL database. So create a new database schema named contactsdb with one table contact by executing the following MySQL statements (using either MySQL Workbench or MySQL Command Line Client):
CREATE DATABASE `contactsdb`;
CREATE TABLE `contacts` (
  `id` int(11) NOT NULL AUTO_INCREMENT,
  `firstname` varchar(20) NOT NULL,
  `lastname` varchar(20) NOT NULL,
  `city` varchar(30) NOT NULL,
  `country` varchar(30) NOT NULL,
  PRIMARY KEY (`id`)
);
As you can see, the contacts table has 5 columns: id, firstname, lastname, city, and country.Next, make a new directory for the project, called ContactManager. And under this project create src folder to store Java source files. And create the directory com\mycompany under src, for the package named com.mycompany. Then we have the following directory structure:Now under mycompany, create a new Java source file named ContactInserter.java with the following code:
As you can see, this program simply connects to the database, inserts a row to the contacts table and then exits.Next, you will see how to use Ant to compile, package and run this program.
3. Write Ant build script
Create the build.xml file under project’s root directory with the following XML code:
This Ant build file contains 4 targets init, compile, dist and clean – similar to the one described in the previous lesson.In the command line prompt, change the working directory to the project’s directory, and type ant command. You should see the following output:Typing ant command without any arguments will execute the default target. In our build file, the default target is dist which depends on compile target which depends on init target. Hence these 3 targets are executed in the following order: init, compile and dist. The clean target was not executed because it is standalone.Check the project’s directory and you see the build directory was created and the compiled .class files are put in, as a result of the compile target.And the dist target created the dist directory and generate an executable JAR file in this directory. Now from the command line you can type the following command to run the program from JAR file:
java -jar dist\ContactManager-20191101.jar
And you will see this output:It throws SQLExceptionbecause no JDBC driver for MySQL found in the classpath.Click here to download JDBC driver for MySQL. Download and extract the ZIP archive, e.g. mysql-connector-java-8.0.18.zip and you will see the JAR file named mysql-connector-java-8.0.18.jar.Next, create a directory named lib under the project’s directory and copy the MySQL JDBC driver JAR file to it.In the build.xml file, add two new properties:
This tells Ant to copy the MySQL JDBC driver JAR file to the distribution directory when the dist target is executed.The complete build.xml file now looks like this:
Now, type ant clean to delete everything the buildand dist directories. You will see the following output:Type ant again to rebuild the project. You will see the MySQL JDBC driver JAR file is copied to the dist directory, along with the generated executable JAR file of the program.Now you can type the following command to run the program from the JAR file:
java -jar dist\ContactManager-20191101.jar
You will see the following output:The program runs successfully and prints the message “A row was inserted”. You can check the database to confirm.So each time you make changes to the code, you can run ant command to rebuild the project, conveniently.That’s how to get started with Apache Ant – a popular build tool for Java projects. This lesson just scratches the surface, and Ant has more useful features which you can explore on Ant official homepage.
About the Author:
Nam Ha Minh is certified Java programmer (SCJP and SCWCD). He began programming with Java back in the days of Java 1.4 and has been passionate about it ever since. You can connect with him on Facebook and watch his Java videos on YouTube.
 That means Apache Ant was installed successfully and ready to be used.
 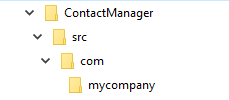 Now under mycompany, create a new Java source file named ContactInserter.java with the following code:
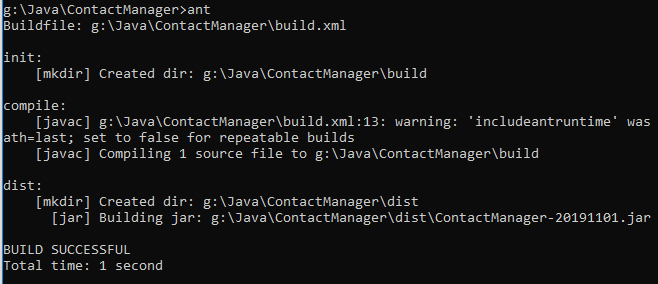 Typing ant command without any arguments will execute the default target. In our build file, the default target is dist which depends on compile target which depends on init target. Hence these 3 targets are executed in the following order: init, compile and dist. The clean target was not executed because it is standalone.Check the project’s directory and you see the build directory was created and the compiled .class files are put in, as a result of the compile target.And the dist target created the dist directory and generate an executable JAR file in this directory. Now from the command line you can type the following command to run the program from JAR file:
 It throws SQLException because no JDBC driver for MySQL found in the classpath.Click here to download JDBC driver for MySQL. Download and extract the ZIP archive, e.g. mysql-connector-java-8.0.18.zip and you will see the JAR file named mysql-connector-java-8.0.18.jar.Next, create a directory named lib under the project’s directory and copy the MySQL JDBC driver JAR file to it.In the build.xml file, add two new properties:
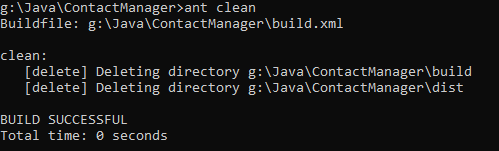 Type ant again to rebuild the project. You will see the MySQL JDBC driver JAR file is copied to the dist directory, along with the generated executable JAR file of the program.Now you can type the following command to run the program from the JAR file:
 The program runs successfully and prints the message “A row was inserted”. You can check the database to confirm.So each time you make changes to the code, you can run ant command to rebuild the project, conveniently.That’s how to get started with Apache Ant – a popular build tool for Java projects. This lesson just scratches the surface, and Ant has more useful features which you can explore on Ant official homepage.
 Nam Ha Minh is certified Java programmer (SCJP and SCWCD). He began programming with Java back in the days of Java 1.4 and has been passionate about it ever since. You can connect with him on Facebook and watch his Java videos on YouTube.
Comments
Thankyou