Sending e-mail with JSP, Servlet and JavaMail
- Details
- Written by Nam Ha Minh
- Last Updated on 22 July 2019 | Print Email
 Code in this tutorial is applied for Servlet 3.0, any version of JSP and JavaMail 1.4. The application can be deployed on any servlet container that supports Servlet 3.0 API such as Tomcat 7.0. The only external library required is JavaMail. If you are new to JavaMail, the following articles would be helpful:
- How to start e-mail programming in Java for how to download and use JavaMail.
- Send e-mail in plain text using JavaMail for how to write code to send a simple e-mail message.
1. Code Java E-mail utility class
Based on the article Send e-mail in plain text using JavaMail we write a utility class called EmailUtility.java as follows:package net.codejava.email;
import java.util.Date;
import java.util.Properties;
import javax.mail.Authenticator;
import javax.mail.Message;
import javax.mail.MessagingException;
import javax.mail.PasswordAuthentication;
import javax.mail.Session;
import javax.mail.Transport;
import javax.mail.internet.AddressException;
import javax.mail.internet.InternetAddress;
import javax.mail.internet.MimeMessage;
/**
* A utility class for sending e-mail messages
* @author www.codejava.net
*
*/
public class EmailUtility {
public static void sendEmail(String host, String port,
final String userName, final String password, String toAddress,
String subject, String message) throws AddressException,
MessagingException {
// sets SMTP server properties
Properties properties = new Properties();
properties.put("mail.smtp.host", host);
properties.put("mail.smtp.port", port);
properties.put("mail.smtp.auth", "true");
properties.put("mail.smtp.starttls.enable", "true");
// creates a new session with an authenticator
Authenticator auth = new Authenticator() {
public PasswordAuthentication getPasswordAuthentication() {
return new PasswordAuthentication(userName, password);
}
};
Session session = Session.getInstance(properties, auth);
// creates a new e-mail message
Message msg = new MimeMessage(session);
msg.setFrom(new InternetAddress(userName));
InternetAddress[] toAddresses = { new InternetAddress(toAddress) };
msg.setRecipients(Message.RecipientType.TO, toAddresses);
msg.setSubject(subject);
msg.setSentDate(new Date());
msg.setText(message);
// sends the e-mail
Transport.send(msg);
}
}The class has one static method, sendEmail() – which takes SMTP server settings and message details as its arguments. We will put SMTP server settings in web.xml file of the application.2. Code E-mail form in JSP
A form for sending an e-mail message would contain the following fields at least:- Recipient address: text field.
- Subject: text field.
- Content: text area.
<%@ page language="java" contentType="text/html; charset=ISO-8859-1"
    pageEncoding="ISO-8859-1"%>
<!DOCTYPE html PUBLIC "-//W3C//DTD HTML 4.01 Transitional//EN" "http://www.w3.org/TR/html4/loose.dtd">
<html>
<head>
<meta http-equiv="Content-Type" content="text/html; charset=ISO-8859-1">
<title>Send an e-mail</title>
</head>
<body>
	<form action="EmailSendingServlet" method="post">
		<table border="0" width="35%" align="center">
			<caption><h2>Send New E-mail</h2></caption>
			<tr>
				<td width="50%">Recipient address </td>
				<td><input type="text" name="recipient" size="50"/></td>
			</tr>
			<tr>
				<td>Subject </td>
				<td><input type="text" name="subject" size="50"/></td>
			</tr>
			<tr>
				<td>Content </td>
				<td><textarea rows="10" cols="39" name="content"></textarea> </td>
			</tr>
			<tr>
				<td colspan="2" align="center"><input type="submit" value="Send"/></td>
			</tr>
		</table>

	</form>
</body>
</html>
The form will look like this in a web browser: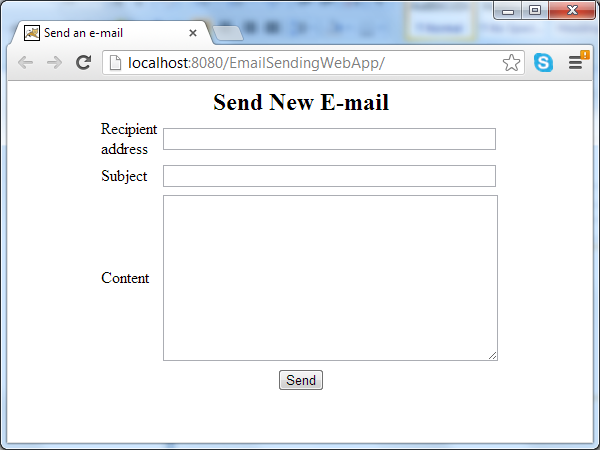 Note that the attribute action of the form is pointing to URL of a servlet which will be created next. On submitting this form, the servlet is called for processing.
 3. Code Java Servlet for sending e-mail
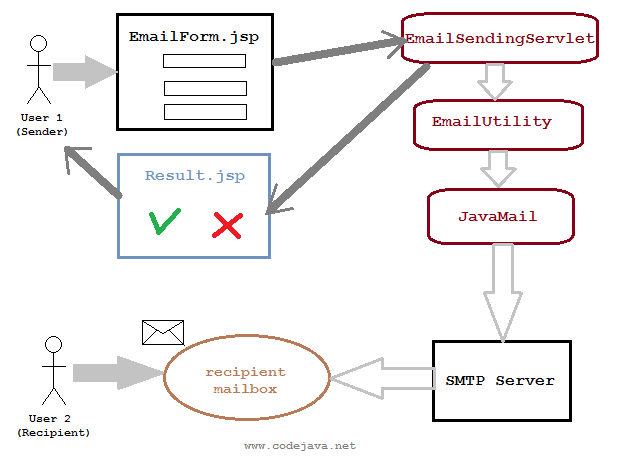
Now we implement a servlet that does the following tasks:- Read SMTP server settings from web.xml file.
- Take input from EmailForm.jsp page.
- Invoke the EmailUtility class to send an e-mail message.
- Return a response to the user.
package net.codejava.email;

import java.io.IOException;

import javax.servlet.ServletContext;
import javax.servlet.ServletException;
import javax.servlet.annotation.WebServlet;
import javax.servlet.http.HttpServlet;
import javax.servlet.http.HttpServletRequest;
import javax.servlet.http.HttpServletResponse;

/**
 * A servlet that takes message details from user and send it as a new e-mail
 * through an SMTP server.
 *
 * @author www.codejava.net
 *
 */
@WebServlet("/EmailSendingServlet")
public class EmailSendingServlet extends HttpServlet {
	private String host;
	private String port;
	private String user;
	private String pass;

	public void init() {
		// reads SMTP server setting from web.xml file
		ServletContext context = getServletContext();
		host = context.getInitParameter("host");
		port = context.getInitParameter("port");
		user = context.getInitParameter("user");
		pass = context.getInitParameter("pass");
	}

	protected void doPost(HttpServletRequest request,
			HttpServletResponse response) throws ServletException, IOException {
		// reads form fields
		String recipient = request.getParameter("recipient");
		String subject = request.getParameter("subject");
		String content = request.getParameter("content");

		String resultMessage = "";

		try {
			EmailUtility.sendEmail(host, port, user, pass, recipient, subject,
					content);
			resultMessage = "The e-mail was sent successfully";
		} catch (Exception ex) {
			ex.printStackTrace();
			resultMessage = "There were an error: " + ex.getMessage();
		} finally {
			request.setAttribute("Message", resultMessage);
			getServletContext().getRequestDispatcher("/Result.jsp").forward(
					request, response);
		}
	}
}
As we can see, the servlet, EmailSendingServlet - loads configuration for SMTP server upon initialization in its init() method, and handles user’s requests in the doPost() method. It reads message details (recipient, subject and content) from EmailForm.jsp page and tries to sending the e-mail by invoking the sendEmail() method of the EmailUtility class. The users will finally receives a Result.jsp page which tells them whether the e-mail was sent or not. 4. Configuring SMTP server
We configure the settings for SMTP server in the web deployment descriptor file (web.xml) as follows:<?xml version="1.0" encoding="UTF-8"?> <web-app xmlns:xsi="http://www.w3.org/2001/XMLSchema-instance" xmlns="http://java.sun.com/xml/ns/javaee" xmlns:web="http://java.sun.com/xml/ns/javaee/web-app_2_5.xsd" xsi:schemaLocation="http://java.sun.com/xml/ns/javaee http://java.sun.com/xml/ns/javaee/web-app_3_0.xsd" id="WebApp_ID" version="3.0"> <display-name>EmailSendingWebApp</display-name> <!-- SMTP settings --> <context-param> <param-name>host</param-name> <param-value>smtp.gmail.com</param-value> </context-param> <context-param> <param-name>port</param-name> <param-value>587</param-value> </context-param> <context-param> <param-name>user</param-name> <param-value>YOUR_EMAIL</param-value> </context-param> <context-param> <param-name>pass</param-name> <param-value>YOUR_PASSWORD</param-value> </context-param> <welcome-file-list> <welcome-file>EmailForm.jsp</welcome-file> </welcome-file-list> </web-app>The SMTP settings are configured as context parameters. In this application, we use a Gmail’s SMTP account, and you should change the sender e-mail address (user) and password to match your account setting. Check your e-mail service provider to make sure SMTP is enabled for your account.Since we use Servlet 3.0 API, the servlet declaration and mapping does not require in this web.xml file. And the EmailForm.jsp is set as default page in the <welcome-file-list> section.
5. Code JSP result page
Code of the Result.jsp page is as simple as follows:<%@ page language="java" contentType="text/html; charset=ISO-8859-1"
pageEncoding="ISO-8859-1"%>
<!DOCTYPE html PUBLIC "-//W3C//DTD HTML 4.01 Transitional//EN"
"http://www.w3.org/TR/html4/loose.dtd">
<html>
<head>
<meta http-equiv="Content-Type" content="text/html; charset=ISO-8859-1">
<title>Result</title>
</head>
<body>
<center>
<h3><%=request.getAttribute("Message")%></h3>
</center>
</body>
</html>It simply displays a message which is sent from the servlet through an attribute named Message. 6. Test the application
Supposing the application is packaged as EmailSendingWebApp.war and is deployed on Tomcat server on localhost at port 8080. Type the following URL in your web browser:http://localhost:8080/EmailSendingWebApp/
A form is displayed for entering message details. Type some information into the fields: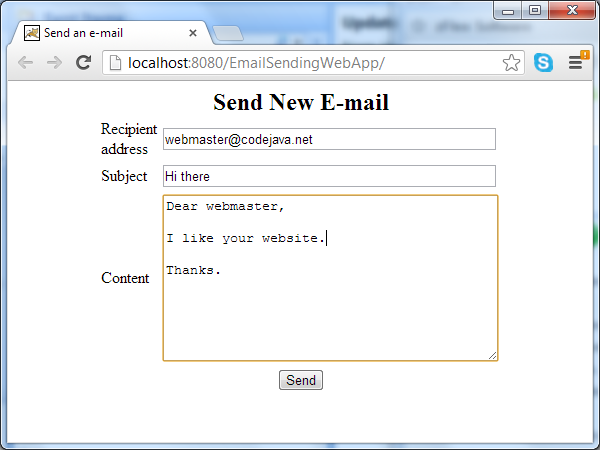 Hit Send button, it will take a while when the e-mail is sending. And finally, we will get a result page which either tells the e-mail was sent:
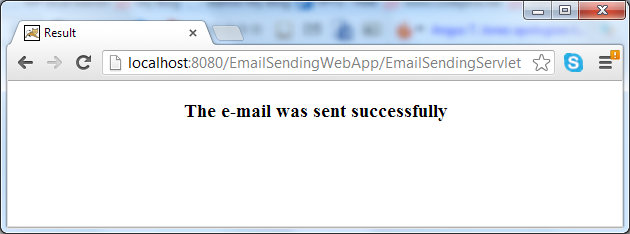 Or there was some error happens:
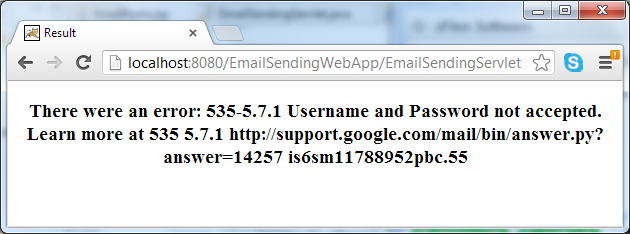 You can download this application as a complete Eclipse project under the download section.
Related Java Send Email Tutorials:
- Send attachments with e-mail using JSP, Servlet and JavaMail
- Send e-mail in HTML format using JavaMail API
- Send e-mail with attachment in Java
Other JSP Tutorials:
- Summary of EL operators with examples
- Java Servlet and JSP Hello World Tutorial with Eclipse, Maven and Apache Tomcat
- How to handle exceptions in JSP
- How to list records in a database table using JSP and JSTL
- How to create dynamic drop down list in JSP from database
About the Author:
 Nam Ha Minh is certified Java programmer (SCJP and SCWCD). He began programming with Java back in the days of Java 1.4 and has been passionate about it ever since. You can connect with him on Facebook and watch his Java videos on YouTube.
| [Eclipse project] | 478 kB |
Comments
There were an error: Could not convert socket to TLS
Love from ???????? Eswatini