How to Create Java Servlet Filter
- Details
- Written by Nam Ha Minh
- Last Updated on 30 November 2023 | Print Email
- Write a Java class that implements the Filter interface and override filter’s life cycle methods.
- Specify initialization parameters for the filter (optional).
- Specify filter mapping, either to Java servlets or URL patterns.
Table of content:2. Specify Initialization Parameters for Filter
4. How to create a servlet filter in Eclipse IDE
5. How to create a servlet filter in NetBeans IDE
Let’s see each step in detailed.1. Create Filter Class
Typically, a filter class has the following structure like this:package net.codejava;
import java.io.IOException;
import javax.servlet.Filter;
import javax.servlet.FilterChain;
import javax.servlet.FilterConfig;
import javax.servlet.ServletException;
import javax.servlet.ServletRequest;
import javax.servlet.ServletResponse;
public class HelloFilter implements Filter {
@Override
public void init(FilterConfig filterConfig) throws ServletException {
// invoked when an instance of this filter is created by the container
// used to initialize resources, read parameters...
}
@Override
public void doFilter(ServletRequest request, ServletResponse response, FilterChain chain)
throws IOException, ServletException {
// invoked when a matching request sent to the server
// used to intercept the request and transform the response
chain.doFilter(request, response); // invokes next filter in the chain
}
@Override
public void destroy() {
// invoked when the filter instance is being destroyed by the container
// used clean up resources
}
}As you can see, this class must implement the Filter interface and override its three life cycle methods: init(), doFilter() and destroy(). The purpose of each method is clearly explained in the comments. Read this article to learn more about the annotation type @WebFilter.package net.codejava;
import java.io.IOException;
import javax.servlet.*;
public class HelloFilter implements Filter {
@Override
public void doFilter(ServletRequest request, ServletResponse response, FilterChain chain)
throws IOException, ServletException {
// invoked when a matching request sent to the server
// used to intercept the request and transform the response
chain.doFilter(request, response); // invokes next filter in the chain
}
} 2. Specify Initialization Parameters for Filter
You can specify initialization parameters for the filter in the web deployment descriptor file (web.xml) like this:<filter> <filter-name>Hello Filter</filter-name> <filter-class>net.codejava.HelloFilter</filter-class> <init-param> <param-name>message</param-name> <param-value>A message from Hello Filter</param-value> </init-param> <init-param> <param-name>threshold</param-name> <param-value>1024</param-value> </init-param> </filter>As you can see, you must specify the filter name and its fully qualified class name:
<filter-name>Hello Filter</filter-name>
<filter-class>net.codejava.HelloFilter</filter-class>
An each parameter is declared like this:
<init-param>
	<param-name>threshold</param-name>
	<param-value>1024</param-value>
</init-param>
You can specify as many parameters as you want. Then in the filter’s init() method you can read these initialization parameters via the FilterConfig object like this:
public void init(FilterConfig fConfig) throws ServletException {
	String message = fConfig.getInitParameter("message");
	String threshold = fConfig.getInitParameter("threshold");

	// do something with the parameters
}
NOTE: You can use annotations to specify initialization parameters right inside the filter class, but it is not recommended because that requires re-compiling the code when you want to change the values of the parameters. 3. Specify Filter Mapping
The purpose of a filter is to intercept requests, so you have to specify what URLs will be handled by the filter via the mapping step. You can map a filter to any URL patterns using either XML or annotations.Specify Filter Mapping via XML
You can map a filter to a servlet like this:<filter-mapping> <filter-name>Hello Filter</filter-name> <servlet-name>Hello Servlet</servlet-name> </filter-mapping>The servlet is declared and mapped in the web.xml file as follows:
<servlet>
	<servlet-name>Hello Servlet</servlet-name>
	<servlet-class>net.codejava.HelloServlet</servlet-class>
</servlet>

<servlet-mapping>
	<servlet-name>Hello Servlet</servlet-name>
	<url-pattern>/hello</url-pattern>
</servlet-mapping>
If the servlet class is annotated using @WebServlet annotation, you must specify the name of the servlet like this:
@WebServlet(name = "Hello Servlet", urlPatterns = {"/hello"})
public class HelloServlet extends HttpServlet {

}
You can map a filter to a URL pattern like this:<filter-mapping> <filter-name>Hello Filter</filter-name> <url-pattern>/*</url-pattern> </filter-mapping>Here, the filter Hello Filter is mapped to the URL pattern /*, which means it will intercept all the requests.And the following example illustrates how to map a filter to multiple URL patterns:
<filter-mapping>
	<filter-name>Hello Filter</filter-name>
	 <url-pattern>/hello</url-pattern>
	 <url-pattern>/bonjour</url-pattern>
	 <url-pattern>/ciao</url-pattern>
</filter-mapping>
Specify Filter Mapping using Annotations
From Servlet API 3.0, you can use the @WebFilter to annotate a class a filter. For example:import javax.servlet.annotation.WebFilter;
// other imports
@WebFilter("/hello")
public class HelloFilter implements Filter {
// implement life cycle methods…
}You can see this filter class is mapped to the URL pattern /hello - which is more convenient than using XML, right?The following example shows how to map a filter to multiple URL patterns:@WebFilter({ "/servlet1", "/servlet2", "/servlet3" })
public class FilterA implements Filter {
}And this example illustrates how to map a filter to a servlet using annotation:@WebFilter(servletNames = { "Hello Servlet" })
public class HelloFilter implements Filter {
}Note that you can map one filter to one or more serlvets/URL patterns, and map multiple filters to one servlet/URL pattern. 4. How to create a servlet filter in Eclipse IDE
When developing a Java web application using Eclipse IDE, you can create a filter easily via wizards. To create a filter class in Eclipse, click menu File > New, and choose Filter under Web group: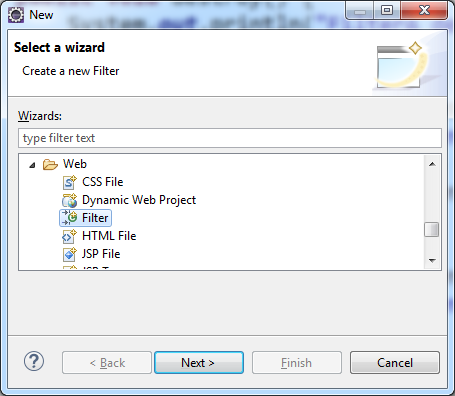 Or you can right-click on a package, and click New > Filter:
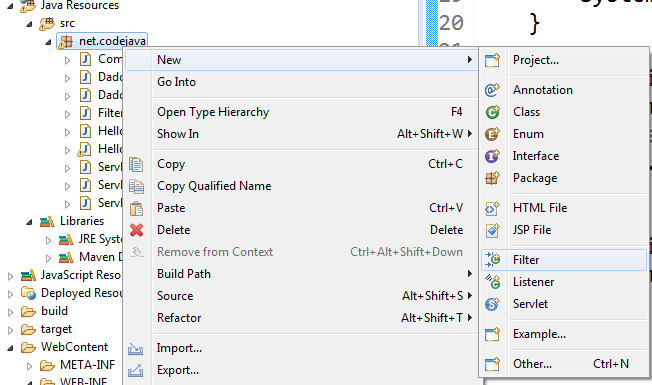 Then specify the class name of the filter:
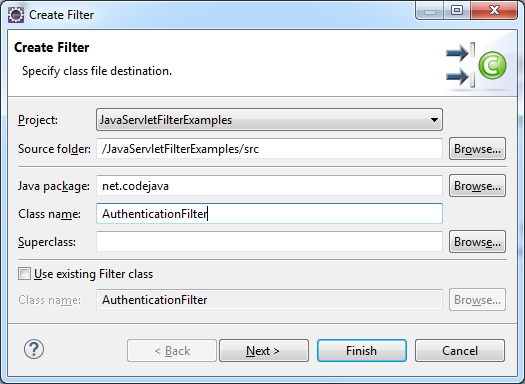 Click Next. Then specify filter mappings:
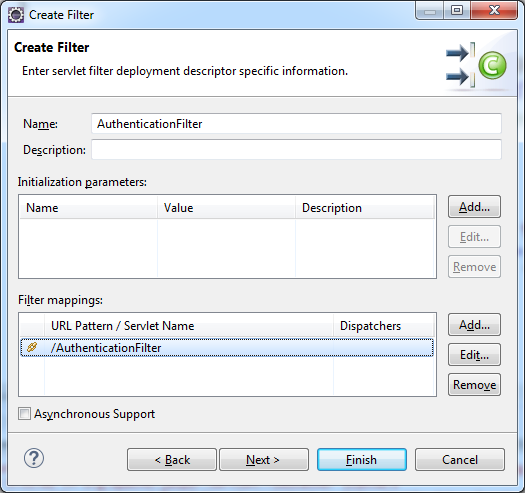 You can specify URL pattern mapping:
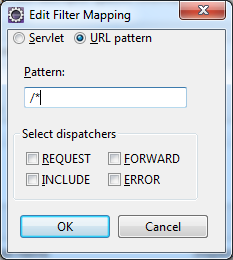 or specify servlet mapping:
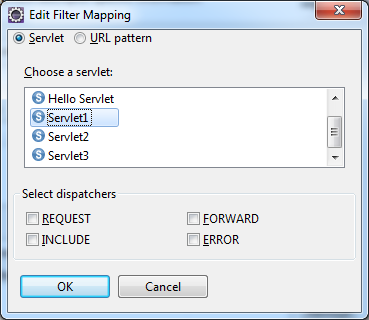 Click Finish and Eclipse will generate basic code for the filter class with @WebFilter annotations.
 5. How to create a servlet filter in NetBeans IDE
NetBeans IDE also makes it easy to create a filter. Click menu File > New File… and choose Filter in the Web group: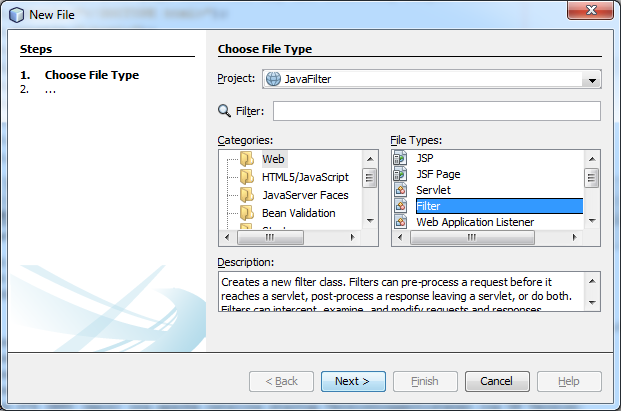 Click Next, and specify the class name for the filter:
 Click Next to configure filter deployment:
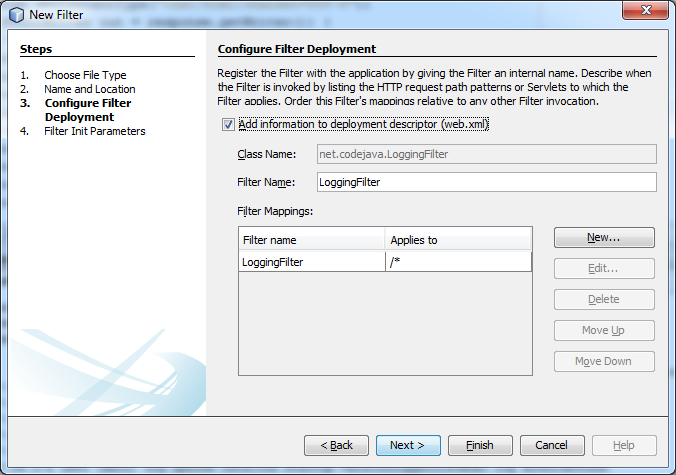 You can choose to use XML mapping for filter by checking the option “Add information to deployment descriptor (web.xml)”. And edit the filter mappings:
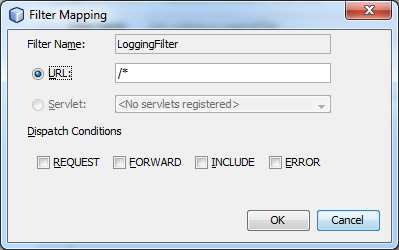 Finally, specify the init parameters for the filter:
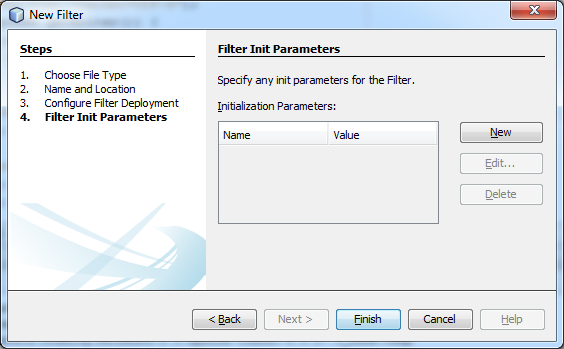 Click Finish and NetBeans will generate code for the filter based on the information you have provided.That's almost the things you need to know about creating a Java filter. I recommend you to read this famous Servlet and JSP book to learn fully about Java servlet and JSP. If you want to get hands-on experience in developing a fully functional website with Java, this course is my recommendation.
 References:
Related Tutorials:- @WebFilter annotation examples
- How to implement authentication filter for Java web application
- How to modify HTTP response using Java Filter
Other Java Servlet Tutorials:
- Java Servlet for beginners (XML)
- Java Servlet for beginners (Annotation)
- Java Servlet and JSP Hello World Tutorial with Eclipse, Maven and Apache Tomcat
- How to use Cookies in Java web application
- How to use Session in Java web application
- Java File Upload Example with Servlet
- Java File Download Servlet Example
About the Author:
 Nam Ha Minh is certified Java programmer (SCJP and SCWCD). He began programming with Java back in the days of Java 1.4 and has been passionate about it ever since. You can connect with him on Facebook and watch his Java videos on YouTube.
Comments
thanks a lot