Getting Familiar with IntelliJ IDEA - Tutorial for beginner
- Details
- Written by Nam Ha Minh
- Last Updated on 11 March 2020 | Print Email
1. Setup MySQL database
Create a new database named sales with one table named product with the following structure:
CREATE TABLE `product` (
  `id` int(11) NOT NULL AUTO_INCREMENT,
  `name` varchar(45) NOT NULL,
  `brand` varchar(45) NOT NULL,
  `madein` varchar(45) NOT NULL,
  `price` float NOT NULL,
  PRIMARY KEY (`id`)
)
Note: Later you will see you can even create a database (schema) and tables within the IDE.
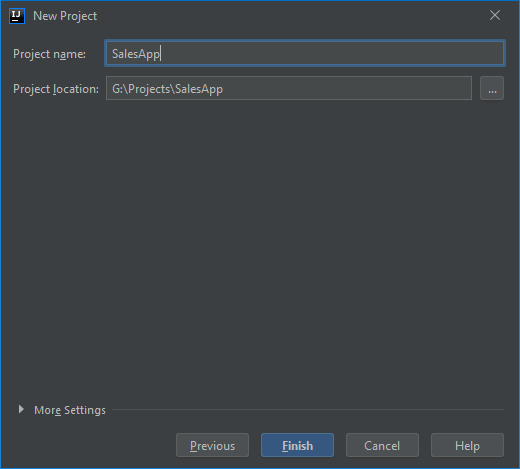
2. Create new project
Open IntelliJ IDEA and click Create New Project in the welcome screen (or File > New Project if you’re already in the IDE). The New Project dialog appears:
 Click Finish, and click OK if it asks to create the directory. Then you can see the workspace looks like this:
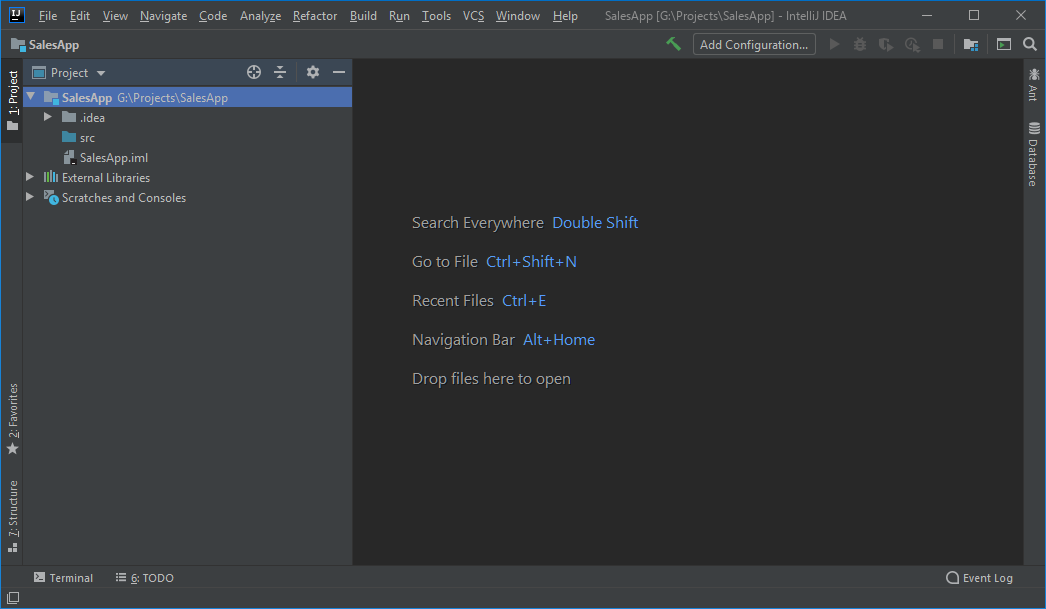 As you can see, the default views include Project, Structure, Terminal, Databases… and IntelliJ IDEA hints the 4 shortcut keys in the center. The workspace looks similar to Eclipse/NetBeans but it intelligently tells you the most frequently needed shortcuts.
 3. Connect to MySQL database in IntelliJ IDEA
Now, let’s see how to connect to MySQL database right inside the IDE. First, we need to define a data source.Click the Database view, then click the + sign at the top left corner, point to Data Source and click MySQL: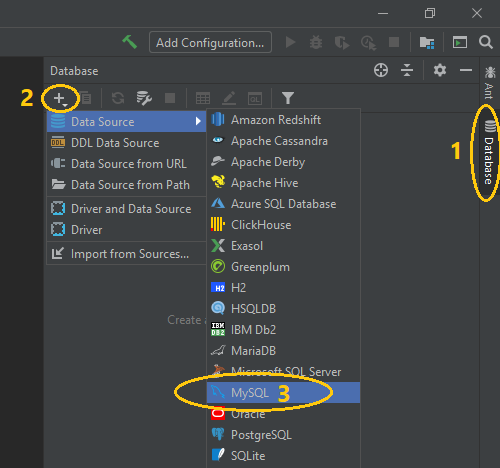 Then in the Data Sources and Drivers dialog, you need to specify database connection information and JDBC driver to use. Type in user, pass and Database name as shown in the following screenshot:
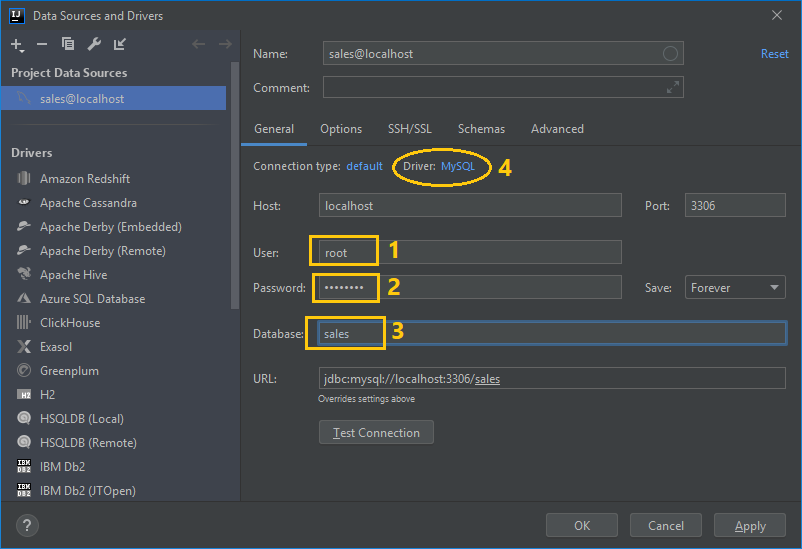 And click Driver: MySQL (4) > Go to Driver. Select a version for MySQL JDBC driver as follows:
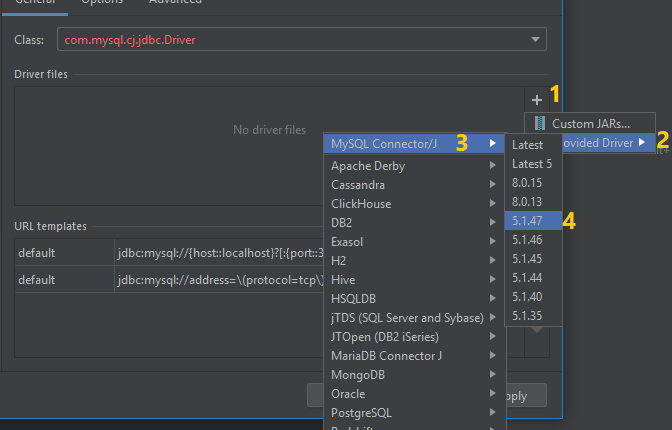 Then IntellIJ IDEA automatically downloads the required JAR file (this saves time in finding jar files on the Internet).
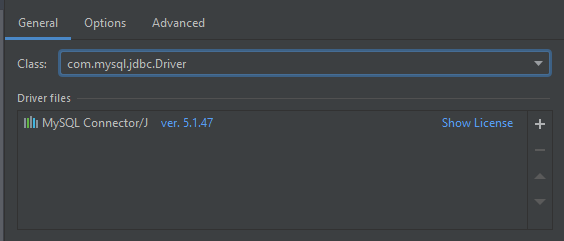 Here, you need to choose the correct driver class name, e.g. com.mysql.jdbc.Driver for MySQL Connector/J version 5.1.47. Then click OK, the IDE will connect to the database and open the console editor that allows you to type SQL statement directly, as shown in the following screenshot:
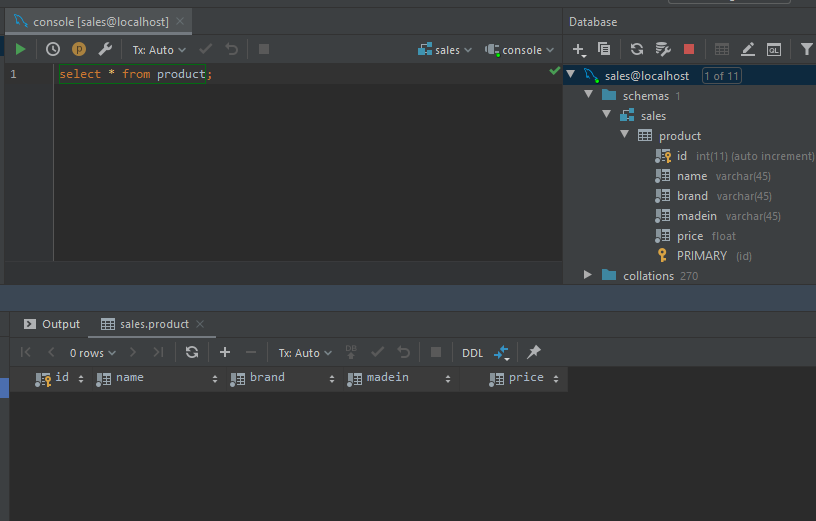 Now, you can experiment database development support in IntelliJ IDEA. Play around with the Database view to see the table structure; type a SELECT statement in the console editor and execute it; see the result set, which is empty because we haven’t inserted any rows to the product table yet.Note that the Database view allows you to create new database (schema) and tables directly, so you don’t have to use any external database tools. Awesome!So, as you have seen, IntelliJ IDEA makes it easy to work with a database right inside from the IDE (you don’t have to open any external programs) in just few clicks. That means our productivity is increased.
 4. Code a batch insert program
Next, let’s code the first Java program that inserts 100 rows into the product table using JDBC batch update feature.Right click on the src folder in the Project view, and select New > Package: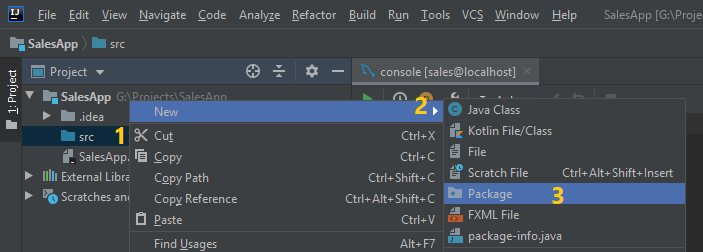 Then enter the name for the package, e.g. net.codejava – as shown below:
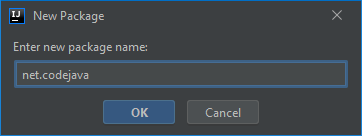 Click OK to create the package. Then right-click on the package name, select New > Class:
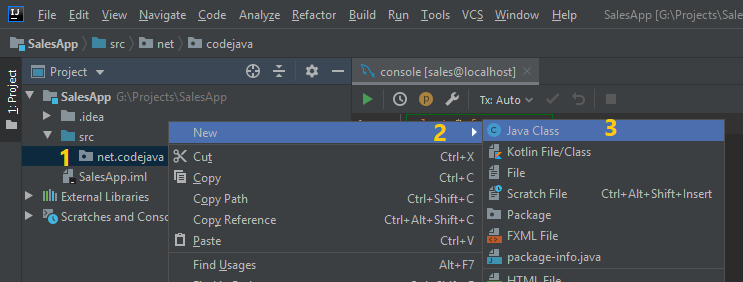 Enter the name of the new class is BatchInsertApp, as below:
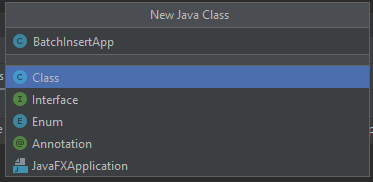 As you can see, IntelliJ IDEA suggests you to create a class (default), interface, enum or annotation – so you can easily change without going one step backward.Hit Enter to create the class. Then type the word main – you can see the IDE instantly suggests you to create the main method:
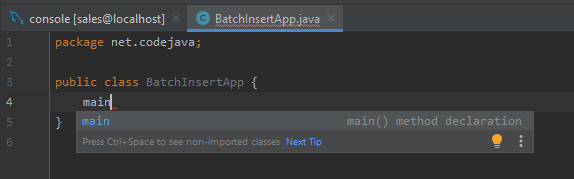 Press Enter to insert the main method. Then type the following initial code for the main method:
String url = "jdbc:mysql://localhost:3306/sales";
String username = "root";
String password = "password";

try {
    Connection connection = getConnection(url, username, password);
    String sql = "";
    PreparedStatement statement = connection.prepareStatement(sql);

} catch (SQLException e) {
    e.printStackTrace();
}
The IDE automatically suggests code completion as you type. You can press Ctrl + Space to force the IDE showing code suggestion; and Alter + Enter to show hints.Now let’s modify the sql variable to write a SQL Insert statement to experiment the auto completion for SQL statement, something as shown below: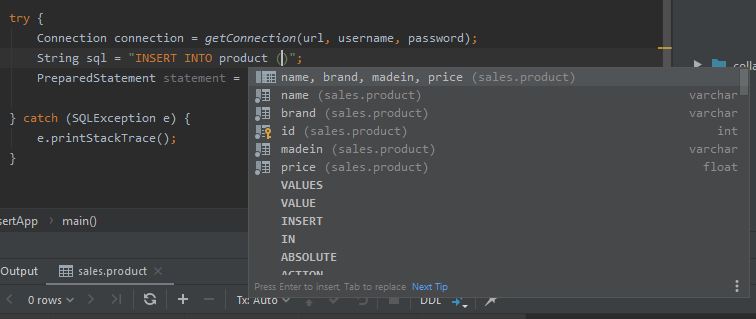 You see? It’s very quick and convenient as the IDE hints the table name, field names and other SQL keywords.Then write the complete code as follows:
package net.codejava;

import java.sql.*;

public class JdbcBatchInsertTest {
    public static void main(String[] args) {
        String dbURL = "jdbc:mysql://localhost:3306/sales?useSSL=false";
        String username = "root";
        String password = "password";

        try (Connection connection = DriverManager.getConnection(dbURL, username, password)) {

            String sql = "INSERT INTO product (name, brand, madein, price) VALUES (?, ?, ?, ?)";

            PreparedStatement statement = connection.prepareStatement(sql);
            for (int i = 1; i <= 10; i++) {
                String name = "Name-" + i;
                String brand = "Brand-" + i;
                String madein = "Madein-" + i;
                float price = 1000f;

                statement.setString(1, name);
                statement.setString(2, brand);
                statement.setString(3, madein);
                statement.setFloat(4, price);

                statement.addBatch();

            }

            statement.executeBatch();

        } catch (SQLException ex) {
            ex.printStackTrace();
        }

    }
}
While writing the code, try to use the auto completion for try-catch (Press Alt + Enter to show hints and choose action), for loop (type fori) and print statement (type sout).Next, we need to add a dependency of MySQL JDBBC driver to the project, so it can run. Right-click on the project name and click Open Module Settings (or press F4 key).Then in the Project Structure dialog, under the Modules section, click the + button to add a library from Maven, as shown below: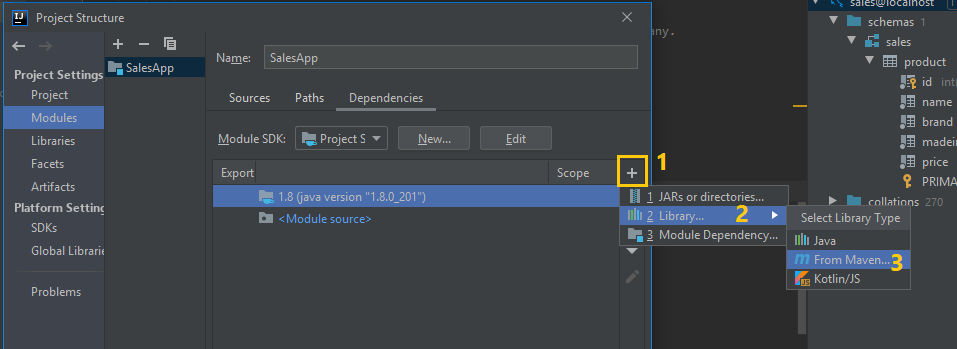 In the search dialog, type mysql-connector-java and click the search button. Wait for a moment, while the IDE is searching on Maven online repository. Then choose the library mysql-connector-java version 5.1.47, like this:
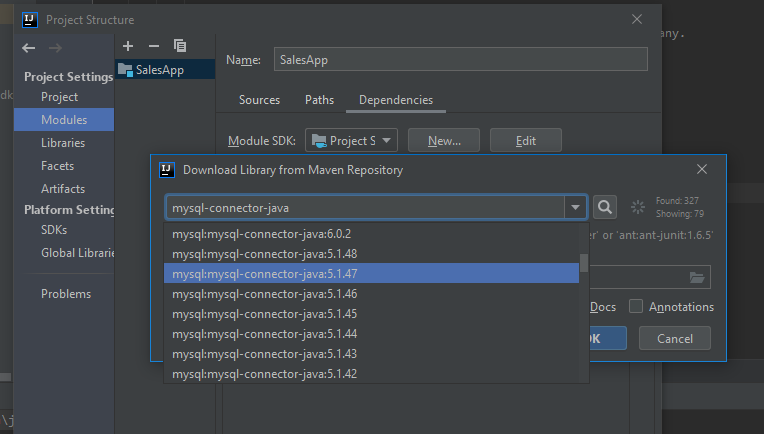 Then check the option Download to and click OK:
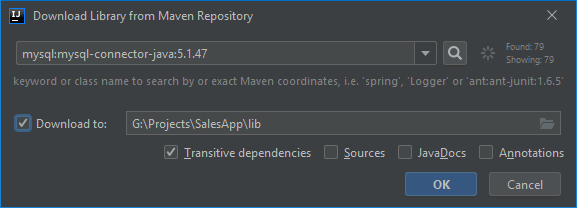 And click OK again to confirm in the Configure Library dialog. Then choose the scope Runtime for the dependency:
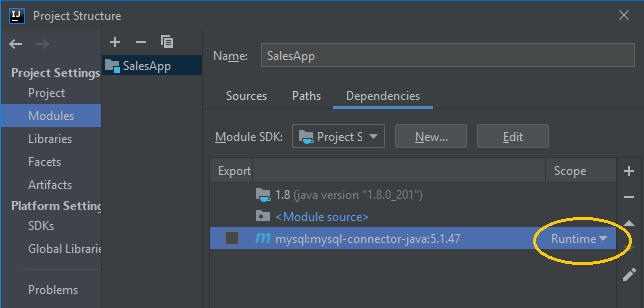 Click OK to close the Project Structure dialog. As you have seen, IntelliJ IDEA makes it easy to get a JAR file from Maven’s online repository. Even you don’t have to open your browser program.
 5. Run the program
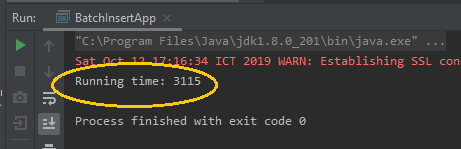
Now, let’s run our program. You can see there are two green arrows on the left side, near the beginning of the class. Click on the first arrow, and choose the first Run option: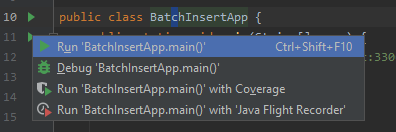
 In this view, you can even add new row and commit to the database. Very convenient!So far you have done your first project using IntelliJ IDEA to get familiar with it. As you experience, IntelliJ is smart and greatly improve developer’s productivity by the ability of doing everything within the IDE itself.Challenge for you today: Code the 2nd program that allows the user to search for data in the product table (by name, brand and madein fields).
 About the Author:
 Nam Ha Minh is certified Java programmer (SCJP and SCWCD). He began programming with Java back in the days of Java 1.4 and has been passionate about it ever since. You can connect with him on Facebook and watch his Java videos on YouTube.
Comments