How to Completely Uninstall IntelliJ IDEA from macOS
- Details
- Written by Nam Ha Minh
- Last Updated on 20 March 2025 | Print Email
- Remove IntelliJ application from Applications directory
- Delete cached files and settings
1. Remove IntelliJ from Applications directory
Open Finder program and go to Applications folder. Locate the IntelliJ icon, right click on it and select Move to Trash, as shown below: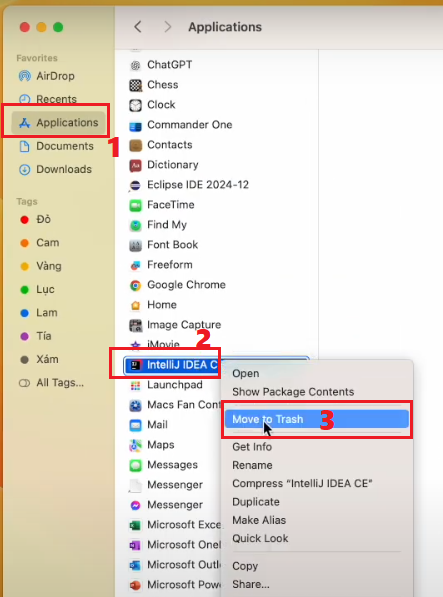 Then empty the trash to permanently delete the IntelliJ application from your computer.
2. Delete Cached Files and Settings
During its life, IntelliJ stores IDE’s settings and cache under your user home directory. So you should also remove the following directories:~/Library/Application Support/JetBrains/<product_version>
~/Library/Caches/JetBrains/<product_version>
For example, if you are about to unisntall IntelliJ IDEA Community 2024.3, then you will need to delete the following directories under your user home:~/Library/Application Support/JetBrains/IdeaIC2024.3
~/Library/Caches/JetBrains/IdeaIC2024.3
On your macOS, open a new Terminal window that is initialized with your user home is the current directory. Then type the following commands:sudo rm -rf Library/Application\ Support/JetBrains/IdeaIC2024.3
sudo rm -rf Library/Caches/JetBrains/IdeaIC2024.3
- The rm command is use to remove a directory and the -rf flag is used to delete all sub files and sub directories.
- The sudo command executes the following command under superuser privilege so you will need to provide your admin username and password to continue.
Other Uninstallation Guides:
- How to Uninstall NetBeans IDE completely from Windows
- How to Completely Uninstall Eclipse IDE from Windows computer
About the Author:
 Nam Ha Minh is certified Java programmer (SCJP and SCWCD). He began programming with Java back in the days of Java 1.4 and has been passionate about it ever since. You can connect with him on Facebook and watch his Java videos on YouTube.
Comments