10 NetBeans Shortcut Keys for Code Refactoring
- Details
- Written by Nam Ha Minh
- Last Updated on 16 February 2020 | Print Email
Today I’m going to share with you some shortcut keys for refactoring Java code in NetBeans IDE. Use these shortcuts to boost your coding productivity.
1. Alt + Enter:
When the cursor is at the line marked as erroneous or problematic, press this shortcut will show up the suggestions (hints) to fix the error/problem:

This shortcut is very useful as it allows you to quickly access the options without moving the mouse to the line number column on the left and then click the hint icon.
2. Ctrl + R:
Renames (with refactor) a variable, method, class or a file. If applied for a variable, the variable is marked in a red rectangle. You type the new name and hit Enter, all references to that variable are updated:
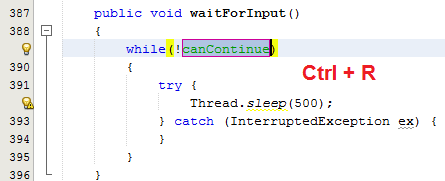
Press Esc to cancel renaming.
If the object being renamed is a method or class, then the following dialog gets displayed:
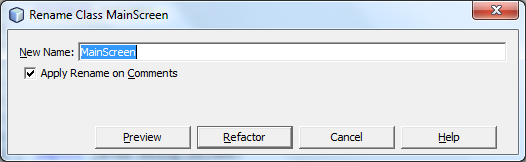
Enter a new name, and then click Refactor.
You can also preview the changes by clicking the Preview button, and then a refactoring view gets displayed like this:
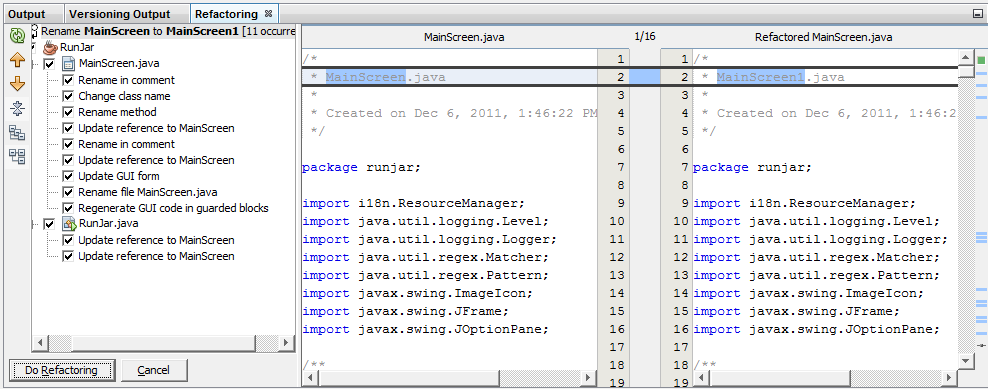
Here you can compare the two versions: the current one versus the refactored one. Then click Do Refactoring to apply the changes.
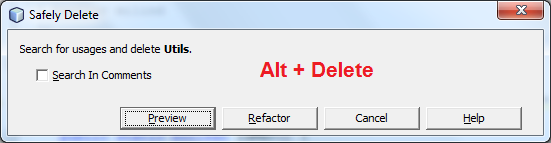
3. Alt + Delete:
Use this shortcut to safely delete a variable, method or class. That means NetBeans will check for any references before deleting.
For example, press Alt + Delete would bring the following dialog:
Click Refactor. If references were found, that means you cannot safely delete the item, as shown in the following warning dialog:
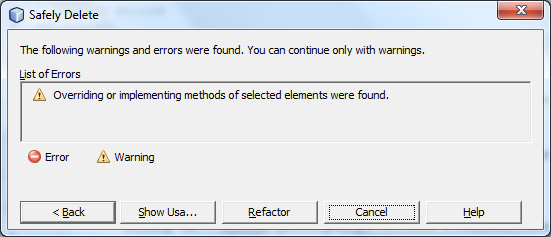
If there is no warning, NetBeans will delete the item because it’s safe.
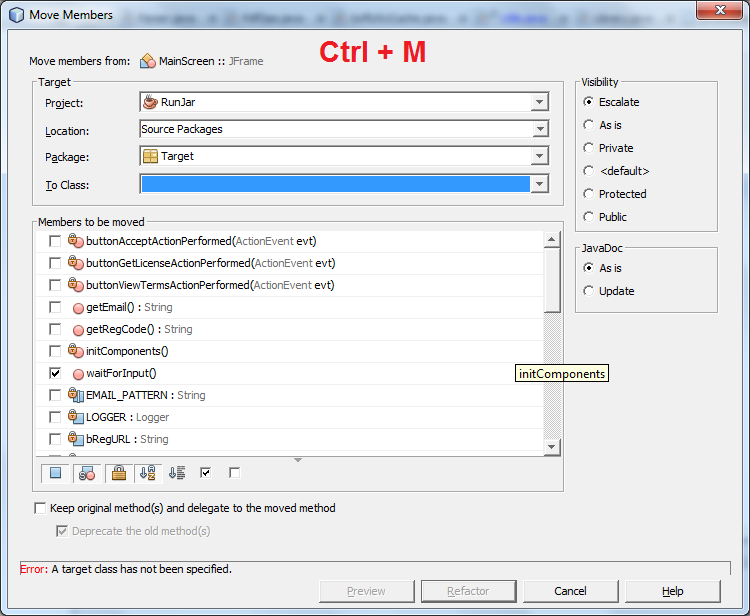
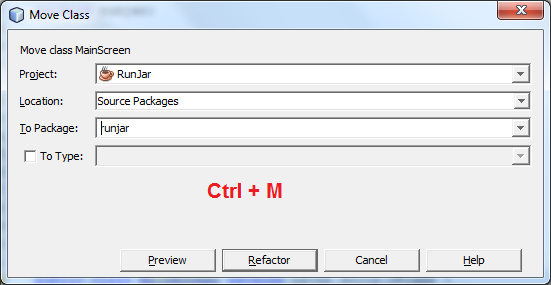
4. Ctrl + M:
Moves members from one class to another, or moves a class from one package to another.
Here’s the Move Members dialog:
And here’s the dialog if the object being moved is a class:
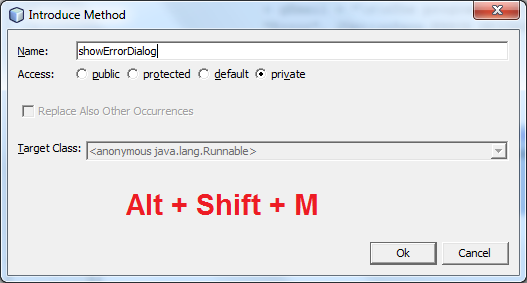
5. Alt + Shift + M:
Extracts a selection of a code block to a new method. The Introduce Method appears as shown in the following screenshot:
6. Alt + Shift + V:
Extracts an existing expression or statement into a new variable. For example, the statement textEmail.getText() appears multiple times so it should be introduced to a variable:
![]()
Then the Introduce Variable dialog appears like this:
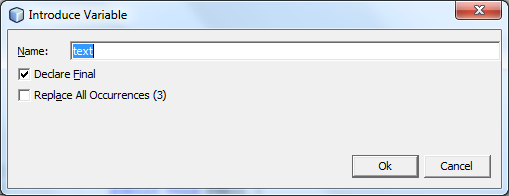
Enter the variable name and click OK. Note that the scope of the newly introduced variable is local.
7. Alt + Shift + C:
Introduces a new constant. This shortcut is useful in case you want to convert a String literal to a constant. For example:

Then the Introduce Constant dialog appears:
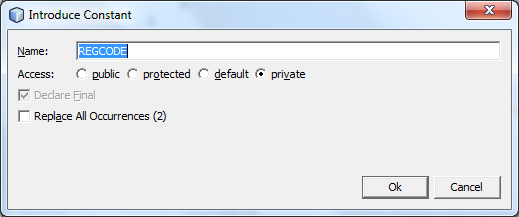
You can update the name, and then click OK.
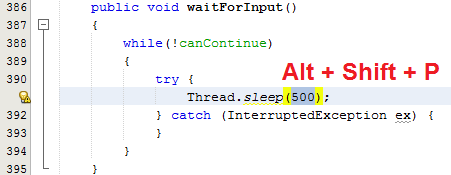
8. Alt + Shift + P:
Introduces a new parameter. This shortcut is useful in case you want to introduce a String literal, numeric literal, boolean literal or an expression to a method parameter. For example, introduce the integer number 500 in the following code to a method parameter:
The Introduce Parameter dialog appears:
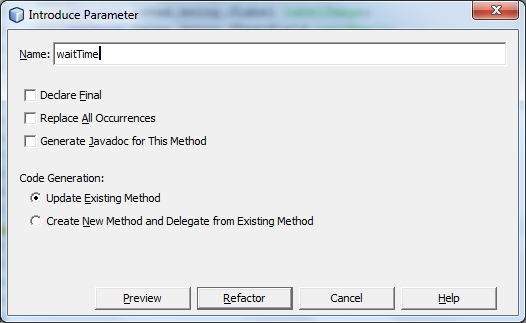
Update the name and click Refactor. Here’s the result:
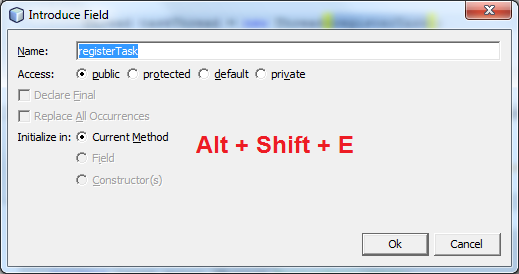
9. Alt + Shift + E:
Introduces a new member/field. Use this shortcut if you want to change scope of a local variable to a class member, or to convert an expression to a field. The Introduce Field dialog looks like the following:
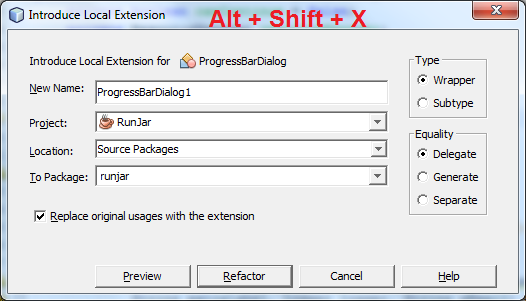
10. Alt + Shift + X:
Introduces local extension. Perhaps this is one of the most complex refactoring features in NetBeans. In short, this creates a subclass or a wrapper class of a selected type in order to have additional methods for that type. Read the following post for more details: Generating (Introduce) Local Extensions.
Here’s a screenshot of the Introduce Local Extension dialog:
Other NetBeans Tutorials:
- What is NetBeans? - for beginner
- How to Use NetBeans IDE from the Basics
- Java Hello World for Beginner with NetBeans IDE
- How to Update License Header for Java files in NetBeans
- 16 NetBeans Shortcut Keys for Code Editing
About the Author:
 Nam Ha Minh is certified Java programmer (SCJP and SCWCD). He began programming with Java back in the days of Java 1.4 and has been passionate about it ever since. You can connect with him on Facebook and watch his Java videos on YouTube.