JFrame basic tutorial and examples
- Details
- Written by Nam Ha Minh
- Last Updated on 06 July 2019 | Print Email
1. Creating a JFrame window
- Normally we create a frame window by creating a class that extends javax.swing.JFrame class:
public class SwingJFrameDemo extends javax.swing.JFrame { public SwingJFrameDemo() { super("Demo program for JFrame"); } } - Or create a JFrame just like any other Java objects:
JFrame frame = new JFrame("Demo program for JFrame"); In the code above we create a frame window entitled “Demo program for JFrame”.
2. Setting layout manager
The default layout of the frame is BorderLayout, we can set another layout like this:frame.setLayout(new GridBagLayout());Or:
frame.setLayout(new GridLayout());
frame.setLayout(new CardLayout());Or:
frame.setLayout(new FlowLayout());Or using absolute layout:
frame.setLayout(null);NOTE: the call setLayout(layout) is equivalent to this call:
frame.getContentPane().setLayout(layout);
3. Adding child components to JFrame
- We can use the method add(Component)to add a component to the frame’s content pane. For example, adding a text field:
JTextField textFieldUserName = new JTextField(50);
frame.add(textFieldUserName);
NOTE: the call add(Component) is equivalent to this call:frame.getContentPane().add(Component);
- Add a component with a layout constraint:
- with BorderLayout:
add(textFieldUserName, BorderLayout.CENTER);
- with GridBagLayout:
GridBagConstraints constraint = new GridBagConstraints();
constraint.gridx = 1;
constraint.gridy = 0;
// set other constraints...

JTextField textFieldUserName = new JTextField(20);
add(textFieldUserName, constraint);
- with BorderLayout:
- Add a menu bar:
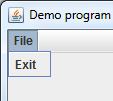
The method setJMenuBar(JMenuBar) is used to add a menu bar to the frame. The following example code adds a menu bar with a File > Exit menu:
JMenuBar menuBar = new JMenuBar();
JMenu menuFile = new JMenu("File");
JMenuItem menuItemExit = new JMenuItem("Exit");
menuFile.add(menuItemExit);

menuBar.add(menuFile);

// adds menu bar to the frame
frame.setJMenuBar(menuBar);
Image:
4. Specifying window closing behavior for JFrame
We can specify which action will be executed when the user clicks on the frame’s close button:
- Do nothing (default):
frame.setDefaultCloseOperation(JFrame.DO_NOTHING_ON_CLOSE);
- Hide the frame:
frame.setDefaultCloseOperation(JFrame.HIDE_ON_CLOSE);
In this case, the frame becomes invisible. To show it again, call:frame.setVisible(true);
- Dispose the frame:
frame.setDefaultCloseOperation(JFrame.DISPOSE_ON_CLOSE);
In this case, the frame is removed and any resources used by the frame are freed. If the frame is the last displayable window on screen, the JVM may terminate. - Exit the program (JVM terminates):
frame.setDefaultCloseOperation(JFrame.EXIT_ON_CLOSE);
5. Showing JFrame on screen
- Make sure we set size for the frame before making it visible:
frame.setSize(300, 200);
frame.setVisible(true);
Image: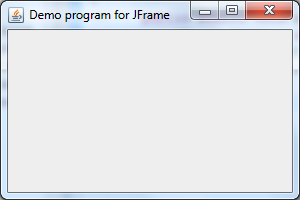
- It is recommended to instantiate and showing the frame in the Swing event dispatcher thread (EDT) like this:
SwingUtilities.invokeLater(new Runnable() { @Override public void run() { new SwingJFrameDemo().setVisible(true); } }); - Center the frame on screen:
frame.setLocationRelativeTo(null);
- Maximize the frame window:
frame.setExtendedState(JFrame.MAXIMIZED_BOTH);
- Set window location on screen:
frame.setLocation(100, 100);
Or:frame.setLocation(new java.awt.Point(100, 100));
- Set size and location together:
We can use the setBounds(x, y, width, height) method to set size and location of the frame in one call:
frame.setBounds(100, 100, 300, 400);
Or pass a Rectangle object:frame.setBounds(new java.awt.Rectangle(100, 100, 300, 400));
- Pack the frame:
If we don’t want to specify or (don’t know) the exact size of the frame, we can use the method pack() to let the frame resizes itself in a manner which ensures all its subcomponents have their preferred sizes:
frame.pack();
- Set the frame window always on top other windows:
frame.setAlwaysOnTop(true);
6. Handling window events for JFrame
The interface java.awt.event.WindowListener defines various window events to which we can listen if interested. The method addWindowListener(WindowListener) of JFrame class is used to add a window listener for the frame.- Listen to window events by implementing the WindowListenerinterface:
In this way, have the frame class implements the WindowListener interface and overrides all its methods, like the following example:
public class FrameDemo extends JFrame implements WindowListener { public FrameDemo() { super("Frame Demo"); // initialization code... setSize(300, 400); addWindowListener(this); setVisible(true); } public void windowActivated(WindowEvent event) { System.out.println("The window has been activated"); } public void windowClosed(WindowEvent event) { System.out.println("The window has been closed"); } public void windowClosing(WindowEvent event) { System.out.println("About to close the window"); } public void windowDeactivated(WindowEvent event) { System.out.println("The window has been deactivated"); } public void windowDeiconified(WindowEvent event) { System.out.println("The window has been restored"); } public void windowIconified(WindowEvent event) { System.out.println("The window has been minimized"); } public void windowOpened(WindowEvent event) { System.out.println("The window has been opened"); } } - Listen to window events by overriding java.awt.event.WindowAdapter’s methods:
In case we want to listen to only one (or more, but not all) events, we can create a listener class that extends from the WindowAdapter class and override only the interested event methods:
class MyWindowListener extends WindowAdapter {
	// overrides only one method:
	public void windowClosing(WindowEvent event) {
		System.out.println("About to close the window");
	}
}
Then add this listener for the frame as follows:
MyWindowListener listener = new MyWindowListener();
frame.addWindowListener(listener);
Or we can use anonymous class syntax like this:
addWindowListener(new WindowAdapter() {
	public void windowClosing(WindowEvent event) {
		System.out.println("About to close the window");
	}
});
7. Customizing JFrame’s appearance
- Set icon image for the frame:The icon image is in the file system:
Image icon = new javax.swing.ImageIcon("images/android.png").getImage();
frame.setIconImage(icon);
Here the image android.png is placed under directory images which is relative to the application’s directory.
Image:
The icon image is in the classpath or in jar files:String iconPath = "/net/codejava/swing/jframe/android.png"; Image icon = new ImageIcon(getClass().getResource(iconPath)).getImage(); frame.setIconImage(icon);
- Here the image android.png is placed under the package net.codejava.swing.jframe of the application.
NOTE: if the image could not be found, the frame still has the default icon - which is the coffee cup. - Disable resizing:
By default, the users can resize the frame. Use the following code if we want to prevent the frame from being resized:
frame.setResizable(false);
- Set background color:
frame.getContentPane().setBackground(Color.GREEN);
- Undecorate the frame:
frame.setUndecorated(true);
If the frame is undecorated, its border, title bar and window buttons are all removed, only keep its content pane visible.
8. JFrame demo program
To demonstrate the techniques mentioned in this article and for your reference, we create a Swing program looks like the following:
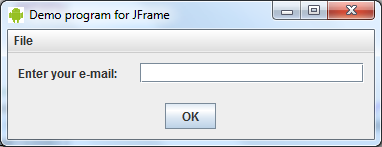
On clicking the close button, a confirm message dialog appears:
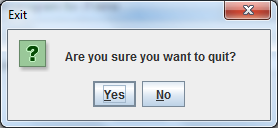
If “Yes” is selected, the program exits, otherwise the frame remains visible on screen.
You can download this demo program’s source code and executable jar file in the attachments section.
Other Java Swing Tutorials:
- Java Swing Hello World Tutorial for Beginners Using Text Editor
- JPanel basic tutorial and examples
- JLabel basic tutorial and examples
- JTextField basic tutorial and examples
- JButton basic tutorial and examples
- JComboBox basic tutorial and examples
- JCheckBox basic tutorial and examples
- JList basic tutorial and examples
- JTree basic tutorial and examples
About the Author:
 Nam Ha Minh is certified Java programmer (SCJP and SCWCD). He began programming with Java back in the days of Java 1.4 and has been passionate about it ever since. You can connect with him on Facebook and watch his Java videos on YouTube.
| [Source code and runnable jar file] | 10 kB |
Comments
apsar hoe are you
setDefaultCloseOperation(JFrame.DO_NOTHING_ON_CLOSE); solve it!
so maybe quit is not enough?
thanks.