How to Deploy JAR File to Heroku
- Details
- Written by Nam Ha Minh
- Last Updated on 29 October 2021 | Print Email
- You don’t want to put your code (for security reason) to Heroku via Git push deployment
- You have only JAR file, without source code
- Your project compilation time exceeds the Heroku’s limit, so you have to compile and package your project locally
- Use Maven to build and package your Java project to an executable JAR file
- Install Heroku Java CLI plugin
- Create a new Heroku app
- Deploy the JAR file
1. Package JAR file using Maven
Be sure that you declare the packaging type of your project in pom.xml file is jar:<project ...>
...
<packaging>jar</packaging>
...
</project>
mvn package
In case you use Eclipse IDE, right-click on project and select Run As > Maven goal… and specify the goal package. The result is a JAR file created under target folder of the project.
2. Install Java Plugin for Heroku CLI
Next, type heroku login to sign in your Heroku account in Heroku CLI. Then type the following command to install the Java Plugin for Heroku CLI:heroku plugins:install java
You would see the output as follows:
3. Deploy JAR File to Heroku
Next, create a new app on Heroku by executing this command:heroku create app_name --no-remote
The option --no-remote tells Heroku do not set Git remote reference for the project, as you’re going to deploy your app by sending JAR file, not by sending source code via Git push.heroku deploy:jar target/your_app.jar -a app_name
You would see the output looks something like this: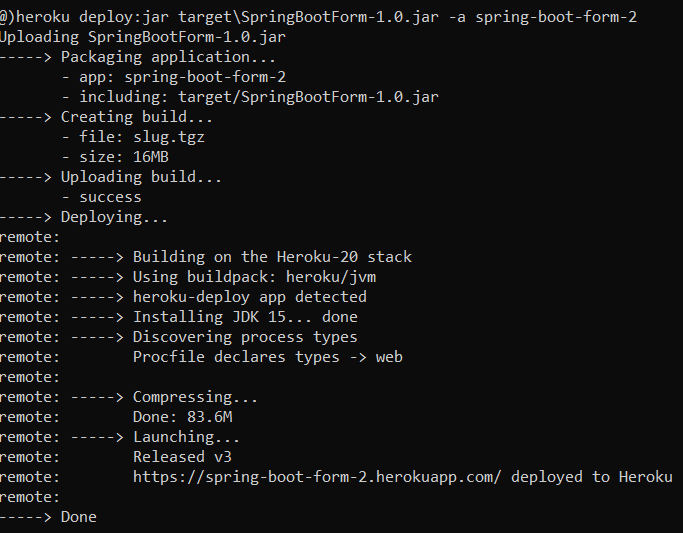 That’s it. You’re all set. Your application has been successfully deployed on to Heroku using JAR deployment. Now you can access your application via URL https://app_name.herokuapp.com.To watch the steps of deploying a JAR file to Heroku step by step, I recommend you watch the following video:
 Other Heroku tutorials:
- What is Heroku for Developers (Benefits, how it works and key concepts)
- Deploy Simple Spring Boot Project to Heroku using Git and Heroku CLI
- Change Java version for Apps deployed on Heroku
- Add Custom Domain Names for Heroku Apps
- Deploy Spring Boot App with MySQL Database on Heroku
- How to Enable Secure Connection for Heroku Apps
About the Author:
 Nam Ha Minh is certified Java programmer (SCJP and SCWCD). He started programming with Java in the time of Java 1.4 and has been falling in love with Java since then. Make friend with him on Facebook and watch his Java videos you YouTube.