JList custom renderer example
- Details
- Written by Nam Ha Minh
- Last Updated on 06 July 2019 | Print Email
This article explains building a custom renderer for JList and proceeds to show some examples.
We will write code to achieve an output like: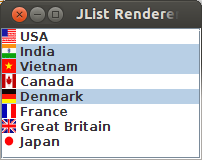
Output
Table of Contents:
3. Creating the List with Entity Objects
6. Developing a Custom Renderer
7. Handling Visual Selection with Custom Renderer
1. Introduction
JList is a Swing component with which we can display a list of elements. The element can be any Java object. We can customize the way the element is displayed in the JList component in the GUI.
2. Developing the Entity
It is quite important to understand that a JList can contain any list of contiguous elements. This means that, we can add any list of contiguous Java object to the list. We have earlier seen in our JList basic tutorial and examples on how to add a list of String instances and show them in the list. So, adding any other Java object is the same.
Let us first write our entity:package net.codejava.model;
/**
* Entity to represent a Country object
*
* @author wwww.codejava.net
*/
public class Country {
private String name;
private String code;
public Country(String name, String code) {
this.name = name;
this.code = code;
}
public String getName() {
return name;
}
public void setName(String name) {
this.name = name;
}
public String getCode() {
return code;
}
public void setCode(String code) {
this.code = code;
}
} The above entity is a simple and straightforward POJO bean which represents a Country entity.3. Creating the List with Entity Objects
Let us now build the GUI and display the countries in a JList instance.package net.codejava.swing;
import javax.swing.DefaultListModel;
import javax.swing.JFrame;
import javax.swing.JList;
import javax.swing.JScrollPane;
import javax.swing.SwingUtilities;
import net.codejava.model.Country;
/**
* JList Custom Renderer Example
*
* @author wwww.codejava.net
*/
public class JListCustomRendererExample extends JFrame {
public JListCustomRendererExample() {
Country us = new Country("USA", "us");
Country in = new Country("India", "in");
Country vn = new Country("Vietnam", "vn");
Country ca = new Country("Canada", "ca");
Country de = new Country("Denmark", "de");
Country fr = new Country("France", "fr");
Country gb = new Country("Great Britain", "gb");
Country jp = new Country("Japan", "jp");
//create the model and add elements
DefaultListModel<Country> listModel = new DefaultListModel<>();
listModel.addElement(us);
listModel.addElement(in);
listModel.addElement(vn);
listModel.addElement(ca);
listModel.addElement(de);
listModel.addElement(fr);
listModel.addElement(gb);
listModel.addElement(jp);
//create the list
JList<Country> countryList = new JList<>(listModel);
add(new JScrollPane(countryList));
this.setDefaultCloseOperation(JFrame.EXIT_ON_CLOSE);
this.setTitle("JList Renderer Example");
this.setSize(200, 200);
this.setLocationRelativeTo(null);
this.setVisible(true);
}
public static void main(String[] args) {
SwingUtilities.invokeLater(new Runnable() {
@Override
public void run() {
new JListCustomRendererExample();
}
});
}
}We first create the instances of the Country object, one each for a country that we would like to display. We then create the DefaultListModel instance. Note that, we parameterize this instance with the Country class, as we are going to add instances of Country to our JList. We then create the JList instance, we pass the model. The model already has all the data and so, it would be displayed.
Let us now run the program:
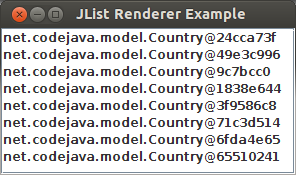
Initial Output
What is being displayed? Actually, the list of Country instances that we added is being displayed. So, why is that we see a weird output?
4. Default Rendering for JList
As we know, the data of a JList is handled by a ListModel. Likewise, the display of objects in a JList is handled by an object called Renderer. For a JList, a renderer is provided by default. So, how does this renderer work?
The renderer is responsible for displaying all the elements in the list. The renderer actually calls the toString() method on the object and uses that string value in the display. As we did not override toString() method in our instance class Country, the Object's toString() is invoked and that is what is displayed. Remember that, the class Object is the top-most class in Java's class hierarchy and all classes extend Object by default.5. Implementing toString()
Let us now implement toString() in our class. We would like to display the name of the country in the list. So, our toString() can simply return the name:
@Override
public String toString() {
    return name;
}
Let us now run the program:
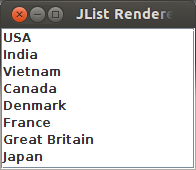
Output with toString() Implementation
6. Developing a Custom Renderer for JList
The above implementation is good enough for most cases. However, what about custom painting? Images? In our case, what if we would like to display the country's flag alongside the name of the country?
In such a case, we will have to write our own custom renderer. To develop a custom renderer, we should write a class that implements ListCellRenderer interface. This interface has one method getListCellRendererComponent(). This method expects a component to be returned back. This component should handle the display of the item.
So, we can have this class extend JLabel as a JLabel can display both icon and text. These icons would be simple .png images. Let us now write the code for the renderer:
 package net.codejava.swing;

import java.awt.Component;
import javax.swing.ImageIcon;
import javax.swing.JLabel;
import javax.swing.JList;
import javax.swing.ListCellRenderer;
import net.codejava.model.Country;

/**
 * Custom renderer to display a country's flag alongside its name
 *
 * @author wwww.codejava.net
 */
public class CountryRenderer extends JLabel implements ListCellRenderer<Country> {

    @Override
    public Component getListCellRendererComponent(JList<? extends Country> list, Country country, int index,
        boolean isSelected, boolean cellHasFocus) {

        String code = country.getCode();
        ImageIcon imageIcon = new ImageIcon(getClass().getResource("/images/" + code + ".png"));

        setIcon(imageIcon);
        setText(country.getName());

        return this;
    }

}
To develop a custom renderer, we need to implement the javax.swing.ListCellRenderer interface. This interface has a single method getListCellRendererComponent()which returns a java.awt.Component instance. So, basically, we can return a Swing component from this method which does the rendering.
Note the usage of parameterized syntax when implementing the interface. This is possible since JDK 1.7.
As we are going to display an icon and a text, the JLabel component will be ideal to use for rendering. So, we have our renderer extend the JLabel class while implementing the ListCellRenderer interface.
Now, inside the method, we can simply call the JLabel'ssetIcon() and setText() methods to set the icon and the text respectively. That is exactly what we do. Setting the text is pretty straightforward. We want the country's name to be displayed as the text. So, we make a call to the getName() method on the Country instance and pass the value to the setText() method.
The setIcon() method expects a javax.swing.ImageIcon instance. We have images (flags of the country) whose name is the same as the country code. All the images are .png files and we have located them under the images directory. So, we use the getClass().getResource() call to load the images (this is a standard way to load resources located within a jar).
We get the country code by calling the getCode() method on the Country instance passed. Then we add the .png extension and load the image. This ImageIcon instance is then passed to the setIcon() method.
Note that the Country instance is passed to the getListCellRendererComponent()method. This indicates the instance per row. This is much needed to perform the rendering. Also, the JList instance itself is passed to the method.
We can now use the renderer by setting it to the list. This can be achieved by the following line of code:
countryList.setCellRenderer(new CountryRenderer());
The above line sets the cell renderer for the JList to our newly developed renderer.
Let us now run the code and see the output:
Output with custom renderer
Now, we are able to display the countries with their flags. This makes for a good UI.
However, we have one problem now. Run the program again and try 'selecting' a country. This is done by clicking on an item. When we click on the list with the mouse, nothing seems to happen.
7. Handling Visual Selection for JList with Custom Renderer
Actually, selection does happen, but it is not shown visibly. Let's take a step back and think of how selection is shown visually. When we select an item, the particular item's background is shown in a different color. By default, this color is blue, but the user can set it to a different color by making a call to the setSelectionForeground() method on the JList instance. In the same way, the user can also set the selection foreground by calling the setSelectionBackground() method.
As we are using the JLabel component to do the rendering, 2 things happen. First, the opaque property of the JLabel by default is false. This means that JLabel doesn't show the underlying component (in this case the JList). Secondly, JLabel's foreground and background color are by default black and white. So, JLabel uses these colors to display the item. So, even when the user does a selection, the selection is not shown in a different color.
Let us now add code to correct these. Firstly, we have to set the opacity to true. We can do this within the getListCellRendererComponent() method. However, this property is not going to change for the lifetime of the instance. So, it is enough to set it once. The best place to do this one-time activity would be the constructor. So, let us write the constructor and make this call, like:
public CountryRenderer() {
    setOpaque(true);
}
Next, let us handle the selection. One of the handy parameters passed to the getListCellRendererComponent() method is the isSelected parameter. This parameter indicates if the item is selected or not. So, we can set the JLabel's foreground and background colors to be the same as the JList instance's colors. When the item is selected, we should use the JList's selection colors. When it is not selected, we should use the JList's normal colors.
So, let us add code in the getListCellRendererComponent(), like:
if (isSelected) {
    setBackground(list.getSelectionBackground());
    setForeground(list.getSelectionForeground());
} else {
    setBackground(list.getBackground());
    setForeground(list.getForeground());
}
Note that we are calling the getSelectionBackground()andgetSelectionForeground() method on the JList instance and using those colors. We are not setting any colors on our own. This is important as the user might have set a different selection color than the default one. So, we simply make use of it.
The complete renderer code now looks like this:
package net.codejava.swing;

import java.awt.Component;
import javax.swing.ImageIcon;
import javax.swing.JLabel;
import javax.swing.JList;
import javax.swing.ListCellRenderer;
import net.codejava.model.Country;

/**
 * Custom renderer to display a country's flag alongside its name
 *
 * @author wwww.codejava.net
 */
public class CountryRenderer extends JLabel implements ListCellRenderer<Country> {

    public CountryRenderer() {
        setOpaque(true);
    }

    @Override
    public Component getListCellRendererComponent(JList<? extends Country> list, Country country, int index,
            boolean isSelected, boolean cellHasFocus) {

        String code = country.getCode();
        ImageIcon imageIcon = new ImageIcon(getClass().getResource("/images/" + code + ".png"));

        setIcon(imageIcon);
        setText(country.getName());

        if (isSelected) {
            setBackground(list.getSelectionBackground());
            setForeground(list.getSelectionForeground());
        } else {
            setBackground(list.getBackground());
            setForeground(list.getForeground());
        }

        return this;
    }
}
Let us now run the program. We get the following output:
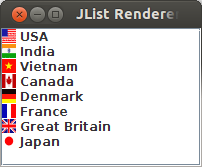
Custom renderer with selection
The selection now works fine and we are also displaying the countries with their flags.
Here is the full source of our main class:
package net.codejava.swing;

import java.awt.Color;
import javax.swing.DefaultListModel;
import javax.swing.JFrame;
import javax.swing.JList;
import javax.swing.JScrollPane;
import javax.swing.SwingUtilities;

import net.codejava.model.Country;

/**
 * JList Custom Renderer Example
 *
 * @author wwww.codejava.net
 */
public class JListCustomRendererExample extends JFrame {

    public JListCustomRendererExample() {
        Country us = new Country("USA", "us");
        Country in = new Country("India", "in");
        Country vn = new Country("Vietnam", "vn");
        Country ca = new Country("Canada", "ca");
        Country de = new Country("Denmark", "de");
        Country fr = new Country("France", "fr");
        Country gb = new Country("Great Britain", "gb");
        Country jp = new Country("Japan", "jp");

        //create the model and add elements
        DefaultListModel<Country> listModel = new DefaultListModel<>();
        listModel.addElement(us);
        listModel.addElement(in);
        listModel.addElement(vn);
        listModel.addElement(ca);
        listModel.addElement(de);
        listModel.addElement(fr);
        listModel.addElement(gb);
        listModel.addElement(jp);

        //create the list
        JList<Country> countryList = new JList<>(listModel);
        add(new JScrollPane(countryList));
        countryList.setCellRenderer(new CountryRenderer());

        this.setDefaultCloseOperation(JFrame.EXIT_ON_CLOSE);
        this.setTitle("JList Renderer Example");
        this.setSize(200, 200);
        this.setLocationRelativeTo(null);
        this.setVisible(true);
    }

    public static void main(String[] args) {
        SwingUtilities.invokeLater(new Runnable() {
            @Override
            public void run() {
                new JListCustomRendererExample();
            }
        });
    }
}
Other Java Swing Tutorials:
- Java Swing Hello World Tutorial for Beginners Using Text Editor
- JFrame basic tutorial and examples
- JPanel basic tutorial and examples
- JTextField basic tutorial and examples
- JButton basic tutorial and examples
- JComboBox basic tutorial and examples
- JCheckBox basic tutorial and examples
- JList basic tutorial and examples
- JTree basic tutorial and examples
About the Author:
 Nam Ha Minh is certified Java programmer (SCJP and SCWCD). He began programming with Java back in the days of Java 1.4 and has been passionate about it ever since. You can connect with him on Facebook and watch his Java videos on YouTube.
| [Source code and executable Jar file] | 10 kB |
Comments
es un maestro, gracias muchas gracias
Then I would suggest you extend JPanel instead of JLabel, and add the image, the two JLabels and the button to the JPanel, using a LayoutManager. Everything else in the original code can be used as is.