JTable Simple Renderer Example
- Details
- Written by Nam Ha Minh
- Last Updated on 06 July 2019 | Print Email
This article explains how to write a simple renderer to customize the display in a JTable and proceeds to show an example.
Let us consider an example. We want to display the student details in a table. The student details consist of fields like id, name and grade. Let us proceed to build code.
Let us proceed to build code. Our aim is to show grades visually with colors like:
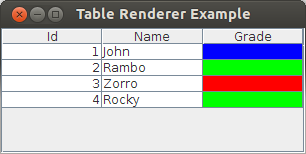
Output of a JTable with custom renderer (for Grade column)
1. Steps o create a custom renderer for JTable:
We follow these steps to achieve the above:
- Develop the Entity Model class
- Develop the Table Model class
- Develop the initial GUI screen to use the above table model and display a list
- Develop custom renderer to achieve the display
- Use the custom renderer
2. Developing the Entity class:
Firstly, we write the POJO value bean that represents our entity named Student:
package net.codejava.model;

public class Student
{
    public static enum Grade {
        A, B, C;
    }

    private int id;
    private String name;
    private Grade grade;

    public Student(int id, String name, Grade grade) {
        this.id = id;
        this.name = name;
        this.grade = grade;
    }

    public int getId()
    {
        return id;
    }

    public void setId(int id)
    {
        this.id = id;
    }

    public String getName()
    {
        return name;
    }

    public void setName(String name)
    {
        this.name = name;
    }

    public Grade getGrade()
    {
        return grade;
    }

    public void setGrade(Grade grade)
    {
        this.grade = grade;
    }

}
This is a simple POJO value bean that represents the entity Student and with appropriate getter and setter methods. Note that we are using an enum for Grade.
3. Developing the TableModel class:
Let us now write the table model. We extend the AbstractTableModel provided in Swing API and develop our code. This is similar to what is cited in our Editable JTable Example
package net.codejava.swing;

import java.util.List;
import javax.swing.table.AbstractTableModel;

import net.codejava.model.Student;
import net.codejava.model.Student.Grade;

public class StudentTableModel extends AbstractTableModel
{
    private final List<Student> studentList;

    private final String[] columnNames = new String[] {
            "Id", "Name", "Grade"
    };
    private final Class[] columnClass = new Class[] {
        Integer.class, String.class, Grade.class
    };

    public StudentTableModel(List<Student> studentList)
    {
        this.studentList = studentList;
    }

    @Override
    public String getColumnName(int column)
    {
        return columnNames[column];
    }

    @Override
    public Class<?> getColumnClass(int columnIndex)
    {
        return columnClass[columnIndex];
    }

    @Override
    public int getColumnCount()
    {
        return columnNames.length;
    }

    @Override
    public int getRowCount()
    {
        return studentList.size();
    }

    @Override
    public Object getValueAt(int rowIndex, int columnIndex)
    {
        Student row = studentList.get(rowIndex);
        if(0 == columnIndex) {
            return row.getId();
        }
        else if(1 == columnIndex) {
            return row.getName();
        }
        else if(2 == columnIndex) {
            return row.getGrade();
        }
        return null;
    }
}
This is a very typical implementation of the table model. We define the column headers and implement the methods that return the column count, row count and so on. This model holds a List<Student>. The most important implementation is the getValueAt() method. Based on the column number, the appropriate method call is made and the data is returned.
Let us now build a simple JFrame to display this table:
package net.codejava.swing;

import java.util.ArrayList;
import java.util.List;
import javax.swing.JFrame;
import javax.swing.JScrollPane;
import javax.swing.JTable;
import javax.swing.SwingUtilities;
import net.codejava.model.Student;
import net.codejava.model.Student.Grade;

public class TableRendererSample extends JFrame
{
    public TableRendererSample()
    {
        Student row1 = new Student(1, "John", Grade.B);
        Student row2 = new Student(2, "Rambo", Grade.A);
        Student row3 = new Student(3, "Zorro", Grade.C);
        Student row4 = new Student(4, "Rocky", Grade.A);

        //build the list
        List<Student> StudentList = new ArrayList<Student>();
        StudentList.add(row1);
        StudentList.add(row2);
        StudentList.add(row3);
        StudentList.add(row4);

        //create the model
        StudentTableModel model = new StudentTableModel(StudentList);
        //create the table
        JTable table = new JTable(model);

        //add the table to the frame
        this.add(new JScrollPane(table));

        this.setTitle("Table Renderer Example");
        this.setDefaultCloseOperation(JFrame.EXIT_ON_CLOSE);
        this.pack();
        this.setVisible(true);
    }

    public static void main(String[] args)
    {
        SwingUtilities.invokeLater(new Runnable() {
            @Override
            public void run() {
                new TableRendererSample();
            }
        });
    }
}
Here, we are building a simple GUI. Firstly, we create the Student instances and add them to a list. Secondly, we create the model instance by passing this list. And finally, we create the table by passing in this model.
We get the following output when we run this example:
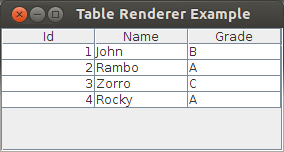
JTable Initial Output
The output shows a table with the Student values of id, name and grade displayed. On closer observation, we find that the values in the id column are displayed right-aligned whereas the values in the name and the grade column are displayed left-aligned. Therefore, how did this happen?
4. JTable Default Renderer:
The display happened via renderers. Renderers are the components that control the display of values in a cell in a table. Thus, all the cells in the table delegate the display of values to the Renderer.
But, wait a minute. We did not mention anything about renderers in our code. Hence, where did the renderers come from?
A JTable automatically creates renderers for cells which can be called as default renderers. These renderers are based on the data type the cell displays.
For example, for a numeric column, JTable creates renderers which display the value as right-aligned. For a text column, JTable creates renderers which display the value as left-aligned. And so on for all the columns. But, then a question would arise – how does the JTable know the data type of our column? It's simple because the table model provides it. If you look at the table model code again, you can find a getColumnClass() method which returns the data type of that particular column. So, based on that, the JTable simply assigns the corresponding renderer to all cells of that particular column.
5. JTable Custom Renderers:
Therefore, a natural question would arise. Can we customize the renderer? Of course, we can. That is exactly what we are going to do now.
Let us take an example. Instead of just displaying the grades for a student, we want to assign a color for each grade and use those colors to indicate the grade. For example, let us say, if a student has grade A, we want to paint the cell with a green color. And blue for grade B and red for grade C. Let us now see how to do that.
Understanding Renderers:
Renderers are developed by implementing the interface TableCellRenderer. It has only one method and the method definition is as follows:
The method definition is quite lengthy. Let us take a step back and think about what is needed for a renderer to work. Remember that, each cell's display is delegated to a renderer. Thus, a renderer needs complete information about the cell – this would simply include the row number of the cell, the column number of the cell and the value of the cell. Hence, we see those 3 as being part of the parameters being passed to this method. And of course the table instance. Along with that, there are 2 more parameters isSelected and hasFocus which provide information on whether the particular cell is selected and if the cell has focus. This information will come in handy for detailed customization.
The return type of the method is java.awt.Component which is the top-most parent for all components in Swing. This means that, we can return any component with which we can customize the display. The most common usage is to use a JLabel as the component. Thus, let us proceed and write an implementation for our case:
package net.codejava.swing;

import java.awt.Color;
import java.awt.Component;
import javax.swing.JLabel;
import javax.swing.JTable;
import javax.swing.table.TableCellRenderer;
import net.codejava.model.Student.Grade;

public class GradeRenderer extends JLabel implements TableCellRenderer
{

    public GradeRenderer()
    {
        super.setOpaque(true);
    }

    @Override
    public Component getTableCellRendererComponent(JTable table, Object value, boolean isSelected,
        boolean hasFocus, int row, int column)
    {
        Grade grade = (Grade) value;
        if(grade == Grade.A) {
            super.setBackground(Color.GREEN);
        }
        else if(grade == Grade.B) {
            super.setBackground(Color.BLUE);
        }
        else if(grade == Grade.C) {
            super.setBackground(Color.RED);
        }

        return this;
    }

}
In our implementation, we extend the JLabel class and implement the TableCellRenderer interface. We override the getTableCellRendererComponent() method where we do the customization and simply return 'this' from the method. Here, it represents the current JLabel instance.
In the method, we first get the value of the cell. In this case, we are writing a renderer for the grade column, so we know that the value parameter is an instance of the Grade class. Next, we get that instance and do a comparison. If the grade is A, we simply call the super.setBackground(Color.GREEN) and so on for the other two grades. Here, as our super class is JLabel it calls the setBackground() method of the JLabel instance to set the background color.
Importantly, we call the setOpaque(true) in the constructor as without that the color will not be visible.
Hence, how do we use the renderer? You can recall our initial discussion about renderer i.e. a renderer is connected with the data type. Here, data type means the Class type of that column. And, our renderer which we call GradeRenderer should be used whenever the JTable attempts to display a Grade value. So, we use the renderer like:
We simply mention that, for the class Grade, our renderer should be the default renderer. Let us run the program now:
JTable Output with Custom Renderer
The output nicely shows the grade of a student in a color. Whenever the JTable encounters an instance of class Grade, it knows where to delegate the display to – in this case, the display is delegated to GradeRenderer by calling the getTableCellRendererComponent() method and passing the needed parameters. The renderer in turn returns a JLabel instance with the appropriate coloring and then, that is used to display the value.
Here is the full source code of our GUI:
package net.codejava.swing;

import java.util.ArrayList;
import java.util.List;
import javax.swing.JFrame;
import javax.swing.JScrollPane;
import javax.swing.JTable;
import javax.swing.SwingUtilities;
import net.codejava.model.Student;
import net.codejava.model.Student.Grade;

public class TableRendererSample extends JFrame
{
    public TableRendererSample()
    {
        Student row1 = new Student(1, "John", Grade.B);
        Student row2 = new Student(2, "Rambo", Grade.A);
        Student row3 = new Student(3, "Zorro", Grade.C);
        Student row4 = new Student(4, "Rocky", Grade.A);

        //build the list
        List<Student> StudentList = new ArrayList<Student>();
        StudentList.add(row1);
        StudentList.add(row2);
        StudentList.add(row3);
        StudentList.add(row4);

        //create the model
        StudentTableModel model = new StudentTableModel(StudentList);
        //create the table
        JTable table = new JTable(model);
        //set the renderer
        table.setDefaultRenderer(Grade.class, new GradeRenderer());

        //add the table to the frame
        this.add(new JScrollPane(table));

        this.setTitle("Table Renderer Example");
        this.setDefaultCloseOperation(JFrame.EXIT_ON_CLOSE);
        this.pack();
        this.setVisible(true);
    }

    public static void main(String[] args)
    {
        SwingUtilities.invokeLater(new Runnable() {
            @Override
            public void run() {
                new TableRendererSample();
            }
        });
    }

}
Related JTable Tutorials:
- A Simple JTable Example for Display
- Editable JTable Example
- 6 Techniques for Sorting JTable You Should Know
- How to scroll JTable row to visible area programmatically
- JTable column header custom renderer examples
- Setting column width and row height for JTable
- How to handle mouse clicking event on JTable column header
- How to create JComboBox cell editor for JTable
- JTable popup menu example
About the Author:
 Nam Ha Minh is certified Java programmer (SCJP and SCWCD). He began programming with Java back in the days of Java 1.4 and has been passionate about it ever since. You can connect with him on Facebook and watch his Java videos on YouTube.
Comments
Why no renderer for integers?
Double, Date, Currencies?
Why always only this unnecessary colour match, nonsense that no one needs,
It's annoying!
Why no renderer for the column number
Student = boring example
You have to use a table model which holds the data of the table.
After updating data in the model, you call table.fireDataChanged().
How can I refresh the table with new data after a database query?
Great example, thank you for it.
Is it possible to color a cell but see the text in it at the same time?