How to create Spring MVC project using Maven command
- Details
- Written by Nam Ha Minh
- Last Updated on 20 February 2020 | Print Email
cd g:\Java\Spring
And type the following command to create a Spring MVC project:mvn archetype:generate ^ -DarchetypeGroupId=co.ntier ^ -DarchetypeArtifactId=spring-mvc-archetype ^ -DarchetypeVersion=1.0.2Note that this command is quite long so I use the line-continuation character ^ (on Windows). On Linux, the line-continuation character is backslash (\):
mvn archetype:generate \ -DarchetypeGroupId=co.ntier \ -DarchetypeArtifactId=spring-mvc-archetype \ -DarchetypeVersion=1.0.2Depend on your Maven, it might download necessary JAR files from Maven’s central repository. And then it will be generating project in interactive mode – asking for your project’s information, for example:
Define value for property 'groupId': net.codejava Define value for property 'artifactId': MySpringMvc Define value for property 'version' 1.0-SNAPSHOT: : 1.0 Define value for property 'package' net.codejava: : net.codejavaThen it asks you to confirm (press Y to confirm):
Confirm properties configuration: groupId: net.codejava artifactId: MySpringMvc version: 1.0 package: net.codejava Y: : YOnce confirmed, Maven will generate your Spring MVC project (BUILD SUCCESS):
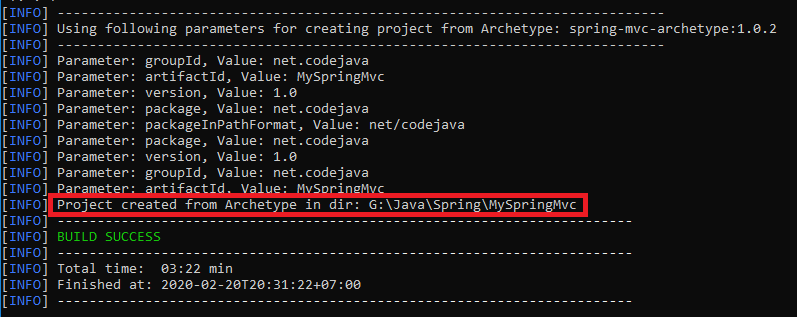
Project created from Archetype in dir: G:\Java\Spring\MySpringMvc
That means the Spring MVC project named MySpringMvc has been create successfully. Import this project in Eclipse, you will see the following project structure: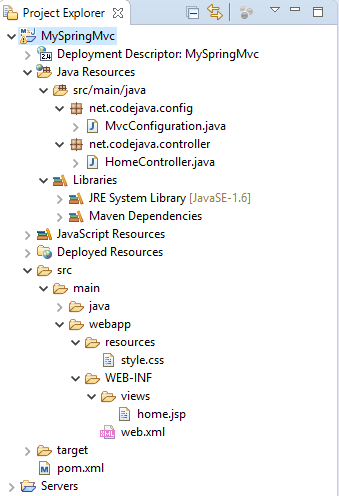
- pom.xml file that specifies dependencies for Spring MVC framework, Serlvet & JSP API, Spring test…
- web.xml that configures Spring Dispatcher servlet.
- MvcConfiguration class that configures Spring MVC’s view resolver and resources handler.
- HomeController class is for Spring MVC controller with a handler method for the application’s context root.
- home.jsp file is the homepage of the application.
mvn archetype:generate ^ -DarchetypeGroupId=co.ntier ^ -DarchetypeArtifactId=spring-mvc-archetype ^ -DarchetypeVersion=1.0.2 ^ -DgroupId=net.codejava ^ -DartifactId=SpringMvcApp ^ -Dversion=1.0 ^ -Dpackage=net.codejava.spring ^ -DinteractiveMode=falseThat’s how to use Maven’s command to quickly create a Spring MVC project. You can also use the project as a guide to your first, hello world Spring MVC application.
Related Spring Tutorials:
- How to create a Spring MVC project using Maven and Eclipse in one minute
- Spring MVC beginner tutorial with Spring Tool Suite IDE
- How to bootstrap a Spring Web MVC application programmatically
Other Spring Tutorials:
- Spring Dependency Injection Example (XML)
- Understand the core of Spring framework
- Understand Spring MVC
- Understand Spring AOP
- Spring MVC Form Handling Tutorial
- Spring MVC Form Validation Tutorial
- 14 Tips for Writing Spring MVC Controller
- Spring Web MVC Security Basic Example (XML Configuration)
- Understand Spring Data JPA with Simple Example
- Spring MVC + Spring Data JPA + Hibernate - CRUD Example
About the Author:
 Nam Ha Minh is certified Java programmer (SCJP and SCWCD). He began programming with Java back in the days of Java 1.4 and has been passionate about it ever since. You can connect with him on Facebook and watch his Java videos on YouTube.
Comments