Spring MVC + Spring Data JPA + Hibernate - CRUD Example
- Details
- Written by Nam Ha Minh
- Last Updated on 24 June 2019 | Print Email
 The software programs and technologies used in this tutorial are: Java 8, Apache Tomcat 9, MySQL Server 5.7, Eclipse IDE 4.7 (Oxygen), Spring framework 5.1, Hibernate framework 5.4, Spring Data JPA 2.1.5 and Servlet 3.1.Here's the table of content:
3. Create JPA Configuration File
8. Code Spring MVC Controller Class
10. Code Create New Customer Feature
11. Code Edit Customer Feature
12. Code Delete Customer Feature
13. Code Search Customer Feature
Let's start with the database first.1. Create Database
We use MySQL database. The sample application will manage data in a table named customer which is in the schema named sales. The table customer has 4 fields: id, name, email and address: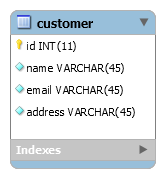
CREATE DATABASE `sales`;
CREATE TABLE `customer` (
  `id` int(11) NOT NULL AUTO_INCREMENT,
  `name` varchar(45) NOT NULL,
  `email` varchar(45) NOT NULL,
  `address` varchar(45) NOT NULL,
  PRIMARY KEY (`id`)
) ENGINE=InnoDB DEFAULT CHARSET=utf8;
2. Create Project in Eclipse
Create a Dynamic Web Project in Eclipse, and convert it to Maven project: right-click on the project, select Configure > Convert to Maven Project. The Create new POM dialog appears. Enter the following information:- Group Id: net.codejava
- Artifact Id: CustomerManager
Make sure that the JRE version for the project is Java 8 or newer.Next, open the Maven's project file pom.xml to configure the dependencies for the project. Declare properties for the version of Spring and Hibernate frameworks:<properties> <spring.version>5.1.5.RELEASE</spring.version> <hibernate.version>5.4.1.Final</hibernate.version> </properties>Specify the following dependency for the core of Spring framework:
<dependency>
	<groupId>org.springframework</groupId>
	<artifactId>spring-context</artifactId>
	<version>${spring.version}</version>
</dependency>
For web development with Spring MVC:<dependency>
<groupId>org.springframework</groupId>
<artifactId>spring-webmvc</artifactId>
<version>${spring.version}</version>
</dependency>To use Spring Data JPA, we need to specify the following dependencies:<dependency>
<groupId>org.springframework</groupId>
<artifactId>spring-orm</artifactId>
<version>${spring.version}</version>
</dependency>
<dependency>
<groupId>org.springframework.data</groupId>
<artifactId>spring-data-jpa</artifactId>
<version>2.1.5.RELEASE</version>
</dependency>We use Hibernate as a provider of JPA, so add the following dependency:<dependency>
<groupId>org.hibernate</groupId>
<artifactId>hibernate-core</artifactId>
<version>${hibernate.version}</version>
</dependency>To let the application work with MySQL database, we need to have the dependecy for MySQL JDBC driver:<dependency> <groupId>mysql</groupId> <artifactId>mysql-connector-java</artifactId> <version>8.0.14</version> <scope>runtime</scope> </dependency>And for Java Servlet, JSP and JSTL:
<dependency>
	<groupId>javax.servlet</groupId>
	<artifactId>javax.servlet-api</artifactId>
	<version>3.1.0</version>
	<scope>provided</scope>
</dependency>
<dependency>
	<groupId>javax.servlet.jsp</groupId>
	<artifactId>javax.servlet.jsp-api</artifactId>
	<version>2.3.1</version>
	<scope>provided</scope>
</dependency>
<dependency>
	<groupId>jstl</groupId>
	<artifactId>jstl</artifactId>
	<version>1.2</version>
</dependency>
You can see the complete code of the pom.xml file in the sample project attached along this tutorial.Create two Java packages under the source folder:
- net.codejava.config: for configuration classes.
- net.codejava.customer: for application-specific classes.
3. Create JPA Configuration File
Since JPA is used, we need to specify database connection properties in the persistence.xml file instead of hibernate.cfg.xml file. Create a new directory named META-INF in the source folder to put the persistence.xml file as follows: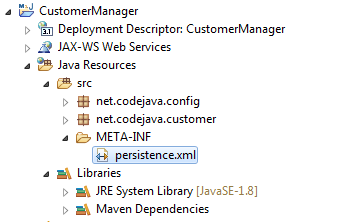 And write XML code for the persistence.xml file like this:
<?xml version="1.0" encoding="UTF-8"?>
<persistence xmlns="http://xmlns.jcp.org/xml/ns/persistence"
	xmlns:xsi="http://www.w3.org/2001/XMLSchema-instance"
	xsi:schemaLocation="http://xmlns.jcp.org/xml/ns/persistence
          http://xmlns.jcp.org/xml/ns/persistence/persistence_2_1.xsd"
	version="2.1">

	<persistence-unit name="SalesDB">
		<properties>
			<property name="javax.persistence.jdbc.url" value="jdbc:mysql://localhost:3306/sales" />
			<property name="javax.persistence.jdbc.user" value="root" />
			<property name="javax.persistence.jdbc.password" value="password" />
			<property name="javax.persistence.jdbc.driver" value="com.mysql.jdbc.Driver" />
			<property name="hibernate.show_sql" value="true" />
			<property name="hibernate.format_sql" value="true" />
		</properties>
	</persistence-unit>

</persistence>
As you can see, we specify database connection properties such as URL, user, password and JDBC driver class. Note that the persistence unit name SalesDB will be used in the configuration code.
4. Code Model Class
Create the domain class Customer to map with the table customer in the database as following:package net.codejava.customer;
import javax.persistence.Entity;
import javax.persistence.GeneratedValue;
import javax.persistence.GenerationType;
import javax.persistence.Id;
@Entity
public class Customer {
@Id
@GeneratedValue(strategy = GenerationType.IDENTITY)
private Long id;
private String name;
private String email;
private String address;
protected Customer() {
}
protected Customer(String name, String email, String address) {
this.name = name;
this.email = email;
this.address = address;
}
// getters and setters are not shown for brevity
}As you can see, we use the annotation @Entity to map this class to the table customer (the class has same name as the table). All the class' field names are also identical to the table's ones. The field id is annotated with @Id and @GeneratedValue annotations to indicate that this field is primary key and its value is auto generated.
5. Code Configuration Classes
Next, let's write some Java code to configure Spring MVC and Spring Data JPA. We use Java-based configuration as it's simpler than XML.Configure Spring Dispatcher Servlet:To use Spring MVC for our Java web application, we need to register the Spring Dispatcher Servlet upon application's startup by coding the following class:package net.codejava.config;
import javax.servlet.ServletContext;
import javax.servlet.ServletException;
import javax.servlet.ServletRegistration;
import org.springframework.web.WebApplicationInitializer;
import org.springframework.web.context.support.AnnotationConfigWebApplicationContext;
import org.springframework.web.servlet.DispatcherServlet;
public class WebAppInitializer implements WebApplicationInitializer {
@Override
public void onStartup(ServletContext servletContext) throws ServletException {
AnnotationConfigWebApplicationContext appContext = new AnnotationConfigWebApplicationContext();
appContext.register(WebMvcConfig.class);
ServletRegistration.Dynamic dispatcher = servletContext.addServlet(
"SpringDispatcher", new DispatcherServlet(appContext));
dispatcher.setLoadOnStartup(1);
dispatcher.addMapping("/");
}
}The onStartup() method of this class will be automatically invoked by the servlet container when the application is being loaded. The Spring Dispatcher Servlet handles all the requests via the URL mapping "/" and it looks for configuration in the WebMvcConfig class, which is described below. Configure Spring MVC:Create the WebMvcConfig class under the net.codejava.config package with the following code:package net.codejava.config;
import org.springframework.context.annotation.Bean;
import org.springframework.context.annotation.ComponentScan;
import org.springframework.context.annotation.Configuration;
import org.springframework.web.servlet.view.InternalResourceViewResolver;
@Configuration
@ComponentScan("net.codejava ")
public class WebMvcConfig {
@Bean(name = "viewResolver")
public InternalResourceViewResolver getViewResolver() {
InternalResourceViewResolver viewResolver = new InternalResourceViewResolver();
viewResolver.setPrefix("/WEB-INF/views/");
viewResolver.setSuffix(".jsp");
return viewResolver;
}
}This class is annotated with the @Configuration annotation to tell Spring framework that this is a configuration class. The @ComponentScan annotation tells Spring to scan for configuration classes in the net.codejava package.In this class, we simply create a view resolver bean that specifies the prefix and suffix for view files. So create the directory views under WebContent/WEB-INF directory to store JSP files.You can add more Spring MVC configurations here. Configure Spring Data JPA:To enable Spring Data JPA, we need to create two beans: EntityManagerFactory and JpaTransactionManager. So create another configuration class named JpaConfig with the following code:package net.codejava.config;
import javax.persistence.EntityManagerFactory;
import org.springframework.context.annotation.Bean;
import org.springframework.context.annotation.Configuration;
import org.springframework.data.jpa.repository.config.EnableJpaRepositories;
import org.springframework.orm.jpa.JpaTransactionManager;
import org.springframework.orm.jpa.LocalEntityManagerFactoryBean;
import org.springframework.transaction.annotation.EnableTransactionManagement;
@Configuration
@EnableJpaRepositories(basePackages = {"net.codejava.customer"})
@EnableTransactionManagement
public class JpaConfig {
@Bean
public LocalEntityManagerFactoryBean entityManagerFactory() {
LocalEntityManagerFactoryBean factoryBean = new LocalEntityManagerFactoryBean();
factoryBean.setPersistenceUnitName("SalesDB");
return factoryBean;
}
@Bean
public JpaTransactionManager transactionManager(EntityManagerFactory entityManagerFactory) {
JpaTransactionManager transactionManager = new JpaTransactionManager();
transactionManager.setEntityManagerFactory(entityManagerFactory);
return transactionManager;
}
}Here, two important annotations are used:- @EnableJpaRepositories: this tells Spring Data JPA to look for repository classes in the specified package (net.codejava) in order to inject relevant code at runtime.
- @EnableTransactionManagement: this tells Spring Data JPA to generate code for transaction management at runtime.
In this class, the first method creates an instance of EntityManagerFactory to manage the persistence unit SalesDB (this name is specified in the persistence.xml file above).And the last method creates an instance of JpaTransactionManagerfor the EntityManagerFactory created by the first method.That's the minimum required configuration for using Spring Data JPA.
6. Code Respository Interface
Next, create the CustomerRepository interface that extends the CrudRepository interface defined by Spring Data JPA with the following code:package net.codejava.customer;
import java.util.List;
import org.springframework.data.repository.CrudRepository;
import org.springframework.data.repository.query.Param;
public interface CustomerRepository extends CrudRepository<Customer, Long> {
}You see, this is almost the code we need for the data access layer. Deadly simple, right? As with Spring Data JPA, you don't have to write any DAO code. Just declare an interface that extends the CrudRepository interface, which defines CRUD methods like save(), findAll(), findById(),deleteById(), etc. At runtime, Spring Data JPA automatically generates the implementation code.Note that we must specify the type of the model class and type of the primary key field when extending the CrudRepository interface: CrudRepository<Customer, Long>
7. Code Service Class
Next, code the CustomerService class in the business/service layer with the following code:package net.codejava.customer;
import java.util.List;
import org.springframework.beans.factory.annotation.Autowired;
import org.springframework.stereotype.Service;
import org.springframework.transaction.annotation.Transactional;
@Service
@Transactional
public class CustomerService {
@Autowired CustomerRepository repo;
public void save(Customer customer) {
repo.save(customer);
}
public List<Customer> listAll() {
return (List<Customer>) repo.findAll();
}
public Customer get(Long id) {
return repo.findById(id).get();
}
public void delete(Long id) {
repo.deleteById(id);
}
}Note that this class is annotated with the @Transactional annotation so all of its methods will be intercepted by Spring Data JPA for transaction management. And an instance of CustomerRepository interface will be injected into this class:@Autowired CustomerRepository repo;This is like magic, as we don't write any DAO code but Spring Data JPA will generate an implementation automatically at runtime.And as you can see, all the methods in this class are for CRUD operations. It simply delegates all the call to a CustomerRepositoryobject. This class seems to be redundant, but it is needed to decouple the business/service layer from the repository/DAO layer.
8. Code Spring MVC Controller Class
Next, in the controller layer, create the CustomerController class to handle all requests from the clients with the following code:package net.codejava.customer;
import org.springframework.beans.factory.annotation.Autowired;
import org.springframework.stereotype.Controller;
@Controller
public class CustomerController {
@Autowired
private CustomerService customerService;
// handler methods will go here...
}This is a typical Spring MVC controller class, which is annotated with the @Controller annotation. You can see an instance of CustomerService is injected into this class using the @Autowired annotation.We will write code for the handler methods in the following sections.
9. Code List Customer Feature
The application's home page displays all customers, so add the following handler method to the CustomerController class:@RequestMapping("/")
public ModelAndView home() {
List<Customer> listCustomer = customerService.listAll();
ModelAndView mav = new ModelAndView("index");
mav.addObject("listCustomer", listCustomer);
return mav;
}And code the view page (index.jsp) as follows:<%@ page language="java" contentType="text/html; charset=ISO-8859-1"
pageEncoding="ISO-8859-1"%>
<%@ taglib uri="http://java.sun.com/jsp/jstl/core" prefix="c" %>
<!DOCTYPE html PUBLIC "-//W3C//DTD HTML 4.01
Transitional//EN" "http://www.w3.org/TR/html4/loose.dtd">
<html>
<head>
<meta http-equiv="Content-Type" content="text/html; charset=ISO-8859-1">
<title>Customer Manager</title>
</head>
<body>
<div align="center">
<h2>Customer Manager</h2>
<form method="get" action="search">
<input type="text" name="keyword" />
<input type="submit" value="Search" />
</form>
<h3><a href="/new">New Customer</a></h3>
<table border="1" cellpadding="5">
<tr>
<th>ID</th>
<th>Name</th>
<th>E-mail</th>
<th>Address</th>
<th>Action</th>
</tr>
<c:forEach items="${listCustomer}" var="customer">
<tr>
<td>${customer.id}</td>
<td>${customer.name}</td>
<td>${customer.email}</td>
<td>${customer.address}</td>
<td>
<a href="/edit?id=${customer.id}">Edit</a>
<a href="/delete?id=${customer.id}">Delete</a>
</td>
</tr>
</c:forEach>
</table>
</div>
</body>
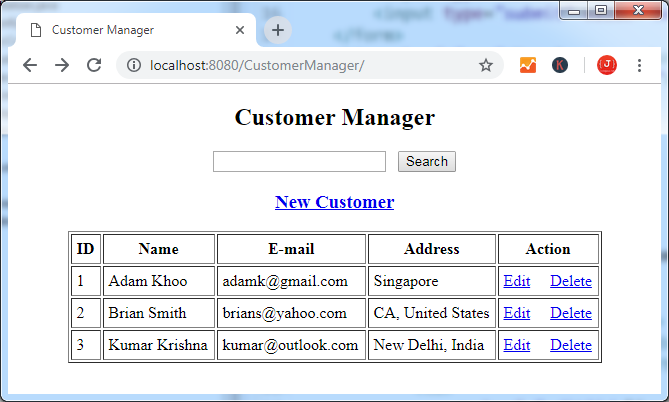
</html>Now you can run the website application. Add some rows in the table customer and access the URL http://localhost:8080/CustomerManager/, you should see something like this:
10. Code Create New Customer Feature
To implement the create new customer feature, we need to write two handler methods. The first one is to display the new customer form:@RequestMapping("/new")
public String newCustomerForm(Map<String, Object> model) {
Customer customer = new Customer();
model.put("customer", customer);
return "new_customer";
}And write code for the JSP page new_customer.jsp as follows:<%@ page language="java" contentType="text/html; charset=ISO-8859-1"
pageEncoding="ISO-8859-1"%>
<%@ taglib prefix="form" uri="http://www.springframework.org/tags/form"%>
<!DOCTYPE html PUBLIC "-//W3C//DTD HTML 4.01 Transitional//EN"
"http://www.w3.org/TR/html4/loose.dtd">
<html>
<head>
<meta http-equiv="Content-Type" content="text/html; charset=ISO-8859-1">
<title>New Customer</title>
</head>
<body>
<div align="center">
<h2>New Customer</h2>
<form:form action="save" method="post" modelAttribute="customer">
<table border="0" cellpadding="5">
<tr>
<td>Name: </td>
<td><form:input path="name" /></td>
</tr>
<tr>
<td>Email: </td>
<td><form:input path="email" /></td>
</tr>
<tr>
<td>Address: </td>
<td><form:input path="address" /></td>
</tr>
<tr>
<td colspan="2"><input type="submit" value="Save"></td>
</tr>
</table>
</form:form>
</div>
</body>
</html>Click the link New Customer in the home page, you should see the new customer form looks like this: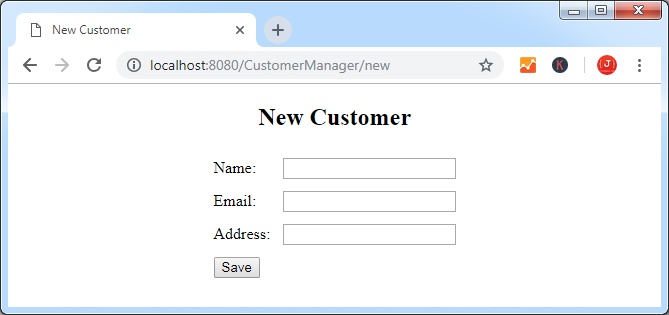 And the second handler method is to handle the Save button on this form:
@RequestMapping(value = "/save", method = RequestMethod.POST)
public String saveCustomer(@ModelAttribute("customer") Customer customer) {
	customerService.save(customer);
	return "redirect:/";
}
As you can see, it will redirect the client to the home page after the customer has been saved successfully.
11. Code Edit Customer Feature
To implement the edit/update customer feature, add the following handler method to the CustomerController class:@RequestMapping("/edit")
public ModelAndView editCustomerForm(@RequestParam long id) {
ModelAndView mav = new ModelAndView("edit_customer");
Customer customer = customerService.get(id);
mav.addObject("customer", customer);
return mav;
}This method will show the Edit customer form, so code the edit_customer.jsp file as follows:<%@ page language="java" contentType="text/html; charset=ISO-8859-1"
pageEncoding="ISO-8859-1"%>
<%@ taglib prefix="form" uri="http://www.springframework.org/tags/form"%>
<!DOCTYPE html PUBLIC "-//W3C//DTD HTML 4.01 Transitional//EN"
"http://www.w3.org/TR/html4/loose.dtd">
<html>
<head>
<meta http-equiv="Content-Type" content="text/html; charset=ISO-8859-1">
<title>Edit Customer</title>
</head>
<body>
<div align="center">
<h2>Edit Customer</h2>
<form:form action="save" method="post" modelAttribute="customer">
<table border="0" cellpadding="5">
<tr>
<td>ID: </td>
<td>${customer.id}
<form:hidden path="id"/>
</td>
</tr>
<tr>
<td>Name: </td>
<td><form:input path="name" /></td>
</tr>
<tr>
<td>Email: </td>
<td><form:input path="email" /></td>
</tr>
<tr>
<td>Address: </td>
<td><form:input path="address" /></td>
</tr>
<tr>
<td colspan="2"><input type="submit" value="Save"></td>
</tr>
</table>
</form:form>
</div>
</body>
</html>Click the Edit hyperlink next to a customer in the home page, the edit customer form should appear like this: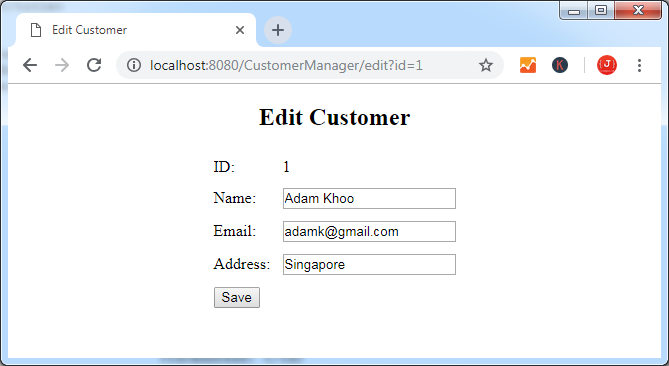 The handler method for the Save button is still the saveCustomer() method.
12. Code Delete Customer Feature
To implement the delete customer feature, add the following code to the CustomerController class:@RequestMapping("/delete")
public String deleteCustomerForm(@RequestParam long id) {
customerService.delete(id);
return "redirect:/";
}Click the Delete link next to a customer in the home page, it will be deleted and the list is refreshed.
13. Code Search Customer Feature
Finally, let's implement the search feature that allows the user to search for customers by typing a keyword. The search function looks for matching keywords in either three fields name, email or address so we need to write a custom method in the CustomerRepository interface like this:package net.codejava.customer;
import java.util.List;
import org.springframework.data.jpa.repository.Query;
import org.springframework.data.repository.CrudRepository;
import org.springframework.data.repository.query.Param;
public interface CustomerRepository extends CrudRepository<Customer, Long> {
@Query(value = "SELECT c FROM Customer c WHERE c.name LIKE '%' || :keyword || '%'"
+ " OR c.email LIKE '%' || :keyword || '%'"
+ " OR c.address LIKE '%' || :keyword || '%'")
public List<Customer> search(@Param("keyword") String keyword);
}You see, the search()method is just an abstract method annotated with the @Query annotation. The search query is JPA query.Then, add the following method in the CustomerService class:public List<Customer> search(String keyword) {
return repo.search(keyword);
}Implement the handler method in the controller class as follows:@RequestMapping("/search")
public ModelAndView search(@RequestParam String keyword) {
List<Customer> result = customerService.search(keyword);
ModelAndView mav = new ModelAndView("search");
mav.addObject("result", result);
return mav;
}And write code for the search result page as follows:<%@ page language="java" contentType="text/html; charset=ISO-8859-1"
pageEncoding="ISO-8859-1"%>
<%@ taglib uri="http://java.sun.com/jsp/jstl/core" prefix="c" %>
<!DOCTYPE html PUBLIC "-//W3C//DTD HTML 4.01 Transitional//EN"
"http://www.w3.org/TR/html4/loose.dtd">
<html>
<head>
<meta http-equiv="Content-Type" content="text/html; charset=ISO-8859-1">
<title>Search Result</title>
</head>
<body>
<div align="center">
<h2>Search Result</h2>
<table border="1" cellpadding="5">
<tr>
<th>ID</th>
<th>Name</th>
<th>E-mail</th>
<th>Address</th>
</tr>
<c:forEach items="${result}" var="customer">
<tr>
<td>${customer.id}</td>
<td>${customer.name}</td>
<td>${customer.email}</td>
<td>${customer.address}</td>
</tr>
</c:forEach>
</table>
</div>
</body>
</html>To test the search function, type a keyword into the search box in the home page, and hit Enter. You should see the search result page looks like this: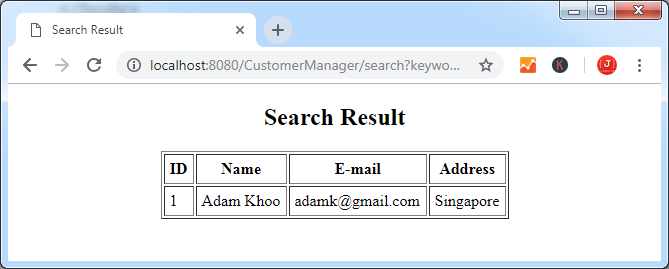 That's how to develop a Spring MVC web application using Spring Data JPA for the data access layer. You've seen Spring Data JPA greatly simplifies the code we need to write.For your reference, here's the final structure of the project in Eclipse IDE:
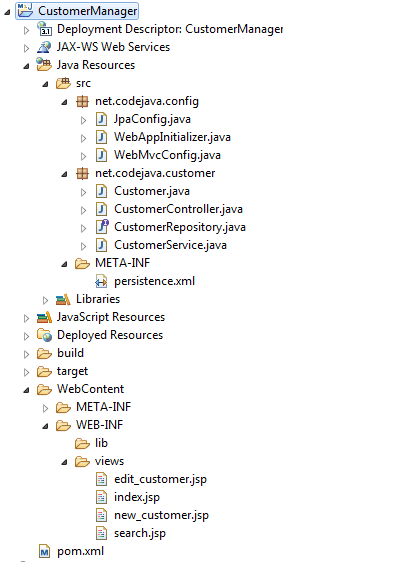 And you can download the sample project in the Attachments section below.
 Related Spring and Database Tutorials:
- Spring MVC with JdbcTemplate Example
- How to configure Spring MVC JdbcTemplate with JNDI Data Source in Tomcat
- Spring and Hibernate Integration Tutorial (XML Configuration)
- Understand Spring Data JPA with Simple Example
Other Spring Tutorials:
- Understand the core of Spring framework
- Understand Spring MVC
- Understand Spring AOP
- Spring MVC beginner tutorial with Spring Tool Suite IDE
- Spring MVC Form Handling Tutorial
- Spring MVC Form Validation Tutorial
- 14 Tips for Writing Spring MVC Controller
- Spring Web MVC Security Basic Example (XML Configuration)
About the Author:
 Nam Ha Minh is certified Java programmer (SCJP and SCWCD). He began programming with Java back in the days of Java 1.4 and has been passionate about it ever since. You can connect with him on Facebook and watch his Java videos on YouTube.
| [Sample Project for Spring MVC and Spring Data JPA] | 14 kB |
Comments
Thank you for this great Tuto.
I have an Error that so far I can't resolve:
Cannot resolve reference to bean 'entityManagerFactory' while setting constructor argument; nested exception is org.springframework.beans.factory.NoSuchBeanDefinitionException: No bean named 'entityManagerFactory' available
Could you PLZ help me to fixe it