Spring Authorization Server Example with OAuth 2 Client Credentials Grant Type and Database Users
- Details
- Written by Nam Ha Minh
- Last Updated on 04 April 2025 | Print Email
- Standard OAuth 2.0 Client Credentials workflow: clients can obtain new access tokens via the /oauth2/token endpoint
- JWT-based access tokens: access tokens are generated in JSON Web Token (JWT) format and can be customized as needed.
- Client credentials stored in a relational database: client ID, client secret and related information are stored in a MySQL database.
- Spring Boot 3.4.4
- Spring framework 6.2.5
- Spring Security 6.4.4
- Spring Security OAuth2 Authorization Server 1.4.2
Table of Content:
1. Why Persistent Client Credentials?
2. Database Design
3. Create New Spring Starter Project
4. Enable Spring Authorization Server
5. Code Data Access Layer
6. Implement Registered Client Repository
7. Test Get Access Token Endpoint
8. Customize Access Token Generation
1. Why Persistent Client Credentials?
According to the OAuth 2.0 Client Credentials grant type, clients must provide a valid client ID and client secret to obtain access tokens. In real-world applications, storing these credentials in a persistent storage solution—such as a database—is essential. This allows clients to be registered in real time and manage their credentials dynamically.Moreover, persisting client credentials in a database enables flexible management, such as adding, disabling, or removing credentials as needed. This approach enhances both the security and scalability of the system.
2. Database Design
To store client credentials in a relational database, we need a table named clients, which should include at least the following columns:- client_id: stores the client identifier
- client_secret: stores the client secret in encoded form (we’ll configure Spring Security use BCrypt password encoder)
- client_name: a meaningful, human-readable name for the client
- scope: stores the authority or role assigned to the client
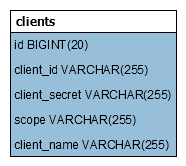 The data in this table should be managed by a separate application (e.g., an API Client Manager), while the authorization server will use it soley for authentication purposes.Now, let’s create a new database schema named rest_api_tests for the sample project we’re going to build below. The table will be automatically created by the application at startup.
 3. Create New Spring Starter Project
In your favorite Java IDE, create a new Spring Starter project with the following details:- Name: SpringAuthorizationServerDatabase
- Type: Maven
- Java version: 21
- Packaging: jar
- Language: Java
- Group Id: net.codejava
- Artifact Id: spring-auth-server-mysql
- Version: 1.0
- Package: net.codejava.oauth2
- Spring Boot version: 3.4.4
- Spring Data JPA
- Spring Security
- Spring OAuth2 Authorization Server
- MySQL JDBC Driver
<dependencies>
	<dependency>
		<groupId>org.springframework.boot</groupId>
		<artifactId>spring-boot-starter-data-jpa</artifactId>
	</dependency>
	<dependency>
		<groupId>org.springframework.boot</groupId>
		<artifactId>spring-boot-starter-oauth2-authorization-server</artifactId>
	</dependency>
	<dependency>
		<groupId>org.springframework.boot</groupId>
		<artifactId>spring-boot-starter-security</artifactId>
	</dependency>
	<dependency>
		<groupId>org.springframework.boot</groupId>
		<artifactId>spring-boot-starter-web</artifactId>
	</dependency>

	<dependency>
		<groupId>org.springframework.boot</groupId>
		<artifactId>spring-boot-devtools</artifactId>
		<scope>runtime</scope>
		<optional>true</optional>
	</dependency>
	<dependency>
		<groupId>com.mysql</groupId>
		<artifactId>mysql-connector-j</artifactId>
		<scope>runtime</scope>
	</dependency>
	<dependency>
		<groupId>org.springframework.boot</groupId>
		<artifactId>spring-boot-starter-test</artifactId>
		<scope>test</scope>
	</dependency>
	<dependency>
		<groupId>org.springframework.security</groupId>
		<artifactId>spring-security-test</artifactId>
		<scope>test</scope>
	</dependency>
</dependencies>
Note that the Spring Test and Spring Security Test dependencies are added automatically by Spring Initializr.
4. Enable Spring Authorization Server
Next, let’s create a new Spring configuration class to enable the authorization server, starting with the following initial code:package net.codejava.oauth2;
import org.springframework.context.annotation.Bean;
import org.springframework.context.annotation.Configuration;
import org.springframework.security.config.Customizer;
import org.springframework.security.config.annotation.web.builders.HttpSecurity;
import org.springframework.security.oauth2.server.authorization.config.annotation.web.configurers.OAuth2AuthorizationServerConfigurer;
import org.springframework.security.web.SecurityFilterChain;
@Configuration
public class AuthorizationServerConfig {
@Bean
SecurityFilterChain authorizationServerFilterChain(HttpSecurity http)
throws Exception {
http.with(OAuth2AuthorizationServerConfigurer.authorizationServer(),
Customizer.withDefaults());
return http.build();
}
}This code snippet activates the authorization server with default security settings for the application: all requests must be authenticated, except for the /oauth2/token endpoint, which handles client requests for obtaining new access tokens.The server will not start until a RegisteredClientRepository is configured, which we’ll set up after implementing the data access layer. 5. Code Data Access Layer
Since we’re using aMySQL database to store client credentials, we need to update the application configuration file (application.properties) by specifying the necessary datasource properties. This allows Spring Data JPA/Hibernate to connect to the MySQL server. Add the following properties:spring.datasource.url=jdbc:mysql://localhost:3306/rest_api_tests spring.datasource.username=root spring.datasource.password=passwordRemember to update the database URL, username and password to match your MySQL server configuration. Also, add the following properties to enable Hibernate to generate database table from Java entity class (forward engineering) and to print SQL statements in the console for easier debugging and testing:
spring.jpa.hibernate.ddl-auto=update
spring.jpa.show-sql=true
spring.jpa.properties.hibernate.format_sql=true
Next, we need to code a Java entity class that maps to the clients table using JPA annotations. The code is as follows:
package net.codejava.oauth2;

import jakarta.persistence.Entity;
import jakarta.persistence.GeneratedValue;
import jakarta.persistence.GenerationType;
import jakarta.persistence.Id;
import jakarta.persistence.Table;

@Entity
@Table(name = "clients")
public class Client {

	@Id @GeneratedValue(strategy = GenerationType.IDENTITY)
	private Long id;
	private String clientName;
	private String clientId;
	private String clientSecret;
	private String scope;

	public static Client clientId(String cid) {
		Client newClient = new Client();
		newClient.setClientId(cid);
		return newClient;
	}

	public Client name(String name) {
		this.clientName = name;
		return this;
	}

	public Client scope(String scope) {
		this.scope = scope;
		return this;
	}

	// getters and setters are not shown for brevity

}
And define the corresponding JPA repository as follows:package net.codejava.oauth2;
import java.util.Optional;
import org.springframework.data.jpa.repository.JpaRepository;
public interface ClientRepository extends JpaRepository<Client, Long> {
Optional<Client> findByClientId(String clientId);
}Spring Data JPA will generate a proxy object that implements the findByClientId() method, which will be used by the server to authenticate clients.Use the following test class to perform unit tests:package net.codejava.oauth2;
import static org.assertj.core.api.Assertions.assertThat;
import java.util.List;
import java.util.Optional;
import org.junit.jupiter.api.Test;
import org.springframework.beans.factory.annotation.Autowired;
import org.springframework.boot.test.autoconfigure.jdbc.AutoConfigureTestDatabase;
import org.springframework.boot.test.autoconfigure.jdbc.AutoConfigureTestDatabase.Replace;
import org.springframework.boot.test.autoconfigure.orm.jpa.DataJpaTest;
import org.springframework.security.crypto.bcrypt.BCryptPasswordEncoder;
import org.springframework.security.crypto.password.PasswordEncoder;
import org.springframework.test.annotation.Rollback;
@DataJpaTest
@AutoConfigureTestDatabase(replace = Replace.NONE)
@Rollback(false)
public class ClientRepositoryTests {
@Autowired private ClientRepository repo;
@Test
public void testAddClients() {
Client client1 = Client.clientId("client-1").name("John Doe").scope("read");
Client client2 = Client.clientId("client-2").name("Max One").scope("read");
Client client3 = Client.clientId("client-3").name("Devi Kumar").scope("write");
Client client4 = Client.clientId("client-4").name("Bob Kai").scope("write");
PasswordEncoder encoder = new BCryptPasswordEncoder();
client1.setClientSecret(encoder.encode("pass1"));
client2.setClientSecret(encoder.encode("pass2"));
client3.setClientSecret(encoder.encode("pass3"));
client4.setClientSecret(encoder.encode("pass4"));
repo.saveAll(List.of(client1, client2, client3, client4));
}
@Test
public void testFindByClientId() {
String clientId = "client-3";
Optional<Client> result = repo.findByClientId(clientId);
assertThat(result).isPresent();
}
}Run the testAddClients() method to persist four client credentials into the database. We’ll use this dummy data later to test the Get Access Token API. As you can see, we use BCryptPasswordEncoder to encode the client secrets.Also, run the testFindByClientId() method to verify that a client can be retrieved by a given client ID. 
Spring Boot REST APIs Ultimate Course
Hands-on REST API Development with Spring Boot: Design, Implement, Document, Secure, Test, Consume RESTful APIs
6. Implement Registered Client Repository
The next step is to configure a RegisteredClientRepository bean that uses the ClientRepository interface. This allows the server to authenticate clients by validating their credentials against the database. Add the following code to the AuthorizationServerConfig class:@Bean
public RegisteredClientRepository registeredClientRepository(ClientRepository clientRepo) {
return new RegisteredClientRepository() {
@Override
public void save(RegisteredClient registeredClient) {
}
@Override
public RegisteredClient findById(String id) {
return null;
}
@Override
public RegisteredClient findByClientId(String clientId) {
Optional<Client> findResult = clientRepo.findByClientId(clientId);
if (findResult.isEmpty()) return null;
Client client = findResult.get();
return RegisteredClient.withId(client.getId().toString())
.clientId(client.getClientId())
.clientSecret(client.getClientSecret())
.scope(client.getScope())
.authorizationGrantType(AuthorizationGrantType.CLIENT_CREDENTIALS)
.clientAuthenticationMethod(ClientAuthenticationMethod.CLIENT_SECRET_POST)
.build();
}
};
}This code requires some explanation:- The method creates a new instance of RegisteredClientRepository and implements the findByClientId() method, which returns a RegisteredClient object based on the provided client ID. Spring Security uses the details of this object for authentication, such as verifying the client secret.
- It calls the findByClientId() method from the ClientRepository interface to check whether a client with the given ID exists in the database. If found, it returns a RegisteredClient object with details copied from the Client entity (ID, client ID, client secret, and scope).
- The authorization grant type is set to CLIENT_CREDENTIALS, indicating that the client will use the OAuth 2.0 Client Credentials flow to obtain access tokens.
- The client authentication method is set to CLIENT_SECRET_POST, which specifies that the client will send client ID and secret as parameters in an HTTP POST request.
@Bean
PasswordEncoder passwordEncoder() {
	return new BCryptPasswordEncoder();
}
Spring Security will use this password encoder to verify the client secrets stored in the database, which are encoded using the BCrypt password encoder.With that, the setup for the Spring authorization server is complete. Now we can start the application to test it out. 7. Test Get Access Token Endpoint
To obtain a new access token from the authorization server using the OAuth2.0 Client Credentials grant type, a client must send a request with the following details:- Endpoint: /oauth2/token
- HTTP method: POST
- Required parameters: client_id, client_secret and grant_type=client_credentials
curl -d "grant_type=client_credentials&client-id=…&client-secret=…" localhost:8080/oauth2/tokenFor example, try the following command:
curl -d "grant_type=client_credentials&client_id=client-1&client_secret=abc" localhost:8080/oauth2/token -vThis command sends client_id as client-1 and client_secret as abc. The server will return an HTTP 401 Unauthorized status because the client secret is invalid, along with the following JSON in the response body:
{"error":"invalid_client"}Now, let’s try making another request with valid a client id and secret, using a command like this:curl -d "grant_type=client_credentials&client_id=client-1&client_secret=pass1" localhost:8080/oauth2/token -v | jqThe server will return an HTTP 200 OK status, along with a newly issued access token included in a JSON object in the response body, as shown below:
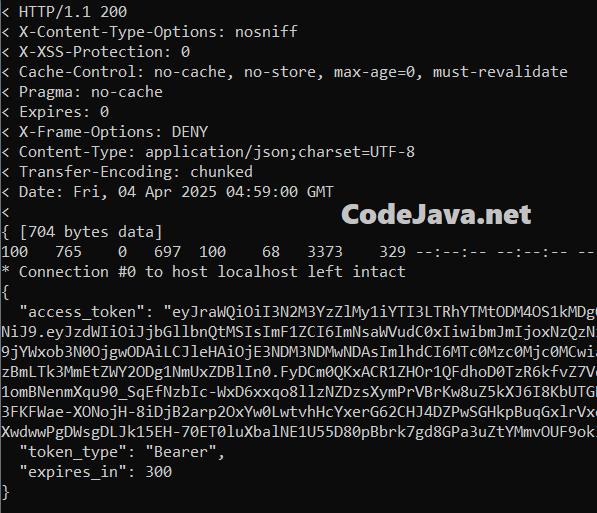 As you can see, the JSON response contains three fields:
- access_token: the issued access token in JWT format, encoded using Base64.
- token_type: always set to Bearer when using OAuth 2.0 Client Credentials grant type.
- expires_in: indicates the token’s expiration time in seconds. By default, the Spring authorization server sets the token to expire in 5 minutes (300 seconds).
{
  "kid": "77c7c6e3-ba27-4aa3-8389-d084cb9f4eeb",
  "alg": "RS256"
}
And the decoded payload:{
"sub": "client-1",
"aud": "client-1",
"nbf": 1743742740,
"iss": "http://localhost:8080",
"exp": 1743743040,
"iat": 1743742740,
"jti": "e33c35f5-7624-4c0f-972a-ef68856e1d0e"
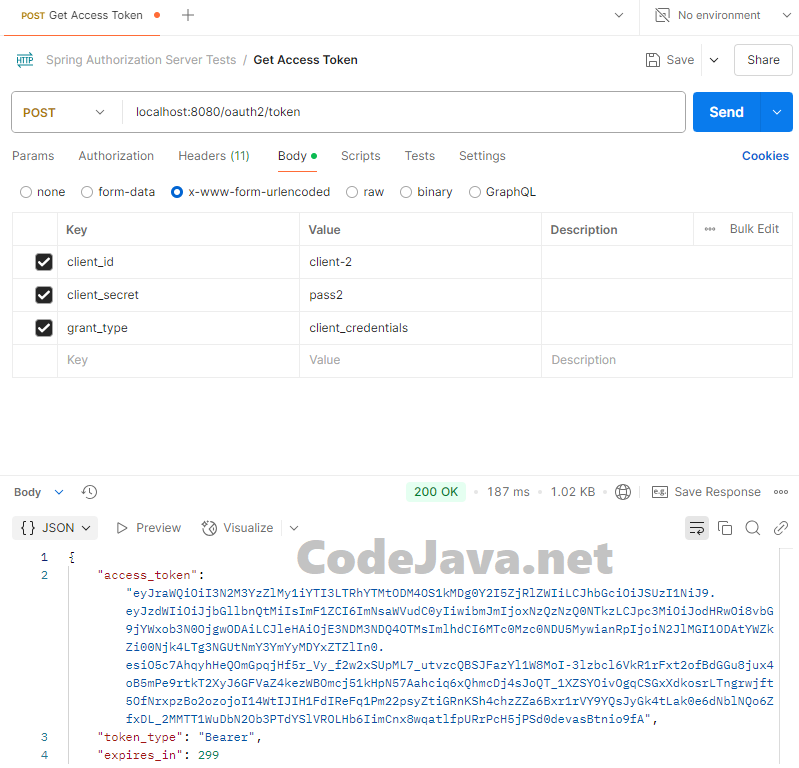
}Read this article to learn more about the structure and meaning of the information contained in a JWT.To test the Get Access Token API using Postman, create a new request with the following details:- Method: POST
- URL: localhost:8080/oauth2/token
- Body: Choose x-www-form-urlencoded and include the following parameters: client_id, client_secret and grant_type.
 You can then use the access token returned in the response to make API calls to protected resources on the server - for example, by including it in the HTTP Authorization request header.However, the generated access token might not meet certain requirements, such as missing scope/authority information or having too short expiry time. In such cases, Spring authorization server allows you to customize the access token generation, as described below.
 8. Customize Access Token Generation
You can customize the claims included in the payload of access tokens issued to clients by declaring a bean of type OAuth2TokenCustomizer in your configuration class. For example:@Bean
public OAuth2TokenCustomizer<JwtEncodingContext> tokenCustomizer() {
return (context) -> {
if (OAuth2TokenType.ACCESS_TOKEN.equals(context.getTokenType())) {
RegisteredClient client = context.getRegisteredClient();
Builder builder = context.getClaims();
builder.issuer("CodeJava");
builder.expiresAt(Instant.now().plus(10, ChronoUnit.MINUTES));
builder.claim("scope", client.getScopes());
}
};
}This code modifies the issued access token by changing the issuer to “CodeJava” (default is a URL), increasing the expiration time to 10 minutes, and adding the “scope” claim.Test the Get Access Token API again and decode the new access token, you’ll see that the changes have been successfully applied:{
"sub": "client-2",
"aud": "client-2",
"nbf": 1743746260,
"scope": [
"read"
],
"iss": "CodeJava",
"exp": 1743746860,
"iat": 1743746260,
"jti": "54555db1-72a7-4eb0-a907-3b40502e1109"
}Read this article to learn more about access token customization with Spring authorization server. Conclusion
Throughout this tutorial, you have learned how to implement a standard authorization server for securing REST APIs using the Spring Security OAuth2 Authorization Server library. Specifically, I showed you how to store client credentials in a relational database and configure Spring authorization server to authenticate the clients properly.You also learned how to test the access token endpoint using both curl and Postman, as well as how to customize the generated JWTs to meet your specific requirements.I hope you found the code examples and explanations in this guide helpful for building secure and reliable REST APIs. To watch the coding in action, watch the following video:Related Articles:
- How to Customize Access Token Generation in Spring Authorization Server
- How to Decode JWTs and Verify Signature
- Testing REST APIs using curl
- Testing REST APIs using Postman
- JSON Web Token (JWT) for Beginners
Other REST API Tutorials:
- Java RESTful Web Services Tutorial for Beginner with Jersey and Tomcat
- Java CRUD RESTful Web Services Examples with Jersey and Tomcat
- Spring Boot Hello World RESTful Web Services Tutorial
- Spring Boot RESTful CRUD API Examples with MySQL database
- Spring Boot File Download and Upload REST API Examples
- Spring Boot REST API CRUD with HATEOAS Tutorial
- How to Use curl for Testing REST APIs (Test CRUD Operations)
- How to Use Postman for Testing REST APIs (Test CRUD Operations)
About the Author:
 Nam Ha Minh is certified Java programmer (SCJP and SCWCD). He began programming with Java back in the days of Java 1.4 and has been passionate about it ever since. You can connect with him on Facebook and watch his Java videos on YouTube.
| [Sample Spring Authorization Server Project] | 34 kB |