Spring Boot File Download and Upload REST API Examples
- Details
- Written by Nam Ha Minh
- Last Updated on 16 November 2023 | Print Email
1. File Upload & Download API Description
This is the description of the file upload API:- End point URI: /uploadFile- HTTP method: POST- Request body has a parameter named “file” along with multipart file data.- Response status: + BAD_REQUEST if the request doesn’t contain multipart file data + METHOD_NOT_ALLOWED if the request method is not POST{
"fileName": "Photo.jpg",
"downloadUri": "/downloadFile/AE7GPzg1",
"size": 13573
}Note that the alphanumeric string at the end of the downloadUri field is the file code which is used in file download API.And below is description of the file download API:- End point URI: /downloadFile/{fileCode}- HTTP method: GET- Response status: + NOT_FOUND if no file found for the given file code + METHOD_NOT_ALLOWED if the request method is not POST + INTERNAL_SERVER_ERROR if any IO error occurs on the server + OK if a file found and the response contains file data
2. Add Required Dependencies
Make sure you have the following dependencies in the pom.xml file:<dependency>
<groupId>org.springframework.boot</groupId>
<artifactId>spring-boot-starter-web</artifactId>
</dependency>
<dependency>
<groupId>org.apache.commons</groupId>
<artifactId>commons-lang3</artifactId>
</dependency>The spring-boot-starter-web dependency is enough for implementing RESTful webservices and multipart file upload functionality. And the commons-lang3 dependency is for using a utility class that generate random alphanumeric strings (used as file identifier or file code).
3. Code File Upload Utility Class
Next, code a utility class that reads the multipart file data from the request and then saves the file on to disk. Below is the code:package net.codejava.upload;
import java.io.IOException;
import java.io.InputStream;
import java.nio.file.Files;
import java.nio.file.Path;
import java.nio.file.Paths;
import java.nio.file.StandardCopyOption;
import org.apache.commons.lang3.RandomStringUtils;
import org.springframework.web.multipart.MultipartFile;
public class FileUploadUtil {
public static String saveFile(String fileName, MultipartFile multipartFile)
throws IOException {
Path uploadPath = Paths.get("Files-Upload");
if (!Files.exists(uploadPath)) {
Files.createDirectories(uploadPath);
}
String fileCode = RandomStringUtils.randomAlphanumeric(8);
try (InputStream inputStream = multipartFile.getInputStream()) {
Path filePath = uploadPath.resolve(fileCode + "-" + fileName);
Files.copy(inputStream, filePath, StandardCopyOption.REPLACE_EXISTING);
} catch (IOException ioe) {
throw new IOException("Could not save file: " + fileName, ioe);
}
return fileCode;
}
}You see, in the saveFile() method, it creates the Files-Upload directory if not exists to store the uploaded files. And it inserts 8 alphanumeric characters before the file name, so in the file download API it can identify a file based on an identifier.Finally, the method returns the fileCode which is then used in download URI field of the response body.
4. Implement File Upload API
Next, code a @RestController class to implement the file upload API as shown below:package net.codejava.upload;
import java.io.IOException;
import org.springframework.http.HttpStatus;
import org.springframework.http.ResponseEntity;
import org.springframework.util.StringUtils;
import org.springframework.web.bind.annotation.PostMapping;
import org.springframework.web.bind.annotation.RequestParam;
import org.springframework.web.bind.annotation.RestController;
import org.springframework.web.multipart.MultipartFile;
@RestController
public class FileUploadController {
@PostMapping("/uploadFile")
public ResponseEntity<FileUploadResponse> uploadFile(
@RequestParam("file") MultipartFile multipartFile)
throws IOException {
String fileName = StringUtils.cleanPath(multipartFile.getOriginalFilename());
long size = multipartFile.getSize();
String filecode = FileUploadUtil.saveFile(fileName, multipartFile);
FileUploadResponse response = new FileUploadResponse();
response.setFileName(fileName);
response.setSize(size);
response.setDownloadUri("/downloadFile/" + filecode);
return new ResponseEntity<>(response, HttpStatus.OK);
}
}You see, the handler method uploadFile() requires a multipart in the request have the name “file”. Spring MVC uses Java Servlet API to handle file uploaded from the client behind the scene. So we just need to write code that saves the file to a specific directory on disk.And you can notice, it puts a FileUploadResponse object into the response body. So code the FileUploadResponse class as follows:package net.codejava.upload;
public class FileUploadResponse {
private String fileName;
private String downloadUri;
private long size;
// getters and setters are not shown for brevity
}Spring Web MVC will serialize this object, which results in a JSON document sent to the client - as required by the API description.
Spring Boot REST APIs Ultimate Course
Hands-on REST API Development with Spring Boot: Design, Implement, Document, Secure, Test, Consume RESTful APIs
5. Test File Upload API with Postman
Testing the file upload API using Postman is quite simple. Create a HTTP POST request with the URL http://localhost:8080/uploadFile. And then in the request’s body, select form-data, add a new key with name “file” and type is File. Then select a file in the Value column: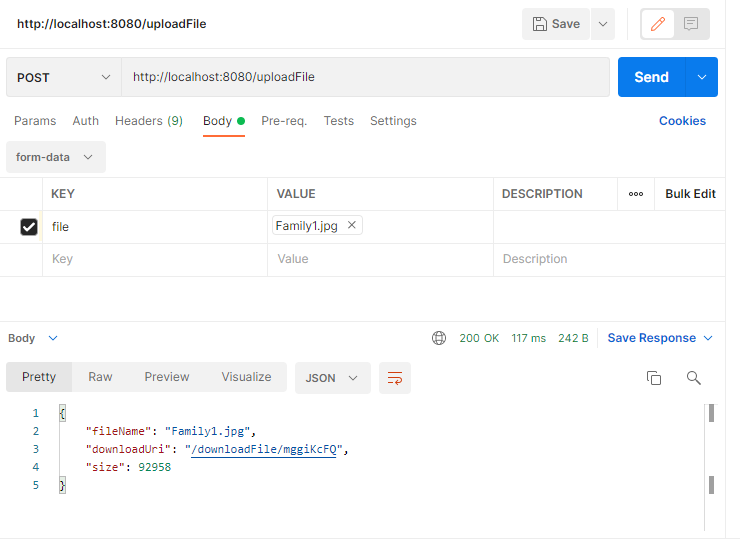 Click Send. You should see the response’s body is a JSON document as shown in the screenshot - meaning that the file has been uploaded successfully and client can use the download URI in the response to download the file.And check the project directory, you should see the file stored in the Files-Upload directory, and the file name starts with an 8-character code, something like mggiKcFQ-Family1.jpg
6. Code File Download Utility Class
To implement the file download API, code a utility class that looks for a file that has a given identifier (fileCode) in the Files-Upload directory. Below is the code:package net.codejava.upload;
import java.io.IOException;
import java.nio.file.Files;
import java.nio.file.Path;
import java.nio.file.Paths;
import org.springframework.core.io.Resource;
import org.springframework.core.io.UrlResource;
public class FileDownloadUtil {
private Path foundFile;
public Resource getFileAsResource(String fileCode) throws IOException {
Path dirPath = Paths.get("Files-Upload");
Files.list(dirPath).forEach(file -> {
if (file.getFileName().toString().startsWith(fileCode)) {
foundFile = file;
return;
}
});
if (foundFile != null) {
return new UrlResource(foundFile.toUri());
}
return null;
}
}You see, the method getFileAsResource requires a String parameter fileCode that acts as an identifier. It returns a Resource object if a matching file is found, or null otherwise.
7. Implement File Download API
Next, write code for a @RestController to implement the file download API as follows:package net.codejava.upload;
import java.io.IOException;
import org.springframework.core.io.Resource;
import org.springframework.http.HttpHeaders;
import org.springframework.http.HttpStatus;
import org.springframework.http.MediaType;
import org.springframework.http.ResponseEntity;
import org.springframework.web.bind.annotation.GetMapping;
import org.springframework.web.bind.annotation.PathVariable;
import org.springframework.web.bind.annotation.RestController;
@RestController
public class FileDownloadController {
@GetMapping("/downloadFile/{fileCode}")
public ResponseEntity<?> downloadFile(@PathVariable("fileCode") String fileCode) {
FileDownloadUtil downloadUtil = new FileDownloadUtil();
Resource resource = null;
try {
resource = downloadUtil.getFileAsResource(fileCode);
} catch (IOException e) {
return ResponseEntity.internalServerError().build();
}
if (resource == null) {
return new ResponseEntity<>("File not found", HttpStatus.NOT_FOUND);
}
String contentType = "application/octet-stream";
String headerValue = "attachment; filename=\"" + resource.getFilename() + "\"";
return ResponseEntity.ok()
.contentType(MediaType.parseMediaType(contentType))
.header(HttpHeaders.CONTENT_DISPOSITION, headerValue)
.body(resource);
}
}As you see, the handler method uses the FileDownloadUtil class to look for a matching file based on the given fileCode. If no file found, it returns HTTP status NOT FOUND (404). If a file found, it sends the file resource as body of the response.Also note the statements that set the content type and header of the response.
8. Test File Download API with Postman
In Postman, create a new HTTP GET request with the following URL (copy the file code in the downloadUri field of upload’s response):http://localhost:8080/downloadFile/mggiKcFQ
If you will see some special characters in the response’s body, which is the content of the file downloaded. You can click Save Response > Save to a file to store the file on disk: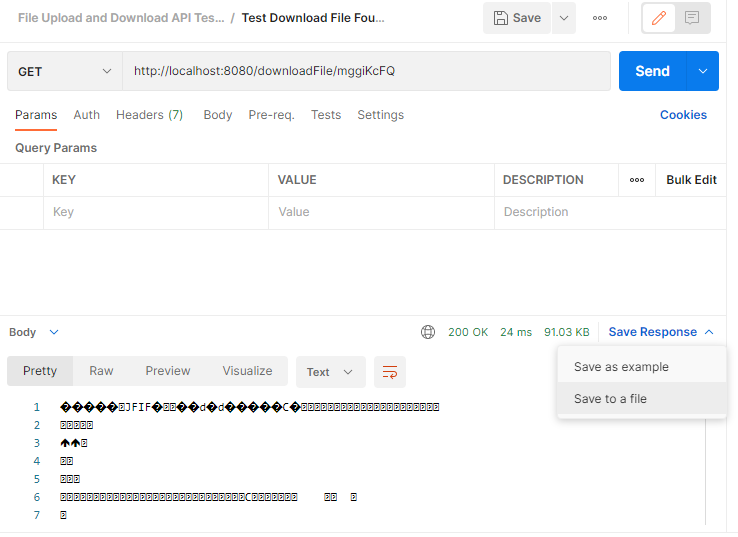 Those are some code examples about File upload API and File download API implemented in Java and Spring framework. You can get the sample project code from this GitHub repo.To see the coding in action, I recommend you watch my video below:
 Related Tutorials:
- Spring Boot File Upload Tutorial (Upload and Display Images)
- Spring Boot Upload Multiple Files Example
- Spring Boot File Upload to Amazon S3 Example
Other Spring Boot Tutorials:
- Spring Boot Export Data to CSV Example
- Spring Boot Hello World Example
- Spring Boot automatic restart using Spring Boot DevTools
- Spring Boot Form Handling Tutorial with Spring Form Tags and JSP
- How to create a Spring Boot Web Application (Spring MVC with JSP/ThymeLeaf)
- Spring Boot - Spring Data JPA - MySQL Example
- Spring Boot Hello World RESTful Web Services Tutorial
- How to use JDBC with Spring Boot
- Spring Boot CRUD Web Application with JDBC - Thymeleaf - Oracle
- Spring Boot RESTful CRUD API Examples with MySQL database
- How to package Spring Boot application to JAR and WAR
- Spring Boot Security Authentication with JPA, Hibernate and MySQL
- Spring Data JPA Paging and Sorting Examples
- Spring Boot Error Handling Guide
About the Author:
 Nam Ha Minh is certified Java programmer (SCJP and SCWCD). He began programming with Java back in the days of Java 1.4 and has been passionate about it ever since. You can connect with him on Facebook and watch his Java videos on YouTube.
Comments