Java RESTful Web Services Tutorial for Beginner with Jersey and Tomcat
- Details
- Written by Nam Ha Minh
- Last Updated on 05 November 2023 | Print Email
1. Create Project and Specify Jersey Dependency
In Eclipse IDE, create a Dynamic Java Web project named as HelloREST. And convert it to Maven project by right clicking on the project, click Configure > Convert to Maven project. Open the pom.xml file and declare the following dependency:<dependencies> <dependency> <groupId>org.glassfish.jersey.containers</groupId> <artifactId>jersey-container-servlet</artifactId> <version>2.25.1</version> </dependency> </dependencies>This dependency is required to develop RESTful web services in Java, using Jersey framework – an implementation of Java API for RESTful Web Services (JAX-RS).Use the version 2.25.x if your Tomcat running on JDK 8. In case you use JDK 11 or later, you should use newer version, e.g. Jersey 2.29.1 like this:
<dependency>
	<groupId>org.glassfish.jersey.containers</groupId>
	<artifactId>jersey-container-servlet</artifactId>
	<version>2.29.1</version>
</dependency>
<dependency>
	<groupId>org.glassfish.jersey.inject</groupId>
	<artifactId>jersey-hk2</artifactId>
	<version>2.29.1</version>
</dependency>
For Jersey 2.26.x or newer, you must also declare the Jersey Inject dependency as shown above. So let use the Jersey version 2.29.1 because it works well both on JDK 8 and recent JDK versions (JDK 11 or newer).
2. Code a Hello World RESTful Web Service
package net.codejava;


import javax.ws.rs.GET;
import javax.ws.rs.Path;
import javax.ws.rs.Produces;
import javax.ws.rs.core.MediaType;

@Path("/bonjour")
public class HelloResource {

	@GET
	@Produces(MediaType.TEXT_PLAIN)
	public String direBonjour() {
		return "Bonjour, tout le monde!";
	}
}
Look, this is your first class for RESTful web services. Let me explain:The @Path annotation defines the relative URL that forms the URI that identifies a resource. You can use this annotation on both class level or method level.The @GET annotation specifies that the annotated method, direBonjour() handles HTTP GET request. Jersey provides annotations corresponding to HTTP methods: @POST, @PUT, @DELETE…The @Produces annotation specifies the content type of the response, which is text plain in our code. You can also specify text/xml, text/html, JSON, etc.And you can see the method direBonjour() returns a plain text, saying hello world in French – as response to the clients.
3. Configure Jersey Servlet Container
Next, we need configure Jersey servlet in the web deployment descriptor (web.xml) file like this:<servlet> <servlet-name>Jersey REST Service</servlet-name> <servlet-class>org.glassfish.jersey.servlet.ServletContainer</servlet-class> <init-param> <param-name>jersey.config.server.provider.packages</param-name> <param-value>net.codejava</param-value> </init-param> <load-on-startup>1</load-on-startup> </servlet> <servlet-mapping> <servlet-name>Jersey REST Service</servlet-name> <url-pattern>/rest/*</url-pattern> </servlet-mapping>Note that we need to specify the package name that contains the classes that need to be exposed as RESTful web services, as an initialization parameter of Jersey servlet; and the URL pattern will be handled by Jersey servlet container.Now, you can add this project to Tomcat and start the server to test the web service.
4. Test RESTful Web Service using web browser
Open a web browser (e.g. Chrome) and type the following URL:http://localhost:8080/HelloREST/rest/bonjour
Then you should see the following page: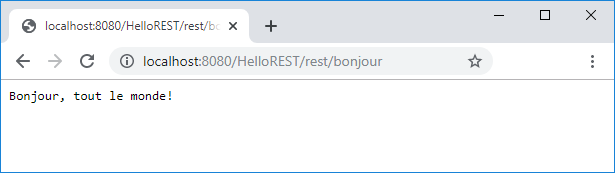 You see, the browser displays the plain text response sent by the web service. Now, add second method to the HelloResource class:
@GET
@Produces(MediaType.TEXT_HTML)
public String sayHTMLHello() {
	return "<html><title>Hello</title><body><h1>Bonjour, tout le monde!</h1><body></html>";
}
This method returns a HTML response. Refresh the browser and you should see: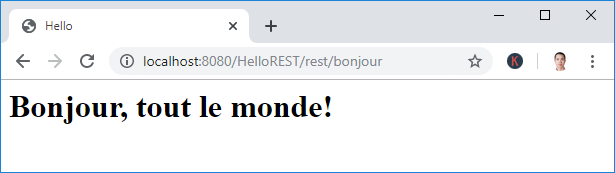 You see, the browser now shows the HTML response sent from the web service (a web browser always expects Text/HTML response). That means with the same URI, the response representation can be different, depending on content type accepted by the clients.
 5. Using JSON for RESTful web services
JSON is a preferred format for data representation in RESTful web services because of its simplicity and lightweight.To use JSON with Jersey, you need to add the following dependency to the pom.xml file:<dependency> <groupId>org.glassfish.jersey.media</groupId> <artifactId>jersey-media-json-jackson</artifactId> <version>2.29.1</version> </dependency>Now, update the HelloResource class to have a new method that produces JSON response, as follows:
@GET
@Produces(MediaType.APPLICATION_JSON)
public String sayJsonHello() {
	return "{\"name\":\"greeting\", \"message\":\"Bonjour tout le monde!\"}";
}
This method returns a simple piece JSON data. If you refresh the browser, you will see nothing changes because the browser doesn’t expect JSON response by default. 
Spring Boot REST APIs Ultimate Course
Hands-on REST API Development with Spring Boot: Design, Implement, Document, Secure, Test, Consume RESTful APIs.
6. Test RESTful Web Service using curl
curl is a command-line tool which is widely used to test RESTful web services APIs. If you’re using Windows 10, curl is shipped with the operating system by default. If not, you can download curl here.Type the following command to test our web service:curl http://localhost:8080/HelloREST/rest/bonjour
Then you can see JSON response:{"name":"greeting", "message":"Bonjour tout le monde!"}You can use the –v option (versbose) to see more details such as request headers and response headers. For example:curl -v http://localhost:8080/HelloREST/rest/bonjour
Then you can see the output something like this: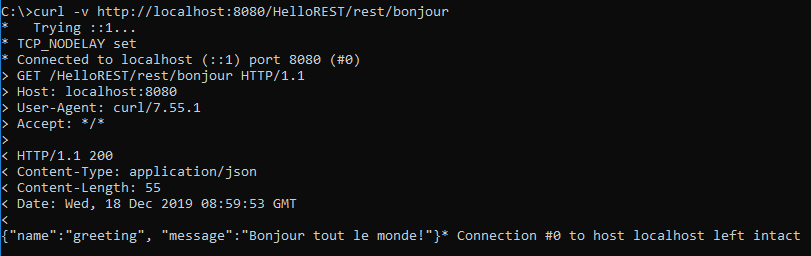 You can use the –H option to specify a HTTP header in the request. For example:
curl -H "Accept: text/html" http://localhost:8080/HelloREST/rest/bonjour
This command tells the server that the client expects response format to be of text/html. Hence the following response:<html><title>Hello</title><body><h1>Bonjour, tout le monde!</h1><body></html>And the following curl command will get plain text response from the server:
curl -H "Accept: text/plain" http://localhost:8080/HelloREST/rest/bonjour
7. Test RESTful Web Service using Postman
Postman is a GUI tool that can be used to test web service APIs. Click here download and install Postman on your computer (you have to create an account to use – free). Then create a new collection and a request under this collection. Then type a URL and click Send, as shown below: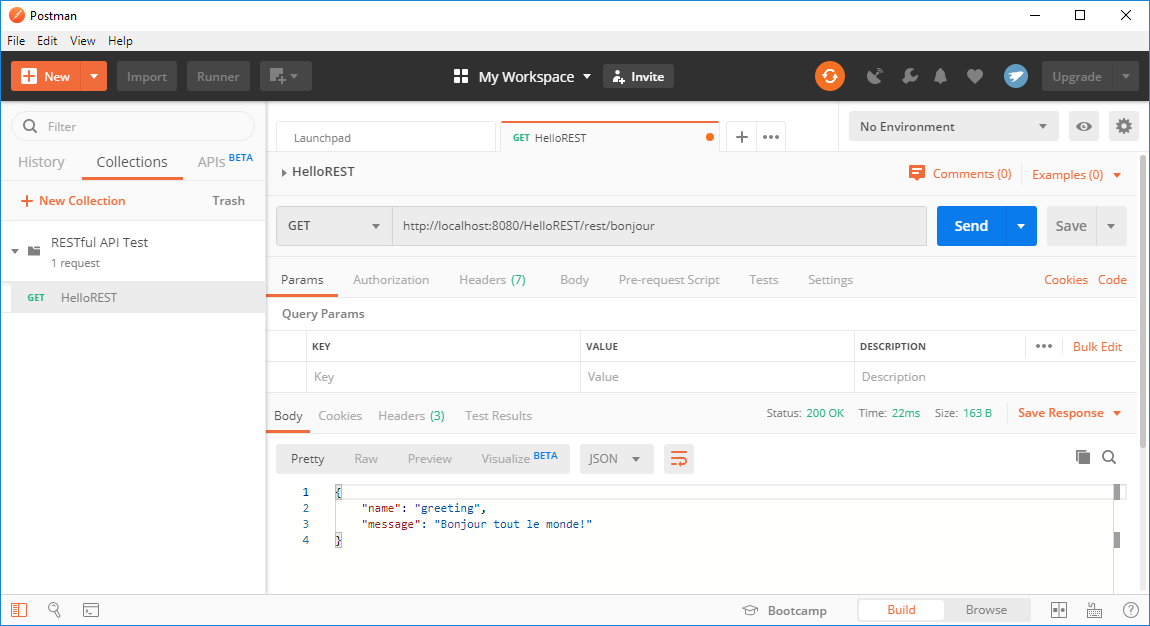 As you can see, Postman is easier to use and more advanced than curl.
 8. Code a RESTful Web Service Client program
You can use Jersey Client API to write client programs that consume RESTful web services. Create a new Maven project, e.g. HelloClient and add the following dependencies to the pom.xml file:<dependency> <groupId>org.glassfish.jersey.core</groupId> <artifactId>jersey-client</artifactId> <version>2.29.1</version> </dependency> <dependency> <groupId>org.glassfish.jersey.inject</groupId> <artifactId>jersey-hk2</artifactId> <version>2.29.1</version> </dependency>Then code a simple RESTful web service client program as follows:
package net.codejava;

import javax.ws.rs.client.Client;
import javax.ws.rs.client.ClientBuilder;
import javax.ws.rs.client.WebTarget;
import javax.ws.rs.core.MediaType;

import org.glassfish.jersey.client.ClientConfig;


public class HelloClient {

	public static void main(String[] args) {
		String uri = "http://localhost:8080/HelloREST/rest/bonjour";
		ClientConfig config = new ClientConfig();
		Client client = ClientBuilder.newClient(config);
		WebTarget target = client.target(uri);

		String response = target.request()
					.accept(MediaType.APPLICATION_JSON)
					.get(String.class);

		System.out.println(response);

	}

}
This program simply sends a GET request to the server at the specified URI and reads the response. Run this program and you should see the following output:{"name":"greeting", "message":"Bonjour tout le monde!"}
This is JSON response because the client expects application/json as the accepted media type.Congratulations, you have done your first hello world RESTful web services application, with both server and client. For your reference, you can download the sample project in the attachments section below, or get the sample codes from this GitHub repo.You can also watch the video version of this tutorial below: What's Next? I recommend you follow this one: Java CRUD RESTful Web Services Examples with Jersey and TomcatRecommended Course:
Other Java Web Services Tutorial:
- Java CRUD RESTful Web Services Examples with Jersey and Tomcat
- Java Client Server XML Web Services (JAX-WS) Tutorial
- Java Web Services Tutorial using Apache Axis2, Ant and Tomcat
- How to code and deploy Java XML Web Services (JAX-WS) on Tomcat
- Monitoring SOAP Messages using TCP/IP Monitor in Eclipse
- Using MTOM to optimize binary data transfer with JAX-WS web services
- Java Web Services Binary Data Transfer Example (base64 encoding)
Spring-based Web Services and REST API Tutorials:
- Spring Boot Hello World RESTful Web Services Tutorial
- Spring Boot RESTful CRUD API Examples with MySQL database
- Spring Boot File Download and Upload REST API Examples
- Spring Boot REST API CRUD with HATEOAS Tutorial
About the Author:
 Nam Ha Minh is certified Java programmer (SCJP and SCWCD). He began programming with Java back in the days of Java 1.4 and has been passionate about it ever since. You can connect with him on Facebook and watch his Java videos on YouTube.
| [RESTful client server project] | 20 kB |
Comments
It was very interesting and useful to see your indications...
What are you doing now? something interesting??
i was getting error 415 unsupported media, I was messing that last dependency
Kindly check possible solutions in this video: youtu.be/t7VuQBHXXrM
first of all, thank you very much for sharing all the information.
I followed all the steps (and double checked the paths in the resources and servlet mapping) but, when I try to open the URL I'm getting an HTTP 404 - Not Found Error. Tomcat is telling me "The origin server did not find a current representation for the target resource or is not willing to disclose that one exists."
Any ideas on what it might be?
Thank you.
Regards,
NB