Spring Boot Hello World RESTful Web Services Tutorial
- Details
- Written by Nam Ha Minh
- Last Updated on 05 July 2024 | Print Email
1. Create Maven project and specify Spring Boot dependencies
First, create a Maven project and specify the following configuration in the pom.xml file:<parent>
<groupId>org.springframework.boot</groupId>
<artifactId>spring-boot-starter-parent</artifactId>
<version>2.2.1.RELEASE</version>
</parent>
<dependencies>
<dependency>
<groupId>org.springframework.boot</groupId>
<artifactId>spring-boot-starter-web</artifactId>
</dependency>
</dependencies>
<properties>
<java.version>1.8</java.version>
</properties>
<build>
<plugins>
<plugin>
<groupId>org.springframework.boot</groupId>
<artifactId>spring-boot-maven-plugin</artifactId>
</plugin>
</plugins>
</build>This is the minimal configuration for a Spring Boot web application. From the JAR files downloaded by Maven, you can see Spring framework provides its own API for RESTful web services (it doesn’t implement JAX-RS specification). It also uses Jackson library for serialization of Java objects to JSON and vice-versa.TIP: Use Spring Boot DevTools for automatic restart so you don't have to manually restart the application during development. 2. Create your first hello world RESTful Web Services Spring Boot application
Create the HelloController class with the following code:package net.codejava;
import org.springframework.web.bind.annotation.RequestMapping;
import org.springframework.web.bind.annotation.RestController;
@RestController
public class HelloController {
@RequestMapping("/hello")
public String hello() {
return "Hello World RESTful with Spring Boot";
}
}This is, perhaps the simplest form of a RESTful webservices API with Spring Boot. The @RestController annotation specifies this class will handle requests and produce responses following REST style. It does all the default configurations so you can start coding your API quickly.package net.codejava;
import org.springframework.boot.SpringApplication;
import org.springframework.boot.autoconfigure.SpringBootApplication;
@SpringBootApplication
public class Application {
public static void main(String[] args) {
SpringApplication.run(Application.class, args);
}
}Now, we’re ready to test our first Spring Boot RESTful web services application.
3. Test your first Spring Boot RESTful Web Services
Run the Application class as a Java application, you should see Spring Boot logo appears and some logging messages outputted to the console like this: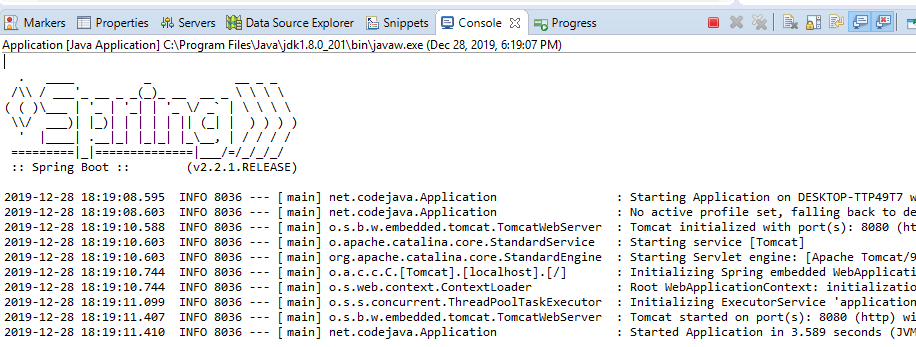
Tomcat started on port(s): 8080 (http) with context path ''
That means your Spring Boot RESTful application is deployed on Tomcat server listening on port 8080. Now you can type the URL http://localhost:8080/hello into your web browser, and get the following page: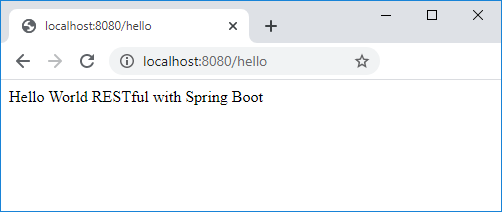 This means our RESTful API has been invoked successfully. You can use the following curl command to test:
curl http://localhost:8080/helloAnd response from the server:
Hello World RESTful with Spring BootNext, let’s update the HelloController class to understand the basic APIs provided by Spring framework for simplifying RESTful webservices API development. Check this article to learn more about API testing using curl command.
4. How to read request parameter
Update the hello() method as below:@RequestMapping("/hello")
public String hello(@RequestParam(name = "name", defaultValue = "World") String name) {
return "Hello " + name;
}The @RequestParam annotation binds the value of the request parameter named “name” to a parameter of this method. If the query parameter is absent, then the default value “world” is used.You must stop the application and run again. Type the following command to test:curl http://localhost:8080/hello?name=NamThe server responds:
Hello Nam

Spring Boot REST APIs Ultimate Course
Hands-on REST API Development with Spring Boot: Design, Implement, Document, Secure, Test, Consume RESTful APIs
5. How to handle different HTTP methods
Basically you can specify a specific HTTP method using the method attribute of the @RequestMapping annotation (default is GET), for example:@RequestMapping(value = "/hello", method = RequestMethod.POST)To simplify RESTful APIs development, Spring provides the annotations @GetMapping, @PostMapping, @PutMapping and @DeleteMapping corresponding to HTTP methods GET, POST, PUT and DELETE. So a typical REST controller will look like this:
@RestController
public class ResourceController {

	@GetMapping("/resources")
	// method that returns all items

	@GetMapping("/resources/{id}")
	// method that returns a specific item

	@PostMapping("/resources")
	// method that creates a new item

	@PutMapping("/resources/{id}")
	// method that updates an item

	@DeleteMapping("/resources/{id}")
	// method that deletes an item
}
6. How to return JSON Response
Serialize Java objects to JSON string and vice-versa is done automatically by Spring (thanks to JSON Jackson library). Create a simple domain model class as below:package net.codejava;
public class Product {
private int id;
private String name;
private float price;
// constructors...
// getters...
// setters...
}Then the following method will return JSON representation of a Product object:@GetMapping("/getproduct")
public Product getProduct() {
return new Product(1, "iPhone", 999.99f);
}Command to test with curl:curl http://localhost:8080/getproductServer responds:
{"id":1,"name":"iPhone","price":999.99}You can also return a collection of Java objects and Spring converts to JSON string neatly.
7. How to read JSON data
You can use the @RequestBody annotation to bind JSON data sent from client as a Java object, for example:@PostMapping("/addproduct")
public void addProduct(@RequestBody Product product) {
System.out.println(product);
}And you can test using the following curl command:curl -X POST -H "Content-Type: application/json"
-d "{\"id\":1,\"name\":\"Kindle Fire\",\"price\":199}"
http://localhost:8080/addproductFor validating data in the request's body (payload), see this article: Spring Boot REST API Request Validation Examples 8. How to specify content type of the request
To explicitly specify the content type accepted by the server, you can use the consumes attribute of a @XXXMapping annotation. For example:@PostMapping(value = "/update", consumes = {MediaType.APPLICATION_JSON_VALUE})Then the client must send request with content type corresponding to the type specified, e.g. application/json in this example. 9. How to specify content type of the response
To explicitly specify the content type of the response sent to the client, you can use the produces attribute of a @XXXMapping annotation. For example:@GetMapping(value = "/getproduct", produces = {MediaType.APPLICATION_JSON_VALUE})Then the content type of the response will be set according to the type specified, e.g. application/json in this example. 10. How to specify HTTP status code for the response
You can use the ResponseEntity class to explicitly produces a response with specific HTTP status, including JSON data in the response body. Consider the following method:@GetMapping("/products/{id}")
public ResponseEntity<Product> getProduct(@PathVariable int id) {
// find the product by id
if (found) {
return new ResponseEntity<Product>(productObject, HttpStatus.OK);
} else {
return new ResponseEntity<Product>(HttpStatus.NOT_FOUND);
}
}As you can see, this method will return a response with HTTP status code 200 (OK) and JSON representation of the Product object if a product found with the given ID. Else return HTTP status code 404 (Not Found). It's recommended to follow best pratices when returning HTTP status code from your REST APIs.That’s how to get started with RESTful webservices API development using Spring Boot. You have learned how to create a hello world Spring Boot REST application and the fundamental APIs for developing REST APIs with Spring. You can download the sample project attached below, or clone the project from this GitHub repo.You can also watch the video version of this tutorial below: What's Next? I recommend you this one: Spring Boot RESTful CRUD API Examples with MySQL database Related Web Services Tutorials:
- Spring Boot RESTful CRUD API Examples with MySQL database
- Spring Boot File Download and Upload REST API Examples
- Spring Boot REST API CRUD with HATEOAS Tutorial
- Java RESTful Web Services Tutorial for Beginner with Jersey and Tomcat
- Java CRUD RESTful Web Services Examples with Jersey and Tomcat
- Spring Boot REST API Request Validation Examples
- How to Use curl for Testing REST APIs (Test CRUD Operations)
Other Spring Boot Tutorials:
- Spring Boot Hello World Example
- Spring Boot Form Handling Tutorial with Spring Form Tags and JSP
- How to create a Spring Boot Web Application (Spring MVC with JSP/ThymeLeaf)
- Spring Boot - Spring Data JPA - MySQL Example
- Spring Boot CRUD Example with Spring MVC – Spring Data JPA – ThymeLeaf - Hibernate - MySQL
- How to use JDBC with Spring Boot
- Spring Boot CRUD Web Application with JDBC - Thymeleaf - Oracle
- How to package Spring Boot application to JAR and WAR
About the Author:
 Nam Ha Minh is certified Java programmer (SCJP and SCWCD). He began programming with Java back in the days of Java 1.4 and has been passionate about it ever since. You can connect with him on Facebook and watch his Java videos on YouTube.
| [Sample Spring Boot RESTful hello world project] | 12 kB |
Comments