Spring and Struts Integration Tutorial Part 1: XML Configuration
- Details
- Written by Nam Ha Minh
- Last Updated on 21 June 2019 | Print Email
Why is Spring and Struts integration?
Spring is an enterprise Java application framework, whereas Struts is a Java web application framework. That means both can be used to develop web applications.Spring MVC is a part of the Spring framework for building Java web application, and Struts also uses MVC architecture based on Java Servlet API. Therefore, when come to integration between Spring and Struts, they should not overlap each other on the MVC part. Instead, they should supplement each other.Spring is very good at dependency injection management so we can use it to manage business beans and Struts’ action beans. On the other side, we use Struts to focus on implementing MVC architecture for our web application. This is a typical scenario for integrating Spring and Struts together, especially for legacy applications were based on Struts.How does Spring and Struts integration work?
The Struts 2 framework provides a plugin called Spring Plugin that enables Spring integration. This plugin is provided in a jar file named struts2-spring-plugin-VERSION.jar. So remember to include this jar file in your application (we will tell you the Maven artifacts later).<action name="processOrder" class="ProcessOrderBean">Here, the class name ProcessOrderBean is ID of a bean declared in Spring’s configuration:
<bean id="ProcessOrderBean" class="net.codejava.ProcessOrderDAO">In addition, we can also use the @Autowired annotation of Spring to let Spring automatically injects dependencies into a class, just like in normal Spring application.Well, that’s enough for the theory. Let’s move forward to the practice part: developing a web application with login function using Spring and Struts 2.To make you follow this tutorial easily, here’s a list of technologies and pieces of software we use:
- Eclipse Luna
- Maven 3.2.1 (bundled with Eclipse)
- Java 8
- Spring Framework 4.1.2.RELEASE
- Struts 2 Framework 2.3.16.3
- Tomcat 8.0
1. Creating Maven Project in Eclipse
Create a new Maven project in Eclipse by going to File > New > Project… from main menu. In the New Project dialog, select Maven Project from the list: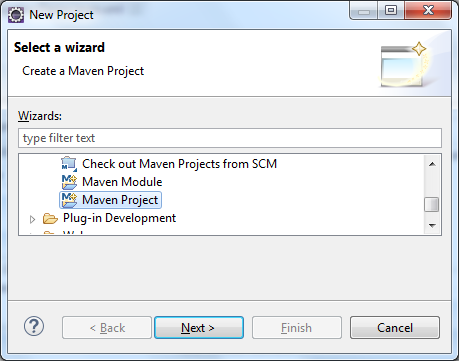 Click Next. In the New Maven Project screen, check the option “Create a simple project (skip archetype selection)”:
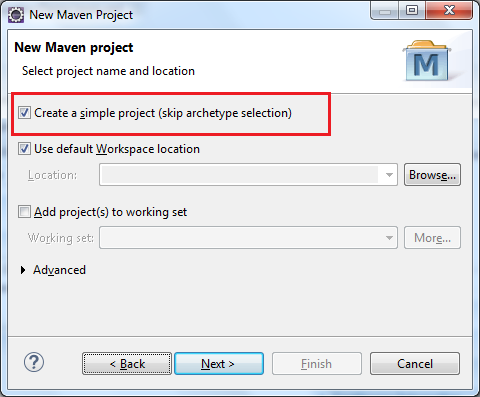 Click Next. In the next screen, enter Group Id and Artifact Id for the project:
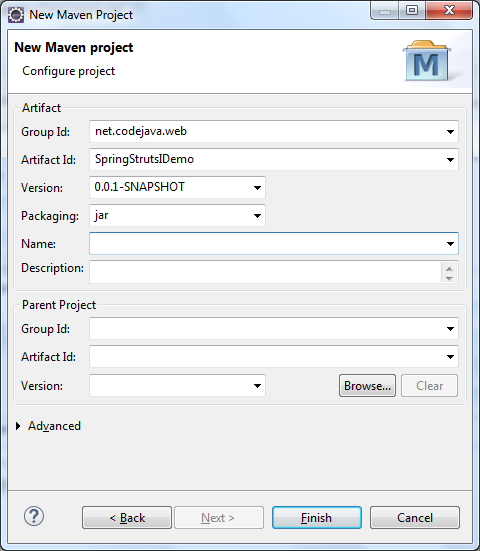 And click Finish. Now we need to convert this project to a Dynamic Web Project. Click Project > Properties from main menu, and select Project Facets branch:
 Make sure you check Dynamic Web Module (3.0) and Java (1.8), and then click OK. Now the project is a Java web project using Maven.
 2. Adding Maven Dependencies
Open Maven project file (pom.xml) and add the following declarations:- Properties for versions of Java and Spring:
<properties>
	<java-version>1.8</java-version>
	<org.springframework-version>4.1.2.RELEASE</org.springframework-version>
</properties>
- Dependencies for Spring framework:
<dependency> <groupId>org.springframework</groupId> <artifactId>spring-context</artifactId> <version>${org.springframework-version}</version> </dependency> <dependency> <groupId>org.springframework</groupId> <artifactId>spring-context-support</artifactId> <version>${org.springframework-version}</version> </dependency> <dependency> <groupId>org.springframework</groupId> <artifactId>spring-webmvc</artifactId> <version>${org.springframework-version}</version> </dependency> - Dependency for Struts 2 framework:
<dependency>
	<groupId>org.apache.struts</groupId>
	<artifactId>struts2-core</artifactId>
	<version>2.3.16.3</version>
</dependency>
- Dependency for Spring Plugin:
<dependency>
	<groupId>org.apache.struts</groupId>
	<artifactId>struts2-spring-plugin</artifactId>
	<version>2.3.16.3</version>
</dependency>
- Dependency for Java Servlet & JSP (for compile only):
<dependency>
	<groupId>javax.servlet</groupId>
	<artifactId>javax.servlet-api</artifactId>
	<version>3.1.0</version>
	<scope>provided</scope>
</dependency>

<dependency>
	<groupId>javax.servlet.jsp</groupId>
	<artifactId>javax.servlet.jsp-api</artifactId>
	<version>2.3.1</version>
	<scope>provided</scope>
</dependency>
3. Coding Model Class
Create a simple model class named User.java which looks like the following code snippet:package net.codejava.web;
public class User {
private String username;
private String email;
private String password;
// getters and setters
}NOTE: getters and setters are removed for brevity. You should write getters and setters completely.
4. Coding Business Class
Write a simple class that acts as a DAO for managing users (UserDAO.java). Here’s the code:package net.codejava.web;
public class UserDAO {
public boolean checkLogin(User user) {
return user.getUsername().equals("admin")
&& user.getPassword().equals("nimda");
}
}As you can see, this DAO class has a very simple business method checkLogin()that is for authenticating the user. The valid username is “admin” and password is “nimda”.
5. Coding Struts Action Class
Write a Struts2 action class (LoginAction.java) with the following code:package net.codejava.web;
import com.opensymphony.xwork2.ActionSupport;
public class LoginAction extends ActionSupport {
private UserDAO userDAO;
private User user;
public void setUserDAO(UserDAO userDAO) {
this.userDAO = userDAO;
}
public void setUser(User user) {
this.user = user;
}
public User getUser() {
return user;
}
public String execute() {
if (userDAO.checkLogin(user)) {
return SUCCESS;
}
return ERROR;
}
}Although this is a simple Struts 2 action class, we still need to understand the following points:- Setter for the userDao member variable: Spring will inject the actual implementation for userDAO via this setter.
- Setter and getter for the user member variable: these methods are used by Struts to populate form fields (in Login page) into a model object (User).
- The execute() method simply redirects the user to the SUCCESS page if the user is authenticated; otherwise redirects to the ERROR page.
6. Coding Login Page
Create a file named LoginForm.jsp under WebContent folder with the following code:<%@ page language="java" contentType="text/html; charset=UTF-8"
pageEncoding="UTF-8"%>
<%@ taglib prefix="s" uri="/struts-tags" %>
<!DOCTYPE html PUBLIC "-//W3C//DTD HTML 4.01 Transitional//EN"
"http://www.w3.org/TR/html4/loose.dtd">
<html>
<head>
<meta http-equiv="Content-Type" content="text/html; charset=UTF-8">
<title>Spring and Struts Integration Demo</title>
</head>
<body>
<div align="center">
<h1>Spring and Struts Integration Demo</h1>
<h2>Users Login</h2>
<s:form action="login" method="post">
<s:textfield label="Username" name="user.username" />
<s:password label="Password" name="user.password" />
<s:submit value="Login" />
</s:form>
</div>
</body>
</html>This is a simple login form using Struts’ form tags.
7. Coding Success and Error Pages
Next, we create a page that will be redirected if the user is authenticated successfully. Name this file as LoginSuccess.jsp with the following code:<%@ page language="java" contentType="text/html; charset=UTF-8"
pageEncoding="UTF-8"%>
<!DOCTYPE html PUBLIC "-//W3C//DTD HTML 4.01 Transitional//EN"
"http://www.w3.org/TR/html4/loose.dtd">
<html>
<head>
<meta http-equiv="Content-Type" content="text/html; charset=UTF-8">
<title>Login Success</title>
</head>
<body>
<div align="center">
<h1>Welcome to CodeJava.net</h1>
</div>
</body>
</html>And an error page (LoginError.jsp) will be displayed if the user is not authenticated:<%@ page language="java" contentType="text/html; charset=UTF-8"
pageEncoding="UTF-8"%>
<!DOCTYPE html PUBLIC "-//W3C//DTD HTML 4.01 Transitional//EN"
"http://www.w3.org/TR/html4/loose.dtd">
<html>
<head>
<meta http-equiv="Content-Type" content="text/html; charset=UTF-8">
<title>Login Error</title>
</head>
<body>
<div align="center">
<h1>Error login. Wrong username/password</h1>
</div>
</body>
</html>These two pages simply display relevant text, one for login successfully, and another for login failed.
8. Configuring Spring and Struts in web.xml
Now, we come to the most interesting part that makes Spring and Struts 2 working together by configuring these two frameworks in the web deployment descriptor file (web.xml):<?xml version="1.0" encoding="UTF-8"?> <web-app version="3.0" xmlns="http://java.sun.com/xml/ns/javaee" xmlns:xsi="http://www.w3.org/2001/XMLSchema-instance" xmlns:web="http://java.sun.com/xml/ns/javaee/web-app_3_0.xsd" xsi:schemaLocation="http://java.sun.com/xml/ns/javaee http://java.sun.com/xml/ns/javaee/web-app_3_0.xsd"> <context-param> <param-name>contextConfigLocation</param-name> <param-value>/WEB-INF/spring/appContext.xml</param-value> </context-param> <listener> <listener-class>org.springframework.web.context.ContextLoaderListener</listener-class> </listener> <filter> <filter-name>DispatcherFilter</filter-name> <filter-class>org.apache.struts2.dispatcher.ng.filter.StrutsPrepareAndExecuteFilter</filter-class> </filter> <filter-mapping> <filter-name>DispatcherFilter</filter-name> <url-pattern>/*</url-pattern> </filter-mapping> </web-app>Here, we configure our web application to load Spring and Struts differently:
- Spring is loaded as a listener class when the application is started. Spring will load configuration from a file named appContext.xmlunder the /WEB/INF/spring directory.
- Struts 2 is loaded as a filter which intercepts all requests coming through the application.
9. Writing Struts Configuration
Next, we configure how Struts processes workflow of the application. Create an XML file named struts.xml under project’s source folder with the following code:<?xml version="1.0" encoding="UTF-8"?>
<!DOCTYPE struts PUBLIC
"-//Apache Software Foundation//DTD Struts Configuration 2.0//EN"
"http://struts.apache.org/dtds/struts-2.0.dtd">
<struts>
<package name="Struts2SpringDemo" extends="struts-default">
<action name="login" class="loginActionBean">
<result name="input">/LoginForm.jsp</result>
<result name="success">/LoginSuccess.jsp</result>
<result name="error">/LoginError.jsp</result>
</action>
</package>
</struts>As we can see, we declare an action called “login” - note that this name must match the action property of the form in the LoginForm.jsp file. Inside this action’s body, we declare mappings of JSP pages with view names for the INPUT, SUCCESS, and ERROR pages.The interesting point here is the class property of the action doesn’t point to a fully qualified class name as usual. Instead it points to ID of a Spring’s bean. So we see how to configure beans in Spring right now.
10. Writing Spring Configuration
Create an XML file name appContext.xml under the /WEB-INF/spring directory (create the spring folder first).<?xml version="1.0" encoding="UTF-8"?> <beans xmlns="http://www.springframework.org/schema/beans" xmlns:xsi="http://www.w3.org/2001/XMLSchema-instance" xsi:schemaLocation="http://www.springframework.org/schema/beans http://www.springframework.org/schema/beans/spring-beans.xsd"> <bean id="loginActionBean" class="net.codejava.web.LoginAction"> <property name="userDAO" ref="userDAO" /> </bean> <bean id="userDAO" class="net.codejava.web.UserDAO" /> </beans>In this Spring application context configuration file, we declare two beans:
- loginActionBean: instantiates an object of the Struts 2 action class above.
- userDAO: creates an instance of UserDAO class which is injected to the loginActionBean bean above.
11. Final Project Structure
So far we have done all the heavy-lifting stuffs. Let’s look back to see how the project is structured: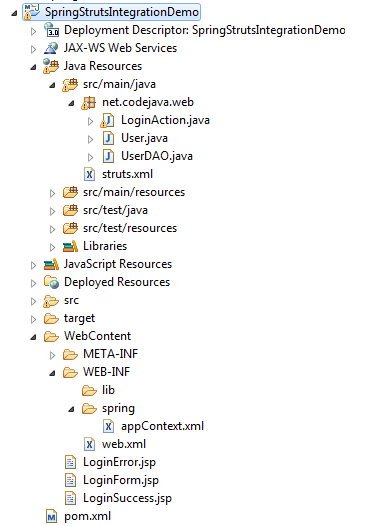 Look back at this structure in case you did something wrong.
12. Testing the Application
Now we are ready to test out the application, supposing you know how to deploy the project onto Tomcat. Start the server and then type the following URL in your browser:http://localhost:8080/SpringStrutsIntegrationDemo/LoginForm.jsp
The login form appears like in the following screenshot: Type “admin” for username and “nimda” for password, and then hit Enter. The success page appears:
 In case you typed wrong username/password, the error page gets displayed:
 Congratulations! You have successfully built a Spring-Struts type of application. Come back often to check out next tutorial in this series.
 References
Related Spring-Struts Integration Tutorials:
- Spring and Struts Integration Tutorial Part 2: Java-Based and Annotations
- Struts - Spring - Hibernate Integration Tutorial Part 1 - XML Configuration
- Struts - Spring - Hibernate Integration Tutorial Part 2 - Java-Based and Annotations
Other Spring Tutorials:
- Understand the core of Spring framework
- Understand Spring MVC
- Understand Spring AOP
- Spring MVC beginner tutorial with Spring Tool Suite IDE
- Spring MVC Form Handling Tutorial
- Spring MVC Form Validation Tutorial
- Spring MVC with JdbcTemplate Example
- Spring MVC + Spring Data JPA + Hibernate - CRUD Example
- 14 Tips for Writing Spring MVC Controller
About the Author:
 Nam Ha Minh is certified Java programmer (SCJP and SCWCD). He began programming with Java back in the days of Java 1.4 and has been passionate about it ever since. You can connect with him on Facebook and watch his Java videos on YouTube.
| [Eclipse-Maven Project] | 16 kB |
Comments
Good Luck to all.
i dont understand why it doesnt work !!!