Spring Web MVC Security Basic Example Part 2 with Java-based Configuration
- Details
- Written by Nam Ha Minh
- Last Updated on 24 June 2019 | Print Email
1. Project Setup
In this tutorial, we use Eclipse IDE to create a dynamic web project, and then convert it to Maven project.The Spring MVC Security Java Config project is developed using the following pieces of technologies (of course you can use newer versions):- Java 8.
- Tomcat 8 with Servlet 3.1.
- Spring framework 4.2.4.RELEASE.
- Spring Security 4.0.3.RELEASE.
- JSTL 1.2
- Eclipse IDE, Mars Release (4.5.0).
<!-- Spring Security Web -->
<dependency>
	<groupId>org.springframework.security</groupId>
	<artifactId>spring-security-web</artifactId>
	<version>${spring.security.version}</version>
</dependency>


<!-- Spring Security Config -->
<dependency>
	<groupId>org.springframework.security</groupId>
	<artifactId>spring-security-config</artifactId>
	<version>${spring.security.version}</version>
</dependency>2. Coding Index Page
Make a directory called views under the /WEB-INF directory, then create an index.jsp file with the following HTML code:<%@ page language="java" contentType="text/html; charset=ISO-8859-1"
pageEncoding="ISO-8859-1"%>
<!DOCTYPE html PUBLIC "-//W3C//DTD HTML 4.01 Transitional//EN"
"http://www.w3.org/TR/html4/loose.dtd">
<html>
<head>
<meta http-equiv="Content-Type" content="text/html; charset=ISO-8859-1">
<title>Spring Security Basic Demo (Java Config)</title>
</head>
<body>
<div align="center">
<h1>Spring Security Basic Demo (Java Config)</h1>
<a href="/admin">Go to Administrator Page</a>
</div>
</body>
</html>As you can see, this is very simple page with a heading “Spring Security Basic Demo (Java Config)” and a hyperlink to the administrator page which requires authentication to access. 3. Coding Admin Page
Next, create an admin.jsp file under the /WEB-INF/views directory with the following code:<%@taglib prefix="c" uri="http://java.sun.com/jsp/jstl/core"%>
<%@ page language="java" session="true" contentType="text/html; charset=ISO-8859-1"
pageEncoding="ISO-8859-1"%>
<!DOCTYPE html PUBLIC "-//W3C//DTD HTML 4.01 Transitional//EN"
"http://www.w3.org/TR/html4/loose.dtd">
<html>
<head>
<meta http-equiv="Content-Type" content="text/html; charset=ISO-8859-1">
<title>Spring Security Basic Demo (Java Config)</title>
</head>
<body>
<div align="center">
<h1>${title}</h1>
<h2>${message}</h2>
<c:if test="${pageContext.request.userPrincipal.name != null}">
<h2>Welcome : ${pageContext.request.userPrincipal.name} |
<a href="/<c:url value="/logout" />" > Logout</a></h2>
</c:if>
</div>
</body>
</html>This is the administrator page which requires authentication and authorization to access. We use JSTL expressions to display the title and message in the model. If the user is logged in, display his username along with a logout link. 4. Coding Spring MVC Controller
Next, we write code for a Spring controller in order to handle requests coming to the application. Create a Java class named MainController under the package net.codejava.spring with the following code:package net.codejava.spring;
import org.springframework.stereotype.Controller;
import org.springframework.web.bind.annotation.RequestMapping;
import org.springframework.web.bind.annotation.RequestMethod;
import org.springframework.web.servlet.ModelAndView;
/**
* Spring Web MVC Security Java Config Demo Project
* Primary controller of the application.
*
* @author www.codejava.net
*
*/
@Controller
public class MainController {
@RequestMapping(value="/", method = RequestMethod.GET)
public ModelAndView visitHome() {
return new ModelAndView("index");
}
@RequestMapping(value="/admin", method = RequestMethod.GET)
public ModelAndView visitAdmin() {
ModelAndView model = new ModelAndView("admin");
model.addObject("title", "Admministrator Control Panel");
model.addObject("message", "This page demonstrates how to use Spring security.");
return model;
}
}As you can see, this controller is designed to handle 2 requests:- “/”: the request to the application’s context root, i.e. the home page.
- “/admin”: the request to the administrator page, which will be secured by Spring security.
5. Configuring Spring Dispatcher Servlet
Instead of using XML configuration in the web.xml file as usual, here we write Java code. Create a Java file called SpringWebAppInitializerwith the following content:package net.codejava.spring;
import javax.servlet.ServletContext;
import javax.servlet.ServletException;
import javax.servlet.ServletRegistration;
import org.springframework.web.WebApplicationInitializer;
import org.springframework.web.context.support.AnnotationConfigWebApplicationContext;
import org.springframework.web.servlet.DispatcherServlet;
/**
* Spring Web MVC Security Java Config Demo Project
* Bootstraps Spring Dispacher Servlet in Servlet 3.0+ environment.
*
* @author www.codejava.net
*
*/
public class SpringWebAppInitializer implements WebApplicationInitializer {
@Override
public void onStartup(ServletContext servletContext) throws ServletException {
AnnotationConfigWebApplicationContext appContext = new AnnotationConfigWebApplicationContext();
appContext.register(MvcConfig.class);
ServletRegistration.Dynamic dispatcher = servletContext.addServlet(
"SpringDispatcher", new DispatcherServlet(appContext));
dispatcher.setLoadOnStartup(1);
dispatcher.addMapping("/");
}
}Here, the SpringWebAppInitializeris a type of WebApplicationInitializerwhich is bootstrapped automatically by any Servlet 3.0+ container (See more: Bootstrapping a Spring Web MVC application programmatically).The above code is equivalent to the following XML snippet in the web.xml:<servlet> <servlet-name>SpringController</servlet-name> <servlet-class>org.springframework.web.servlet.DispatcherServlet</servlet-class> <init-param> <param-name>contextConfigLocation</param-name> <param-value>/WEB-INF/spring-mvc.xml</param-value> </init-param> <load-on-startup>1</load-on-startup> </servlet> <servlet-mapping> <servlet-name>SpringController</servlet-name> <url-pattern>/</url-pattern> </servlet-mapping>
6. Configuring Spring Security Filter
Spring Security Filter is a servlet filter that intercepts requests for securing the application, so we need to load it upon application’s start up.Instead of using XML, here’s Java code to load the Spring Security Filter:package net.codejava.spring;
import org.springframework.security.web.context.AbstractSecurityWebApplicationInitializer;
/**
* Spring Web MVC Security Java Config Demo Project
* Bootstraps Spring Security Filter.
*
* @author www.codejava.net
*
*/
public class SecurityWebApplicationInitializer extends AbstractSecurityWebApplicationInitializer {
public SecurityWebApplicationInitializer() {
super(SecurityConfig.class);
}
}It’s equivalent to the following XML snippet in the web.xml file:<filter> <filter-name>springSecurityFilterChain</filter-name> <filter-class>org.springframework.web.filter.DelegatingFilterProxy</filter-class> </filter> <filter-mapping> <filter-name>springSecurityFilterChain</filter-name> <url-pattern>/*</url-pattern> </filter-mapping>Note that the SecurityWebApplicationInitializerclass passes SecurityConfig.classto its super’s constructor, which tells Spring Security looks for configuration in the class named SecurityConfig- which is described below.
7. Configuring Authentication and Authorization for the Spring MVC application
Create a class named SecurityConfigthat extends the WebSecurityConfigurerAdapterwith the following code:package net.codejava.spring;
import org.springframework.beans.factory.annotation.Autowired;
import org.springframework.context.annotation.Configuration;
import org.springframework.security.config.annotation.authentication.builders.AuthenticationManagerBuilder;
import org.springframework.security.config.annotation.web.builders.HttpSecurity;
import org.springframework.security.config.annotation.web.configuration.EnableWebSecurity;
import org.springframework.security.config.annotation.web.configuration.WebSecurityConfigurerAdapter;
/**
* Spring Web MVC Security Java Config Demo Project
* Configures authentication and authorization for the application.
*
* @author www.codejava.net
*
*/
@Configuration
@EnableWebSecurity
public class SecurityConfig extends WebSecurityConfigurerAdapter {
@Autowired
public void configureGlobal(AuthenticationManagerBuilder auth) throws Exception {
auth
.inMemoryAuthentication()
.withUser("admin").password("nimda").roles("ADMIN");
}
@Override
protected void configure(HttpSecurity http) throws Exception {
http.authorizeRequests()
.antMatchers("/").permitAll()
.antMatchers("/admin**").access("hasRole('ADMIN')")
.and().formLogin();
http.csrf().disable();
}
}This is equivalent to the following configuration in XML: <http auto-config="true">
<intercept-url pattern="/admin**" access="hasRole('ADMIN')" />
<csrf disabled="true" />
</http>
<authentication-manager>
<authentication-provider>
<user-service>
<user name="admin" password="nimda" authorities="ADMIN" />
</user-service>
</authentication-provider>
</authentication-manager>Note that we disable CSRF for the sake of simplicity in this tutorial:http.csrf().disable();That tells Spring Security to intercept the /logout link as an HTTP GET request. In production, you should enable CSRF for best security practice.
8. Configuring Spring MVC Application Context
Instead of using XML, we configure the view resolvers in Spring MVC using Java code like this:package net.codejava.spring;
import org.springframework.context.annotation.Bean;
import org.springframework.context.annotation.ComponentScan;
import org.springframework.context.annotation.Configuration;
import org.springframework.web.servlet.view.InternalResourceViewResolver;
/**
* Spring Web MVC Security Java Config Demo Project
* Configures Spring MVC stuffs.
*
* @author www.codejava.net
*
*/
@Configuration
@ComponentScan("net.codejava.spring")
public class MvcConfig {
@Bean(name = "viewResolver")
public InternalResourceViewResolver getViewResolver() {
InternalResourceViewResolver viewResolver = new InternalResourceViewResolver();
viewResolver.setPrefix("/WEB-INF/views/");
viewResolver.setSuffix(".jsp");
return viewResolver;
}
}As you can see, we configure this InternalResourceViewResolverbean to resolve logical view names to physical JSP pages. It's equivalent to the following XML:<bean class="org.springframework.web.servlet.view.InternalResourceViewResolver"> <property name="prefix" value="/WEB-INF/views/" /> <property name="suffix" value=".jsp" /> </bean>
9. The Whole Project Structure
Lastly, the project’s structure would look like this in Eclipse IDE: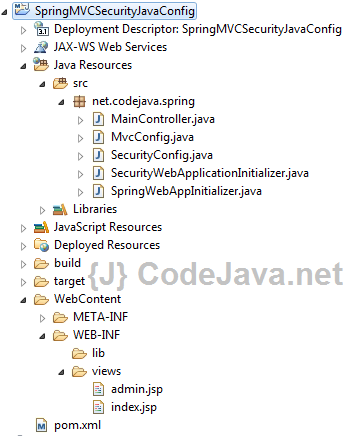 NOTE: For you convenience, we provide full source code of this Spring MVC Security Java Config Project (Eclipse-Maven) in the Download Attachments section.
 10. Test the Spring Security Sample Application
It’s time to test the Spring MVC Security application we’ve built so far. After deploying the project on Tomcat, type the following URL in your browser:http://localhost:8080/SpringMVCSecurityJavaConfig
The home page appears: Click on the hyperlink Go to Administrator Page (it’s equivalent to type the URL: http://localhost:8080/SpringMVCSecurityJavaConfig/admin), Spring automatically generates a login page looks like this:First, let’s type an invalid username and password, Spring security automatically generates an error message in red at the top of the form, which is looking like this:
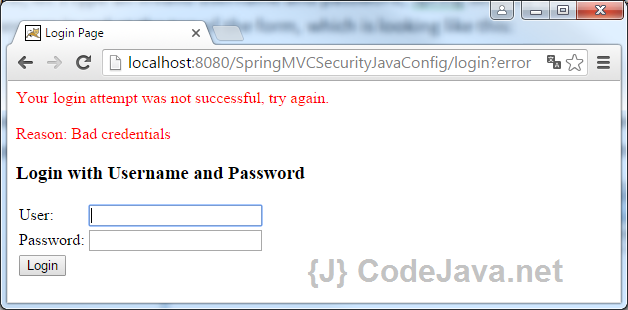 Next, let’s type the correct username and password (admin and nimda, as per configured in this application), Spring security authenticates the login and returns the administrator page as follows:
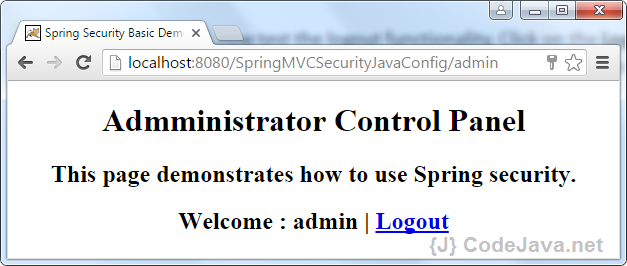 Awesome! Now, let’s test the logout functionality. Click on the Logout link, Spring security filter automatically intercepts the/logout URL, invalidates the session and take you to the login page again:
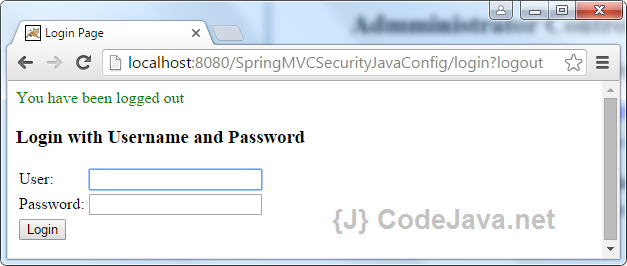 Notice the message ‘You have been logged out’ is displayed in green at the top of the form, and the URL got changed to http://localhost:8080/ SpringMVCSecurityJavaConfig/login?logoutTo make sure Spring security already invalidated the session, let’s try to access the page http://localhost:8080/SpringMVCSecurityJavaConfig/admin again, we will see the login page. It’s working seamlessly!Perfect! We’ve done a basic Spring Web MVC Security project with Java configuration. References:
 Related Spring Security Tutorials:
Other Spring Tutorials:
- Understand the core of Spring framework
- Understand Spring MVC
- Understand Spring AOP
- Spring MVC beginner tutorial with Spring Tool Suite IDE
- Spring MVC Form Handling Tutorial
- Spring MVC Form Validation Tutorial
- 14 Tips for Writing Spring MVC Controller
- Spring Web MVC Security Basic Example (XML Configuration)
- Understand Spring Data JPA with Simple Example
About the Author:
 Nam Ha Minh is certified Java programmer (SCJP and SCWCD). He began programming with Java back in the days of Java 1.4 and has been passionate about it ever since. You can connect with him on Facebook and watch his Java videos on YouTube.
| [Spring Web MVC Security Java Config Eclipse-Maven Project] | 22 kB |
Comments
I download this project. When I attempted to access admin page and login as admin. It redirects to home page not admin page. How to solve it?