In this second part of the Spring and Hibernate integration tutorial series, we demonstrate how to develop a Spring MVC - Hibernate application without using any XML configuration. The following configuration approaches are used for this tutorial’s demo application:
Spring MVC: Annotations for controller, DAO and Java-based configuration for bean definitions.
This is an update and expansion of Part 1, so that we don’t repeat the Project Setup (including database creation and Maven configuration).
Using either XML or Java-based configuration is just a matter of choice. Using which is depending on your taste and situation. We never intend which is better or preferred.
The following technologies and pieces of software are used throughout this tutorial (of course you can use newer versions):
Instead of using XML in web.xml to register the Spring Dispatcher Servlet, we can move the bootstrap code into a Java class that implements the ServletContainerInitializerinterface which is introduced from Servlet 3.0. Spring framework provides an implementation - the SpringServletContainerInitializer class which delegates a Servlet context to any implementations of the WebApplicationInitializer interface.Thus, let’s create SpringWebAppInitializer class to put our bootstrap code like the following:
package net.codejava.spring.config;

import javax.servlet.ServletContext;
import javax.servlet.ServletException;
import javax.servlet.ServletRegistration;

import org.springframework.web.WebApplicationInitializer;
import org.springframework.web.context.support.AnnotationConfigWebApplicationContext;
import org.springframework.web.servlet.DispatcherServlet;

public class SpringWebAppInitializer implements WebApplicationInitializer {

	@Override
	public void onStartup(ServletContext servletContext) throws ServletException {
        AnnotationConfigWebApplicationContext appContext = new AnnotationConfigWebApplicationContext();
        appContext.register(ApplicationContextConfig.class);

        ServletRegistration.Dynamic dispatcher = servletContext.addServlet(
                "SpringDispatcher", new DispatcherServlet(appContext));
        dispatcher.setLoadOnStartup(1);
        dispatcher.addMapping("/");

	}
}
Here, code in the onStartup() method is invoked when the Servlet container initializes the application. This method creates Spring Dispatcher Servlet dynamically to handle all requests coming through the application (denoted by the mapping “/”). The Spring Dispatcher Servlet takes an AnnotationConfigWebApplicationContext which is responsible for Spring-related initializations using annotations. The actual class that does the configurations is ApplicationContextConfig, which is covered in section 4 below.NOTE: The spring-web-VERSION.jar must present on the classpath for this bootstrap mechanism takes effect.
2. Mapping Model Class using JPA Annotations
Instead of using Hibernate XML mapping for model class like Part 1, we embed JPA annotations directly into the model class as follows (User.java):
package net.codejava.spring.model;

import javax.persistence.Column;
import javax.persistence.Entity;
import javax.persistence.GeneratedValue;
import javax.persistence.Id;
import javax.persistence.Table;

@Entity
@Table(name = "USERS")
public class User {
	private int id;
	private String username;
	private String password;
	private String email;

	@Id
	@GeneratedValue
	@Column(name = "USER_ID")
	public int getId() {
		return id;
	}

	// other getters and setters are hidden for brevity

}
Note that if the attribute names of the model class are identical to column names in database, we don’t need to specify column mapping explicitly.
3. Extending DAO Classes
In Part 1, the UserDAO interface declares only one list() method. Now we extend it for full CRUD operations. Hence, update the UserDAO interface as the following code:
package net.codejava.spring.dao;

import java.util.List;

import net.codejava.spring.model.User;

public interface UserDAO {
	public List<User> list();

	public User get(int id);

	public void saveOrUpdate(User user);

	public void delete(int id);
}
Its implementation - UserDAOImpl class is then updated as the following code:
package net.codejava.spring.dao;

import java.util.List;

import net.codejava.spring.model.User;

import org.hibernate.Criteria;
import org.hibernate.Query;
import org.hibernate.SessionFactory;
import org.springframework.beans.factory.annotation.Autowired;
import org.springframework.stereotype.Repository;
import org.springframework.transaction.annotation.Transactional;

@Repository
public class UserDAOImpl implements UserDAO {
	@Autowired
	private SessionFactory sessionFactory;

	public UserDAOImpl() {

	}

	public UserDAOImpl(SessionFactory sessionFactory) {
		this.sessionFactory = sessionFactory;
	}

	@Override
	@Transactional
	public List<User> list() {
		@SuppressWarnings("unchecked")
		List<User> listUser = (List<User>) sessionFactory.getCurrentSession()
				.createCriteria(User.class)
				.setResultTransformer(Criteria.DISTINCT_ROOT_ENTITY).list();

		return listUser;
	}

	@Override
	@Transactional
	public void saveOrUpdate(User user) {
		sessionFactory.getCurrentSession().saveOrUpdate(user);
	}

	@Override
	@Transactional
	public void delete(int id) {
		User userToDelete = new User();
		userToDelete.setId(id);
		sessionFactory.getCurrentSession().delete(userToDelete);
	}

	@Override
	@Transactional
	public User get(int id) {
		String hql = "from User where id=" + id;
		Query query = sessionFactory.getCurrentSession().createQuery(hql);

		@SuppressWarnings("unchecked")
		List<User> listUser = (List<User>) query.list();

		if (listUser != null && !listUser.isEmpty()) {
			return listUser.get(0);
		}

		return null;
	}
}
We’ll see how the SessionFactory and TransationManager are configured in the next section below.
4. Configuring Spring Application Context using Java-based Configuration
Now, we come to the most important and interesting part of the application, which configures beans definitions using Java code instead of XML. Create ApplicationContextConfig class with the following Spring annotations:
@Configuration
@ComponentScan("net.codejava.spring")
@EnableTransactionManagement
public class ApplicationContextConfig {

	// @Bean configurations go here...

}
The @Configuration annotation is required for any Java-based configuration in Spring. The @ComponentScan annotation tells Spring to scan the specified package for annotated classes (the HomeController class in case of this tutorial). The @EnableTransactionManager annotation enables Spring’s annotation-driven transaction management capability. Let’s see how each component is configured using Java code.
Configuring Spring MVC View Resolvers
The following method configures a view resolver that converts logical view names to actual JSP pages:
@Bean(name = "viewResolver")
public InternalResourceViewResolver getViewResolver() {
	InternalResourceViewResolver viewResolver = new InternalResourceViewResolver();
	viewResolver.setPrefix("/WEB-INF/views/");
	viewResolver.setSuffix(".jsp");
	return viewResolver;
}
Configuring DataSource Bean
The following method configures a DataSource to be used with Hibernate’s SessionFactory:
@Bean(name = "dataSource")
public DataSource getDataSource() {
	BasicDataSource dataSource = new BasicDataSource();
	dataSource.setDriverClassName("com.mysql.jdbc.Driver");
	dataSource.setUrl("jdbc:mysql://localhost:3306/usersdb");
	dataSource.setUsername("root");
	dataSource.setPassword("secret");

	return dataSource;
}
NOTE:
We create a DataSource from Apache Commons DBCP for standard database connection pooling capability.
Remember to change attributes of the DataSource according to your environment.
This data source will be injected to a Hibernate’s SessionFactory bean as below.
Configuring SessionFactory Bean
The following method configures a SessionFactory bean:
@Autowired
@Bean(name = "sessionFactory")
public SessionFactory getSessionFactory(DataSource dataSource) {

	LocalSessionFactoryBuilder sessionBuilder = new LocalSessionFactoryBuilder(dataSource);

	sessionBuilder.addAnnotatedClasses(User.class);

	return sessionBuilder.buildSessionFactory();
}
NOTE: For Java-based configuration, Spring provides the LocalSessionFactoryBuilder that facilitates the creation of Hibernate’s SessionFactory. For XML configuration, aLocalSessionFactoryBean is used instead. Notice this statement tells Hibernate to load the User class into its mapping definitions:
This SessionFactory bean will be wired into the UserDAO bean below.
Configuring TransactionManager Bean
The following method configures a HibernateTransactionManager for the SessionFactory:
@Autowired
@Bean(name = "transactionManager")
public HibernateTransactionManager getTransactionManager(
		SessionFactory sessionFactory) {
	HibernateTransactionManager transactionManager = new HibernateTransactionManager(
			sessionFactory);

	return transactionManager;
}
By configuring a transaction manager, code in the DAO class doesn’t have to take care of transaction management explicitly. Instead, the @Transactional annotation is used to tell Spring automatically inserts transaction management code into the bytecode.
Configuring DAO Bean
The following method configures a bean which is a UserDAO implementation:
@Autowired
@Bean(name = "userDao")
public UserDAO getUserDao(SessionFactory sessionFactory) {
	return new UserDAOImpl(sessionFactory);
}
This UserDAO bean is injected into the controller class which is listed below.
5. Updating Spring Controller Class
In addition to the only one list() method in Part 1, the HomeController class is now updated to handle CRUD operations of a list of users:
package net.codejava.spring.controller;

import java.util.List;

import javax.servlet.http.HttpServletRequest;

import net.codejava.spring.dao.UserDAO;
import net.codejava.spring.model.User;

import org.springframework.beans.factory.annotation.Autowired;
import org.springframework.stereotype.Controller;
import org.springframework.web.bind.annotation.ModelAttribute;
import org.springframework.web.bind.annotation.RequestMapping;
import org.springframework.web.bind.annotation.RequestMethod;
import org.springframework.web.servlet.ModelAndView;

/**
 * Handles requests for the application home page.
 */
@Controller
public class HomeController {

	@Autowired
	private UserDAO userDao;

	@RequestMapping("/")
	public ModelAndView handleRequest() throws Exception {
		List<User> listUsers = userDao.list();
		ModelAndView model = new ModelAndView("UserList");
		model.addObject("userList", listUsers);
		return model;
	}

	@RequestMapping(value = "/new", method = RequestMethod.GET)
	public ModelAndView newUser() {
		ModelAndView model = new ModelAndView("UserForm");
		model.addObject("user", new User());
		return model;
	}

	@RequestMapping(value = "/edit", method = RequestMethod.GET)
	public ModelAndView editUser(HttpServletRequest request) {
		int userId = Integer.parseInt(request.getParameter("id"));
		User user = userDao.get(userId);
		ModelAndView model = new ModelAndView("UserForm");
		model.addObject("user", user);
		return model;
	}

	@RequestMapping(value = "/delete", method = RequestMethod.GET)
	public ModelAndView deleteUser(HttpServletRequest request) {
		int userId = Integer.parseInt(request.getParameter("id"));
		userDao.delete(userId);
		return new ModelAndView("redirect:/");
	}

	@RequestMapping(value = "/save", method = RequestMethod.POST)
	public ModelAndView saveUser(@ModelAttribute User user) {
		userDao.saveOrUpdate(user);
		return new ModelAndView("redirect:/");
	}
}
This controller class is responsible for handling workflow of the application such as listing users, creating new, editing and deleting a user.
6. Updating User Listing Page
The UserList.jsp uses JSTL to enumerate the list of users passed from the controller:
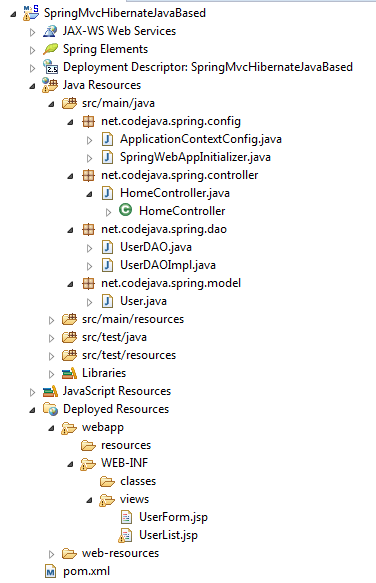
This page is used when creating new user or editing an existing one.Final Project StructureFor your reference, the following screenshot shows final project structure in Eclipse/STS:
8. Testing the Application
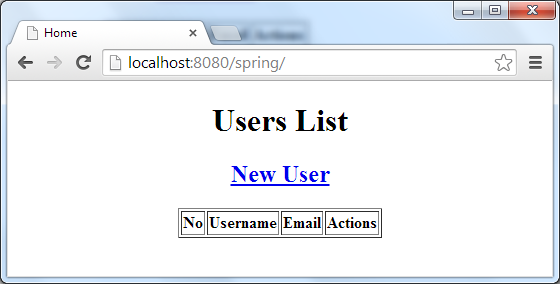
Application URL: http://localhost:8080/springWe will see an empty list of users when accessing the application for the first time:Click New User link to add a new user. The New/Edit User page appears:Enter some dummy information then click Save. The user is saved and we go back to the users list page:Now we can click Edit or Delete link to update or remove a user.Congratulations! You have completed our second part of the Spring-Hibernate integration series. For your convenience, we provide downloads for the project and a deployable WAR file in the attachments section. References:
Nam Ha Minh is certified Java programmer (SCJP and SCWCD). He began programming with Java back in the days of Java 1.4 and has been passionate about it ever since. You can connect with him on Facebook and watch his Java videos on YouTube.
Great tutorial!! My problems were the url from the element a in the jsp and the SQL in the methods UserDAOImpl. The solutions are: remove slash from element 'a' in jsp " " and write the sql sentence same the User POJO
 Click New User link to add a new user. The New/Edit User page appears:
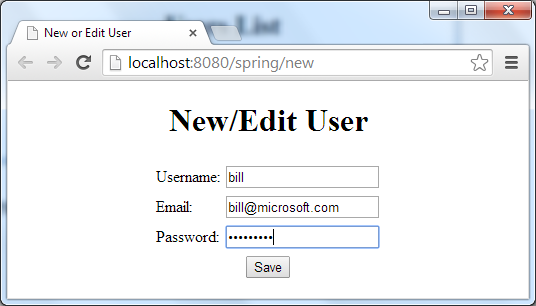 Enter some dummy information then click Save. The user is saved and we go back to the users list page:
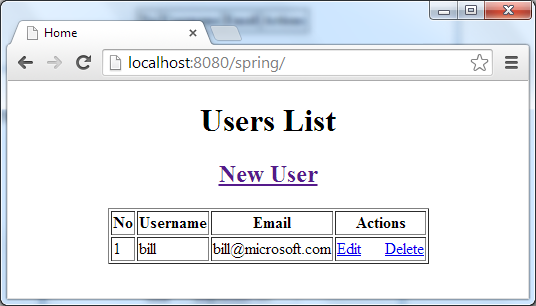 Now we can click Edit or Delete link to update or remove a user.Congratulations! You have completed our second part of the Spring-Hibernate integration series. For your convenience, we provide downloads for the project and a deployable WAR file in the attachments section. References:
  Nam Ha Minh is certified Java programmer (SCJP and SCWCD). He began programming with Java back in the days of Java 1.4 and has been passionate about it ever since. You can connect with him on Facebook and watch his Java videos on YouTube.
Comments
"web.xml is missing and is set to true"
After clicking "run on server" the project is NOT getting deployed.
Answer:--
Add false
in properties of your pom.xml file
change pom.xml
1.7
4.0.3.RELEASE
false