Understanding the core of Spring framework
- Details
- Written by Nam Ha Minh
- Last Updated on 24 June 2019 | Print Email
In this article I will provide a brief overview of Spring framework, its architecture and main features - Inversion of control (IOC) and Aspect oriented programming (AOP). Then we will jump start writing the Spring bean configurations (XML based and Annotation based) taking a real world example of Mr. XYZ writing a book, followed by how to initialize the Spring container.
Table of content:
- Overview and Architecture
- Spring beans definition
- Multiple Spring configuration files
- Using external properties in Spring configuration file
- Initializing the Spring container
Overview of Spring framework
The Spring is the lightweight open source framework which greatly simplifies the development of java based enterprise applications. Spring framework was created by Rod Johson and was described in his book “Expert One-on-One: J2EE Design and Development”. The Spring framework helps in developing loosely coupled and highly cohesive systems. Loose coupling is achieved by Spring’s Inversion of Control (IoC) feature and high cohesion is achieved by Spring’s Aspect oriented programming (AOP) feature.
Spring architecture
Spring framework provides a number of features which are required for developing an enterprise application. However it does not enforce the developers to integrate their application with the complete framework. The various features provided by Spring framework are categorized in seven different modules. Developers may choose to integrate their application with one or more Spring modules depending upon the features they want to use in their application.
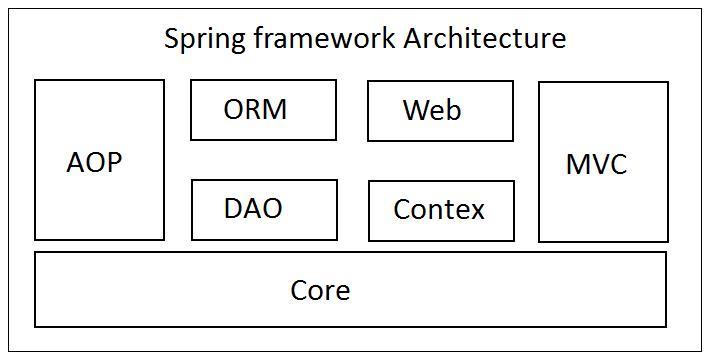
Spring framework architecture
Core container: The core container is the heart of Spring framework and all other modules are built on top of it. It provides the dependency injection feature, also is known as inversion of control. This module contains the BeanFactory (an implementation of factory pattern) which creates and manages the life cycle of the various application objects (known as beans) defined in the Spring bean configuration file.
Application context: This module provides various enterprise level services internationalisation (i18n), scheduling, JNDI access, email etc.
AOP: This module helps in implementing the various cross cutting concerns in the application like logging, transaction management etc. These concerns are decoupled from the application code and are injected into the various point cuts through configuration file.
Spring web: Spring framework helps in developing web based application by providing the Spring web module. This module is built on top of application context module and provides web oriented features.
Spring MVC: Spring MVC module is built on top of Spring web module and helps in developing web application based on MVC design pattern.
Spring DAO: Almost every enterprise application needs to interact with the database. Spring DAO module makes it easy to interact with database by providing an abstraction over low level JDBC tasks like creating a database connection, release it etc.
Spring ORM: There exist a number of popular object-relational mapping tools like Hibernate, iBatis, JPA etc. Spring ORM module helps in integrating with these tools.
Inversion of Control (IoC) or Dependency Injection (DI)
A typical java based enterprise application consists of a number of java classes. To accomplish its designated functionality, each java class (A.java) may depend on one or more other java classes. These other java classes are known as dependencies of the java class A. Generally, each class takes the responsibility to obtain the references of the classes it depends upon. This leads to highly coupled application.
Spring framework helps in developing the loosely coupled applications by delegating the responsibility of acquiring the dependencies of a java class to the Spring container and allowing the java class to focus only on its designated functionality. The Spring container injects the dependencies into the java class as the container is initialized (usually on application start up.)
Dependency injection is also known as inversion of control. Instead of java class obtaining their dependencies from the container, it is the container who is injecting the dependencies in the java class. So there is an inversion of control.
Aspect oriented programming (AOP)
There are a number of aspects which need to be taken care of during developing an enterprise application. These aspects might spread across the various layer of the application. For example logging, transaction management, exceptional handling, performance monitoring etc. These aspects are known as cross cutting concerns. Spring help us in implementing these aspects by providing AOP framework.
Simply put together, the Spring AOP framework hijacks the execution of the program and injects additional features typically before, after or around method execution.
Let us take an example of the logging aspect. Requirement is to
1. log an entry message before executing the method body
2. log an exit message after executing the message body
3. log the time taken by the method to complete the execution.
Here, logging is known as an Aspect. Method execution is known as the Join point. The piece of code which logs the entry message, the exit message and the time taken to execute the method are known as the three advices. The list of methods on which this behaviour is required is known as Point Cuts. And finally the java objects on which this aspect is applied are known as Targets.
There are a number of Advice available in AOP framework. These are :
1. Before advice – Run before the join point (method execution)
2. After returning advice – Run if the join point executes normally.
3. After throwing advice – Run if the join point throws an exception.
4. Around advice – Run around the join point (method execution)
So, Logging the entry message can be implemented by Before advice, Logging the exit message can be implemented by After advice and logging the time taken for method execution can be implemented using Around advice.
Spring beans definition
Let us start with a real world example. One fine day Mr. XYZ thought to writing a book. He chooses his favourite topic of Spring framework and decided the title of the book as “My First Spring Book”. To start with he decided to write two chapters with title “Spring framework - Chapter 1” and “Spring framework - Chapter 2”. Java implementation of this scenario will need a java class Title with an instance variable titleValue. The java class looks as below:
package net.codejava.frameworks.spring.bo;

public class Title {
      private String titleValue;

      public Title(){
      }

      public Title(String titleValue){
            this.titleValue = titleValue;
      }

      public String getTitleValue() {
            return titleValue;
      }

      public void setTitleValue(String titleValue) {
            this.titleValue = titleValue;
      }
}
There are two ways the object of class Title can be instantiated.
1. Using no-argument constructor followed by setter method
2. Using constructor with argument
The java code representation of writing the book title “My First Spring Book”, chapter 1 title “Spring framework - Chapter 1” and chapter2 title “Spring framework - Chapter 2” is shown below:
// Creating the title of the book
// Step 1: Instantiate the object by calling no-argument constructor
Title bookTitle = new Title();
// Step 2: Call the setter method to set title value
bookTitle.setTitleValue("My First Spring Book"); // Setter method
// Creating the titles of the chapters by calling one-argument constructor
Title chapter1Title = new Title("Spring framework - Chapter 1");
Title chapter2Title = new Title("Spring framework - Chapter 2");Notice that the objects of class Title are depended on titleValue. Without a titleValue, the object of Title class does not have any meaning. Thus titleValue is the dependency for classTitle. When we instantiated the object of class Title with a no argument constructor and then called the setter method to set the value of titleValue, it is known as injecting the dependencies using setter method. When we instantiated the object of class Title by calling the one-argument constructor, it is known as injecting the dependencies using constructor.
XML based Spring beans configuration
Let us see how these titles will look in a XML based Spring beans configuration file.
<?xml version="1.0" encoding="UTF-8"?>
<beans xmlns="http://www.springframework.org/schema/beans"
      xmlns:xsi="http://www.w3.org/2001/XMLSchema-instance"
      xsi:schemaLocation="http://www.springframework.org/schema/beans
      http://www.springframework.org/schema/beans/spring-beans-3.0.xsd">

<!-- Below is an example of injecting the dependencies using setter method -->
<bean id="bookTitle" class="net.codejava.frameworks.spring.bo.Title">
      <property name="titleValue">
            <value>My first Spring book</value>
      </property>
</bean>
<!-- Below are examples of injecting the dependencies using constructor -->
<bean id="chapter1Title" class="net.codejava.frameworks.spring.bo.Title">
      <constructor-arg>
            <value>Spring framework - Chapter 1</value>
      </constructor-arg>
</bean>
<bean id="chapter2Title" class="net.codejava.frameworks.spring.bo.Title">
      <constructor-arg>
            <value>Spring framework - Chapter 2</value>
      </constructor-arg>
</bean>
</beans>
Annotation based Spring beans configuration
The beans can also be defined in a java class using annotations. Let us assume that the class BeansConfiguration contains the definition of all the Spring beans. Then this class must have a class level annotation Configuration. Each method in this class will represent one bean if it is preceded by a method level annotation Bean. By default the bean name is equal to the method name. However this can be overridden using the name attribute of the Bean annotation. The annotation based representation of Spring bean configuration file is as below.
@Configuration
public class BeansConfiguration {
      @Bean
      public Title bookTitle(){
            Title title = new Title();
            title .setTitleValue("My first Spring book");
            return title ;
      }
      @Bean
      public Title chapter1Title(){
            returnnew Title("Spring framework - Chapter 1");
      }
       @Bean
      public Title chapter2Title(){
            returnnew Title("Spring framework - Chapter 2");
      }

}
Till now Mr. XYZ has only written the titles (for the book and the two chapters). Now he has started writing the content of the two chapters. Thus we need a java class Chapter.
package net.codejava.frameworks.spring.bo;
public class Chapter {
      private int number;
      private Title title;
      private String content;
      public Chapter(){
      }
      public Chapter(int number, Title title, String content){
            this.number = number;
            this.title = title;
            this.content = content;
      }
      public int getNumber() {
            return number;
      }
      public void setNumber(int number) {
            this.number = number;
      }
      public Title getTitle() {
            return title;
      }
      public void setTitle(Title title) {
            this.title = title;
      }
      public String getContent() {
            return content;
      }
      public void setContent(String content) {
            this.content = content;
      }
}
Now Mr. XYZ has finished writing the two chapters. The java code representation is shown below.
// Injecting the dependencies of chapter1 using setter method
Chapter chapter1 = new Chapter();
Chapter1.setContent("The content of chapter 1 goes here.");
Chapter1.setNumber(1);
Chapter1.setTitle(chapter1Title);
 // Injecting the dependencies of chapter2 using constructor method
Chapter chapter2 =  new Chapter( 2, chapter2Title, "The content of chapter 2 goes here.");
Note that we have already created chapter1Title and chapter2Title.
Let us see how these chapters will look in an XML based Spring beans configuration file.
<!-- injecting the dependencies of chapter1 using setter method -->
<bean id="chapter1" class="net.codejava.frameworks.spring.bo.Chapter">
<property name="number">
            <value>1</value>
      </property>
      <property name="content">
            <value>The content of chapter 1 goes here.</value>
      </property>
      <property name="title">
            <ref bean="chapter1Title"/>
      </property>
</bean>
Note that while setting the property title in chapter1 bean we have used element ref instead of element value. This is because we have already configured the chapter1Title bean above and are simply referring the bean here.
<!-- injecting the dependencies of chapter 2 using constructor by index -->
<bean id="chapter2" class="net.codejava.frameworks.spring.bo.Chapter">
      <constructor-arg index="0">
            <value>2</value>
      </constructor-arg>
      <constructor-arg index="1">
            <ref bean="chapter2Title"/>
      </constructor-arg>
      <constructor-arg index="2">
            <value>The content of chapter 2 goes here.</value>
      </constructor-arg>
</bean>
In the above example of dependency injection using constructor, we have mapped the parameters with constructor arguments by index, explicitly telling which parameter will be mapped with which constructor argument. i.e The value 2 will be mapped with the first constructor argument (index = 0), the chaper2Title will be mapped with seconds constructor argument (index = 1) and value “The content of chapter 2 goes here.” will be mapped with third constructor argument (index = 2). We can also map the parameters with constructor arguments by their types. The Spring bean representation of chapter2 using dependency injection by constructor by type is shown below.
<!-- injecting the dependencies of chapter 2 using constructor by type -->
<bean id="chapter2" class="net.codejava.frameworks.spring.bo.Chapter">
      <constructor-arg type="int">
            <value>2</value>
      </constructor-arg>
      <constructor-arg type="net.codejava.frameworks.spring.bo.Title">
            <ref bean="chapter2Title"/>
      </constructor-arg>
      <constructor-arg type="String">
            <value>The content of chapter 2 goes here.</value>
      </constructor-arg>
</bean>
In case we have not previously defined the bean chapter1Title then we can define it directly while defining the bean chapter1. In this case the bean chapter1Title will be considered as an inner bean.
<!-- injecting the dependencies of chapter 1 by using inner bean -->
<bean id="chapter1" class="net.codejava.frameworks.spring.bo.Chapter">
      <property name="number">
            <value>1</value>
      </property>
      <property name="content">
            <value>The content of chapter 1 goes here.</value>
      </property>
      <property name="title">
            <bean class="net.codejava.frameworks.spring.bo.Title">
                  <constructor-arg>
                        <value>Spring framework - Chapter 1</value>
                  </constructor-arg>
            </bean>
      </property>
</bean>
The Chapter beans can also be configured in a java class using annotation (as we have configured Title beans) in class BeansConfiguration.
@Configuration
public class BeansConfiguration {
// Title beans already defined earlier
      @Bean
      public Chapter chapter1(){
            // Injecting the dependencies using setter method
            Chapter chapter = new Chapter();
            chapter.setContent("The content of chapter 1 goes here.");
            chapter.setNumber(1);
            chapter.setTitle(chapter1Title);
            return chapter;
      }

      @Bean
      public Chapter chapter2(){
            // Injecting the dependencies of chapter2 using constructor method
            return new Chapter(2, chapter2Title, "The content of chapter 2 goes here.");      }
}
Finally after writing the two chapters, Mr. XYZ decided to compile his book. He has got his book registered with ISBN value of 1 (ignore the ISBM format for this article). The java Book class looks as below.
package net.codejava.frameworks.spring.bo;
import java.util.List;
public class Book {
      private int isbn;
      private String author;
      private Title title;
      private List<Chapter> chapters;

      public Book(){
      }

      public Book(int isbn, String author, Title title, List<Chapter> chapters){
            this.isbn = isbn;
            this.author = author;
            this.title = title;
            this.chapters = chapters;
      }

      public int getIsbn() {
            returnisbn;
      }

      public void setIsbn(int isbn) {
            this.isbn = isbn;
      }

      public String getAuthor() {
            returnauthor;
      }
      public void setAuthor(String author) {
           this.author = author;
      }
      public Title getTitle() {
            returntitle;
      }
      public void setTitle(Title title) {
            this.title = title;
      }
      public List<Chapter> getChapters() {
            return chapters;
      }
      public void setChapters(List<Chapter> chapters) {
            this.chapters = chapters;
      }
}
Below is Mr. XYZ’s firstSpringBook bean in XML based Spring configuration file.
<bean id="myFirstSpringBook" class="net.codejava.frameworks.spring.bo.Book">
      <property name="isbn">
            <value>1</value>
      </property>
      <property name="author">
            <value>Mr. XYZ</value>
      </property>
      <property name="title">
            <ref bean="bookTitle"/>
      </property>
      <property name="chapters">
            <list>
                  <ref bean="chapter1"/>
                  <ref bean="chapter2"/>
            </list>
      </property>
</bean>
Note that in the above bean definition we have made references to previously defined bookTitle bean and chapter1 & chapter2 beans. Also we have used setter based dependencies injection.
Annotation based bean definition of myFirstSpringBook bean is as below:
@Configuration
public class BeansConfiguration {

// Title and Chapter beans already defined earlier

      @Bean
      public Book myFirstSpringBook(){
            Book book = new Book();
            book.setIsbn(1);
            book.setAuthor("Mr. XYZ");
            book.setTitle(bookTitle);
            List<Chapter> chapters = new ArrayList<Chapter>();
            chapters.add(chapter1);
            chapters.add(chapter2);
            book.setChapters(chapters );
            return book;
      }
}
Finally Mr. XYZ has published his book on Spring framework. And he is now ready to write many more books on his favourite topics.
Let us recap what we have learned so far.
1. Spring beans definition in
a. XML based Spring definition file
b. Java annotation based Spring definition file
2. Dependencies injection
a. Using setter method
b. Using constructor
i.Mapping via index
ii.Mapping via Type
3. Inner beans
4. Referring previously defined beans
Multiple Spring configuration files
Ah. While we were recapping what we have learned so far, Mr. XYZ has written so many more books. So he has defined many more beans (Titles, Chapters and Books) in the Spring bean configuration file. But Mr. XYZ was not perfect. He wants to make some changes in the some of the beans. And he has to go through the long bean definition file to find his bean of interest and change it as per his new need. It is getting more difficult to maintain so many beans in a single configuration file. We have a solution for Mr. XYZ.
Let us categories the beans in some logical groups. All the title beans in one group, all the chapter beans in second group and all the book beans in third logical group (There can be other logical groupings as well). And thus we will have three bean definition files.
The following are the XML based multiple Spring definition file
1. titles.xml – containing all the title beans (both for books and chapters)
2. chapters.xml – containing all the chapter beans
3. books.xml – containing all the book beans
4. beans.xml (optional) – this is a bean definition file which will import all other three bean definition files. This is an optional file because we can import the chapters and titles bean file in books.xml file.
The structure of beans.xml is as below:
<?xml version="1.0" encoding="UTF-8"?>
<beans xmlns="http://www.springframework.org/schema/beans"
      xmlns:xsi="http://www.w3.org/2001/XMLSchema-instance"
      xsi:schemaLocation="http://www.springframework.org/schema/beans
      http://www.springframework.org/schema/beans/spring-beans-3.0.xsd">

      <import resource="books.xml"/>
      <import resource="chapters.xml"/>
      <import resource="titles.xml"/>
</beans>
Assuming that Mr. XYZ has used java annotation based Spring definitions. In this case
1. TitlesConfiguration.java – containing all the title beans
2. ChaptersConfiguration.java – containing all the chapter beans
3. BooksConfiguration.java – containing all the book beans
4. BeansConfiguration.java (Optional) – this is a bean definition file which will import all other three bean definition files. Again, this is optional file because we can import chapters and titles beans in BooksConfiguration file
The structure of BeansConfiguration.java is as below:
@Import({TitlesConfiguration.class,ChaptersConfiguration.class,BooksConfiguration.class})
@Configuration
publicclass BeansConfiguration {

}
Note the class level annotation Import being used at the top of the class in addition to Configuration annotation.
Let us also look at the content of other three java annotations based Spring beans configuration files.
@Configuration
public class TitlesConfiguration {
      @Bean
      public Title chapter1Title(){
            Title chapter1Title = new Title();
            chapter1Title.setTitleValue("Spring framework - Chapter 1");
            return chapter1Title;
      }

      @Bean
      public Title chapter2Title(){
            returnnew Title("Spring framework - Chapter 2");
      }
      @Bean
      public Title bookTitle(){
            returnnew Title("My first Spring book");
      }
}
@Import(TitlesConfiguration.class)
@Configuration
public class ChaptersConfiguration {
      @Autowired Title chapter1Title;
      @Bean
      public Chapter chapter1(){
            Chapter chapter = new Chapter();
            chapter.setContent("The content of chapter 1 goes here.");
            chapter.setNumber(1);
            chapter.setTitle(chapter1Title);
            return chapter;
      }
      @Autowired Title chapter2Title;
      @Bean
      public Chapter chapter2(){
            returnnew Chapter(2,chapter2Title,"The content of chapter 2 goes here.");
      }
}
Points to note:
1. A class level annotation Import being used to import title beans. This is required because chapter beans depend on title beans.
2. Member level annotation Autowired being used for member variable chapter1Title and chapter2Title. Although the title beans has not been initialised, they will be automatically initialized by the Spring container on seeing the Autowired annotation.
@Import(ChaptersConfiguration.class)
@Configuration
public class BooksConfiguration {
      @Autowired Title bookTitle;
      @Autowired Chapter chapter1;
      @Autowired Chapter chapter2;
      @Autowired Chapter chapter3;

      @Bean
      public Book myFirstSpringBook(){
            Book book = new Book();
            book.setIsbn(1);
            book.setAuthor("Mr. XYZ");
            book.setTitle(bookTitle);
            List<Chapter> chapters = new ArrayList<Chapter>();
            chapters.add(chapter1);
            chapters.add(chapter2);
            chapters.add(chapter3);
            book.setChapters(chapters );
            return book;
      }
}
Similar to ChaptersConfiguration, BooksConfiguration also has an Import annotation. This ensures that all the Chapter beans are also imported by the Spring container. Now, since ChaptersConfiguration already import TitlesConfiguration so there is no need to explicitly import the TitlesConfiguration.
Using external properties in Spring configuration file
Although we have made the life of Mr. XYZ simple by modularising the bean definition file, he is still not happy with us. Every time he has to update the title or chapter content he has to refer the bean definition file which also contains the bean definitions. What MR. XYZ is interested in is just the content (title, chapter content etc). So he wants the content to be separated from the actual bean definitions. We have a solution for him.
Let us revisit the titles.xml file. It contains the title value for book, and various chapters. Let us move these values into a property file named title.properties. So our title.properties file will look like:
myFirstSpringBook.title = My first Spring book
myFirstSpringBook.chapter1.title = Spring framework - Chapter 1
myFirstSpringBook.chapter2.title = Spring framework - Chapter 2
Now in the titles.xml file we will define a PropertyPlaceholderConfigurer bean and will replace the title values with their keys as below.
<beans xsi:schemaLocation="http://www.springframework.org/schema/beans
    http://www.springframework.org/schema/beans/spring-beans-3.0.xsd"
    xmlns="http://www.springframework.org/schema/beans"
    xmlns:xsi="http://www.w3.org/2001/XMLSchema-instance">
   <bean class="org.springframework.beans.factory.config.PropertyPlaceholderConfigurer">
      <property name="location">
         <value>title.properties</value>
      </property>
   </bean>
   <bean id="bookTitle" class="net.codejava.frameworks.spring.bo.Title">
      <property name="titleValue">
         <value>${myFirstSpringBook.title}</value>
      </property>
   </bean>
   <!--Below are examples of injecting the dependencies using constructor-->
   <bean id="chapter1Title" class="net.codejava.frameworks.spring.bo.Title">
      <constructor-arg>
         <value>${myFirstSpringBook.chapter1.title}</value>
      </constructor-arg>
   </bean>
   <bean id="chapter2Title" class="net.codejava.frameworks.spring.bo.Title">
      <constructor-arg>
         <value>${myFirstSpringBook.chapter2.title}</value>
      </constructor-arg>
   </bean>
</beans>
Java annotation based Spring configuration equivalent to XML based Spring configuration for title beans is as below.
@Configuration
@PropertySource("classpath:beans.properties")
public class TitlesConfiguration {
      @Autowired Environment env;

      @Bean
      public Title bookTitle(){
            Title title = new Title();
            title .setTitleValue(env.getProperty("myFirstSpringBook.title"));
            return title ;
      }

      @Bean
      public Title chapter1Title(){
            return new Title(env.getProperty("myFirstSpringBook.chapter1.title"));
      }
      @Bean
      public Title chapter2Title(){
            return new Title(env.getProperty("myFirstSpringBook.chapter2.title"));
      }
 }
Points to note:
1. We have imported the title.properties file using class level annotation PropertySource.
2. We have declared one instance variable of type Environment and used the field level annotation Autowired so that the Spring framework automatically assign the value to this variable.
3. To fetch the value of the key from the property file we used env.getProperty(key).
Initializing the Spring container
In the previous section, we have learned how to define the various beans in Spring configuration file. Now, we will initialize the Spring container asking it to load the various beans defined in the Spring configuration file. There are two flavours of Spring beans container.
1. Bean factories
2. Application context
Bean factories
Spring framework provides an implementation of bean factory container in form of XmlBeanFactory.
1. Loading Spring beans from XML file present in file system:
Resource resource1 = new FileSystemResource("SourceCode/config/beans.xml");
BeanFactory beanFactory1 = new XmlBeanFactory(resource1);
2. Loading Spring beans from XML file present in classpath:
Resource resource2 = new ClassPathResource("beans.xml");
BeanFactory beanFactory1 = new XmlBeanFactory(resource);
The above code will load all the beans defined in the file beans.xml. Now, to obtain the instance of the bean, java code is as below:
Book myFirstSpringBook = (Book) beanFactory.getBean("myFirstSpringBook");Application context
Spring framework provides many implementation of application context container.
1. Loading Spring beans from XML file present in file system:
ApplicationContext applicationContext = new FileSystemXmlApplicationContext(
                                        "SourceCode/config/beans.xml");
2. Loading Spring beans from multiple XML file present in file system:
ApplicationContext applicationContext = new FileSystemXmlApplicationContext(
                        "SourceCode/config/books.xml",
                        "SourceCode/config/chapters.xml",
                        "SourceCode/config/titles.xml");
3. Loading Spring beans from XML file present in classpath:
ApplicationContext applicationContext = new ClassPathXmlApplicationContext("beans.xml");4. Loading Spring beans from multiple XML file present in classpath:
ApplicationContext applicationContext = new ClassPathXmlApplicationContext(
                        "books.xml",
                        "chapters.xml",
                        "titles.xml");
5. Loading Spring beans from Annotation based configuration java file:
ApplicationContext applicationContext = new AnnotationConfigApplicationContext(BeansConfiguration.class);
6. Loading Spring beans from multiple Annotation based configuration java file:
ApplicationContext applicationContext = new AnnotationConfigApplicationContext(
                                TitlesConfiguration.class,
                                ChaptersConfiguration.class,
                                BooksConfiguration.class);
Conclusion
In this article we have introduced with the Spring framework, its architecture and main features. We have learned how the Spring framework helps us develop loosely coupled applications using dependency injection where the dependant objects are injected using a configuration file. We have seen two flavours of Spring bean configuration file – XML based and Annotation based. Finally we have seen various flavours of Spring beans container – bean factories and application context.
Other Spring Tutorials:
- Understand Spring MVC
- Understand Spring AOP
- Spring Dependency Injection Example with XML Configuration
- Spring MVC beginner tutorial with Spring Tool Suite IDE
- Spring MVC Form Handling Tutorial
- Spring MVC Form Validation Tutorial
- 14 Tips for Writing Spring MVC Controller
- Spring Web MVC Security Basic Example (XML Configuration)
- Understand Spring Data JPA with Simple Example
About the Author:
 Nam Ha Minh is certified Java programmer (SCJP and SCWCD). He began programming with Java back in the days of Java 1.4 and has been passionate about it ever since. You can connect with him on Facebook and watch his Java videos on YouTube.
| [Java project in Eclipse IDE] | 2197 kB |
Comments
It's a wonderful tutorial.
One spelling mistake is under "Java annotation based Spring configuration equivalent to XML based Spring configuration for title beans is as below." it should be 'title.properties' for @PropertySource annotation not 'bean.properties'. Please check and modify.
Yes, you need to be familiar with all those 3 types. They are usually mixed in Spring projects.