Exporting data to Excel documents is a common feature of almost any applications. Through this article, I’m very glad to share with you guys my experience in implementing Excel export function in a Spring Boot application with the help of Apache POI Excel library.Suppose that we have an existing Spring Boot project using Spring Data JPA and Hibernate to access data, Thymeleaf to render the view and MySQL as the database.The code examples below demonstrate how to retrieve information about users from the database, and generate an Excel file which the users can download onto their computers.
1. Code of Entity Classes and Repositories Interfaces
We have the Userentity class that maps to the users table in the database, as shown below:
package net.codejava;

import java.util.*;

import javax.persistence.*;

@Entity
@Table(name = "users")
public class User {
	@Id
	@GeneratedValue(strategy = GenerationType.IDENTITY)
	private Integer id;

	private String email;

	private String password;

	@Column(name = "full_name")
	private String fullName;

	private boolean enabled;

	@ManyToMany(cascade = CascadeType.PERSIST, fetch = FetchType.EAGER)
	@JoinTable(
			name = "users_roles",
			joinColumns = @JoinColumn(name = "user_id"),
			inverseJoinColumns = @JoinColumn(name = "role_id")
			)
	private Set<Role> roles = new HashSet<>();

	// constructors, getter and setters are not shown for brevity
}
And the Roleentity class that maps to the roles table in the database:
package net.codejava;

import javax.persistence.*;

@Entity
@Table(name = "roles")
public class Role {
	@Id
	@GeneratedValue(strategy = GenerationType.IDENTITY)
	private Integer id;

	private String name;

	private String description;

	// constructors, getter and setters are not shown for brevity
}
The fields will be included in the generated Excel document are: User ID, E-mail, Full Name, Roles and Enabled.And code of the respective repository interfaces looks like this:
package net.codejava;

import org.springframework.data.jpa.repository.JpaRepository;

public interface UserRepository extends JpaRepository<User, Integer> {

}


public interface RoleRepository extends CrudRepository<Role, Integer> {

}
These are simple, typical repositories as required by Spring Data JPA.
2. Declare Dependency for Excel Library
To generate Excel file, we need to use an external library and Apache POI is one of the most popular ones. So we need to declare the following dependency to use Apache POI for Excel in the Maven’s project file:
In the service layer, we may have the UserServicesclass as follows:
package net.codejava;

import java.util.List;

import javax.transaction.Transactional;

import org.springframework.beans.factory.annotation.Autowired;
import org.springframework.data.domain.Sort;
import org.springframework.stereotype.Service;

@Service
@Transactional
public class UserServices {

	@Autowired
	private UserRepository repo;

	public List<User> listAll() {
		return repo.findAll(Sort.by("email").ascending());
	}

}
As you can see, the listAll() method delegates the call to the findAll() method of the UserRepository interface, which is implemented by Spring Data JPA (extended from JpaRepository). The listAll() method will be invoked to get data about users from the database.
4. Code Excel Exporter Class
Next, code a separate class that is responsible to generate an Excel document based on the input is a List collection of User objects, as shown below:
This class will create an Excel document with one sheet containing a header row and rows for the data. The header row consists of these columns: User ID, E-mail, Full Name, Roles and Enabled.Pay attention to the export() method that takes an HttpServletRespone as the argument, because it will write the content of the Excel file into the output stream of the response, so the clients (web browsers) will be able to download the exported Excel file.
5. Code Handler method in the Controller Class
Next, implement a handler method in a Spring MVC controller class – UserController – as follows:
As you can see the exportToExcel() method will serve HTTP GET request with the URI /users/export/excel. It will use the UserServices class to get data of users from the database, and use the UserExcelExporter class to write an Excel document to the response.Also notice name of the generated Excel file is appended with the current date time, making it’s easier for the users to track multiple versions of files downloaded.
6. Add Export Excel Link in the View Page
We use HTML and Thymeleaf to create a hyperlink that allows the user to click to export data to Excel as follows:
<a th:href="/@{/users/export/excel}">Export to Excel</a>
7. Test Export and Download Excel file
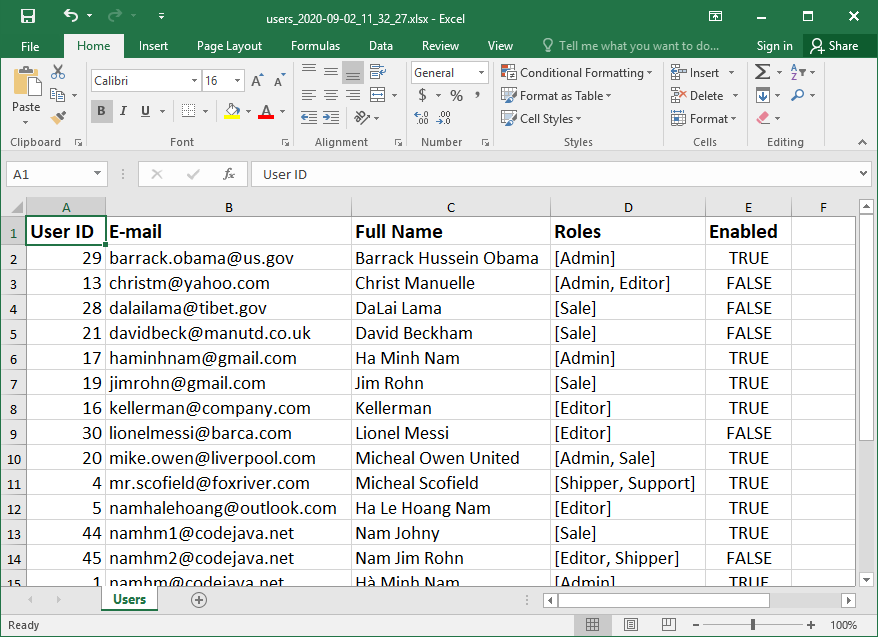
Click the hyperlink Export to Excel, the Spring Boot application will generate an Excel file and the browser will automatically download that file. The file name is something like this: users_2020-09-02_11-30-06.xlsx. Open this file using Microsoft Excel application, you would see the following screen:
Conclusion
So far you have learned how to code Excel export function for a Spring Boot web application. You see, Spring Data JPA makes it easy to get data from the database, and Apache POI makes it easy to generate documents compatible with Microsoft Excel format.For video version of this tutorial, watch the video below:
Nam Ha Minh is certified Java programmer (SCJP and SCWCD). He began programming with Java back in the days of Java 1.4 and has been passionate about it ever since. You can connect with him on Facebook and watch his Java videos on YouTube.
 Nam Ha Minh is certified Java programmer (SCJP and SCWCD). He began programming with Java back in the days of Java 1.4 and has been passionate about it ever since. You can connect with him on Facebook and watch his Java videos on YouTube.
Comments
this is comment
thanks for this article.
How can I consume this method with angular?
Thank you
Roberto