In this Spring Security tutorial, I’d love to share with you how to implement authorization by adding roles to users in a Java web application – from database design to entity classes; from unit tests to adding default role in user registration; to updating a user’s roles in web form.Technologies: Spring Web MVC, Spring Data JPA, Hibernate framework, Spring Security, Spring Boot Test, JUnit 5, AssertJ, Thymeleaf and MySQL database.Basically, we need to have 3 tables in the database like this:A user can have one or more roles, and a role can be assigned to one or more users, thus the entity relationship between users and roles tables is many to many. The users_roles is an intermediate table that realizes this relationship.
1. Code for User and Role Entity Classes & Repositories
Code the Userentity class as follows:
package net.codejava;

import java.util.HashSet;
import java.util.Set;

import javax.persistence.*;

@Entity
@Table(name = "users")
public class User {

	@Id
	@GeneratedValue(strategy = GenerationType.IDENTITY)
	private Long id;

	@Column(nullable = false, unique = true, length = 45)
	private String email;

	@Column(nullable = false, length = 64)
	private String password;

	@Column(name = "first_name", nullable = false, length = 20)
	private String firstName;

	@Column(name = "last_name", nullable = false, length = 20)
	private String lastName;

	@ManyToMany(fetch = FetchType.EAGER)
	@JoinTable(
			name = "users_roles",
			joinColumns = @JoinColumn(name = "user_id"),
			inverseJoinColumns = @JoinColumn(name = "role_id")
	)
	private Set<Role> roles = new HashSet<>();

	public void addRole(Role role) {
		this.roles.add(role);
}

	// getters and setters are not shown for brevity
}
And code the Roleentity class like this:
package net.codejava;

import javax.persistence.*;

@Entity
@Table(name = "roles")
public class Role {
	@Id
	@GeneratedValue(strategy = GenerationType.IDENTITY)
	private Integer id;

	@Column(nullable = false, length = 45)
	private String name;

	public Role() { }

	public Role(String name) {
		this.name = name;
	}

	public Role(Integer id, String name) {
		this.id = id;
		this.name = name;
	}

	public Role(Integer id) {
		this.id = id;
	}


	@Override
	public String toString() {
		return this.name;
	}

	// getters and setters are not shown for brevity
}
As you can see, the User class has a Set of Roles but the Role class doesn’t have any references of User. And by default, no cascade operations on a @ManyToMany relationship – that means updating a User object won’t change the associated Role objects.
2. Unit Test – Create Roles
Next, let’s code the following test class for persisting some Role objects into the database:
package net.codejava;

import static org.assertj.core.api.Assertions.assertThat;

import java.util.List;

import org.junit.jupiter.api.Test;
import org.springframework.beans.factory.annotation.Autowired;
import org.springframework.boot.test.autoconfigure.jdbc.AutoConfigureTestDatabase;
import org.springframework.boot.test.autoconfigure.jdbc.AutoConfigureTestDatabase.Replace;
import org.springframework.boot.test.autoconfigure.orm.jpa.DataJpaTest;
import org.springframework.test.annotation.Rollback;

@DataJpaTest
@AutoConfigureTestDatabase(replace = Replace.NONE)
@Rollback(false)
public class RoleRepositoryTests {

	@Autowired private RoleRepository repo;

	@Test
	public void testCreateRoles() {
		Role user = new Role("User");
		Role admin = new Role("Admin");
		Role customer = new Role("Customer");

		repo.saveAll(List.of(user, admin, customer));

		List<Role> listRoles = repo.findAll();

		assertThat(listRoles.size()).isEqualTo(3);
	}

}
Run the testCreateRoles() method, we’ll end up having 3 new rows inserted to the roles table, according to 3 roles: User, Admin and Customer.
3. Unit Test – Add Roles to User
For testing add roles to users, create the UserRepositoryTests class with the following initial code:
And the following is code snippet of the first test methods that persists a User object without any Roles:
@Test
public void testCreateUser() {
	User user = new User();
	user.setEmail("ravikumar@gmail.com");
	user.setPassword("ravi2020");
	user.setFirstName("Ravi");
	user.setLastName("Kumar");

	User savedUser = userRepo.save(user);

	User existUser = entityManager.find(User.class, savedUser.getId());

	assertThat(user.getEmail()).isEqualTo(existUser.getEmail());

}
And the following test method creates a new user with Admin role:
@Test
public void testAddRoleToNewUser() {
	Role roleAdmin = roleRepo.findByName("Admin");

	User user = new User();
	user.setEmail("mikes.gates@gmail.com");
	user.setPassword("mike2020");
	user.setFirstName("Mike");
	user.setLastName("Gates");
	user.addRole(roleAdmin);

	User savedUser = userRepo.save(user);

	assertThat(savedUser.getRoles().size()).isEqualTo(1);
}
And the following test will update an existing user by adding two roles User and Customer:
@Test
public void testAddRoleToExistingUser() {
	User user = userRepo.findById(1L).get();
	Role roleUser = roleRepo.findByName("User");
	Role roleCustomer = new Role(3);

	user.addRole(roleUser);
	user.addRole(roleCustomer);

	User savedUser = userRepo.save(user);

	assertThat(savedUser.getRoles().size()).isEqualTo(2);
}
Run these test methods and you will see rows inserted into the users and users_roles tables. The roles table is not affected.
4. Set Default Role for User in Registration
A common scenario in user registration is setting the default role for a newly registered user, e.g. User or Customer role. Below is an example code snippet at service layer:
package net.codejava;

@Service
public class UserService {

	@Autowired
	private UserRepository userRepo;

	@Autowired RoleRepository roleRepo;

	@Autowired PasswordEncoder passwordEncoder;

	public void registerDefaultUser(User user) {
		Role roleUser = roleRepo.findByName("User");
		user.addRole(roleUser);

		userRepo.save(user);
	}

}
And the code at controller layer:
package net.codejava;

@Controller
public class AppController {

	@Autowired
	private UserService service;

	@PostMapping("/register")
	public String processRegister(User user) {
		service.registerDefaultUser(user);

		return "register_success";
	}
}
As you can see, it’s very simple – thanks to Spring Data JPA and Hibernate framework that greatly simplifies coding of the data access layer.
5. Assign Roles for User in Web Form
Now, I will show you how to code edit user functionality with web user interface in which we can change the roles assigned to a user.Firstly, implement the following method in UserServiceclass:
public List<User> listAll() {
	return userRepo.findAll();
}
It will show a list of users at the URL http://localhost.../users as shown below:On this users listing page, we can click on an Edit hyperlink to edit a user. So code the handler method like this:
@GetMapping("/users/edit/{id}")
public String editUser(@PathVariable("id") Long id, Model model) {
	User user = service.get(id);
	List<Role> listRoles = service.listRoles();
	model.addAttribute("user", user);
	model.addAttribute("listRoles", listRoles);
	return "user_form";
}
And implement the following two methods in the service class:
public User get(Long id) {
	return userRepo.findById(id).get();
}

public List<Role> listRoles() {
	return roleRepo.findAll();
}
And in the view layer, write the following code for the edit user form:
Then the edit user form would look like this:The cool thing here is that Thymeleaf automatically shows the selected roles according to the roles assigned to the user. And more, you can simply check/uncheck roles here to update roles for the user.And code the handler method for handling form submission as simple as below:
@PostMapping("/users/save")
public String saveUser(User user) {
	service.save(user);

	return "redirect:/users";
}
And the relevant code at the service layer:
public void save(User user) {
	userRepo.save(user);
}
That’s some code examples about adding roles to users in a Spring Boot web application. I hope you’ve found this written tutorial helpful.If you prefer watching video, I’d like to recommend you watch this video to see the coding in action:
Nam Ha Minh is certified Java programmer (SCJP and SCWCD). He began programming with Java back in the days of Java 1.4 and has been passionate about it ever since. You can connect with him on Facebook and watch his Java videos on YouTube.
I believe, for a guy like you, it will be easy to publish a new version of the Spring Security Add Roles to User tutorial based on the latest Spring Boot 3.2.x, which will make it stay relevant for a long time.
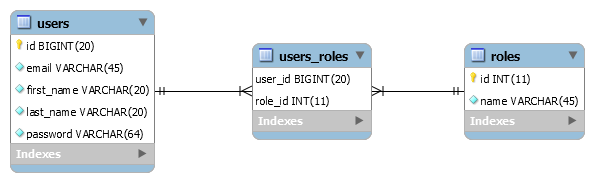 A user can have one or more roles, and a role can be assigned to one or more users, thus the entity relationship between users and roles tables is many to many. The users_roles is an intermediate table that realizes this relationship.
 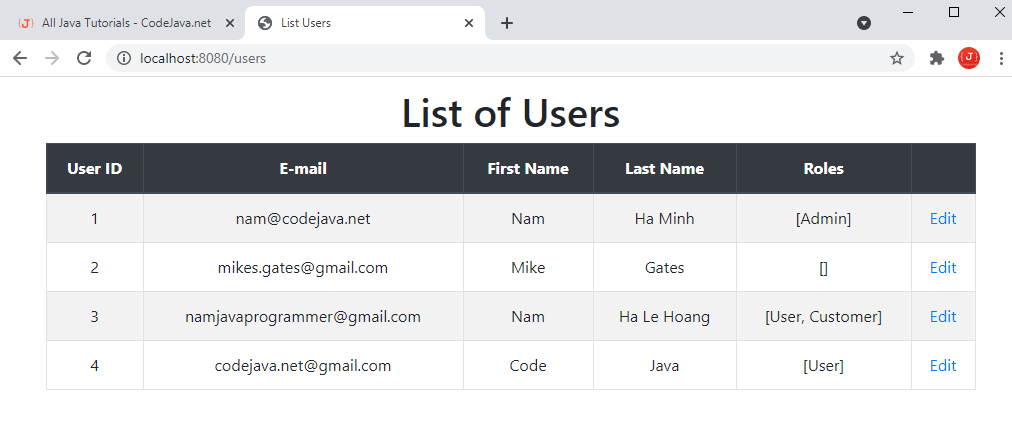 On this users listing page, we can click on an Edit hyperlink to edit a user. So code the handler method like this:
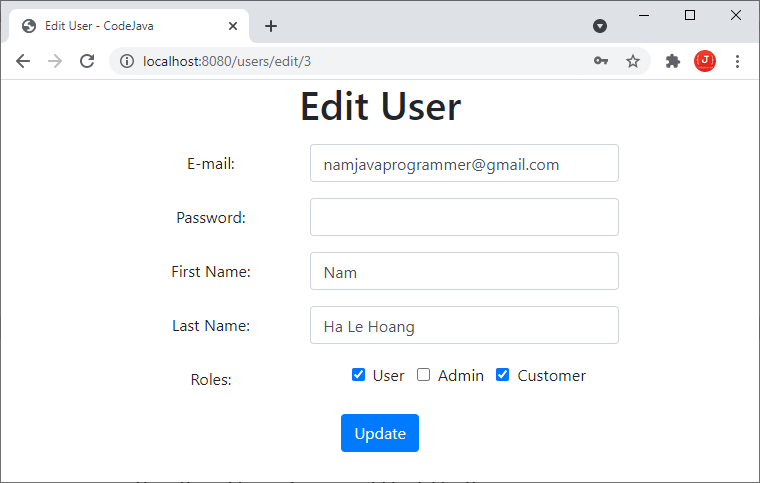 The cool thing here is that Thymeleaf automatically shows the selected roles according to the roles assigned to the user. And more, you can simply check/uncheck roles here to update roles for the user.And code the handler method for handling form submission as simple as below:
 Nam Ha Minh is certified Java programmer (SCJP and SCWCD). He began programming with Java back in the days of Java 1.4 and has been passionate about it ever since. You can connect with him on Facebook and watch his Java videos on YouTube.
Comments
to publish a new version of the Spring Security
Add Roles to User tutorial based on the latest
Spring Boot 3.2.x, which will make it stay relevant
for a long time.
Thank you,