How to create a Spring Boot Web Application (Spring MVC with JSP/ThymeLeaf)
- Details
- Written by Nam Ha Minh
- Last Updated on 11 March 2020 | Print Email
1. Create Spring Boot Project in Eclipse
3. Create Model, Business and Controller Classes
4. How to use JSP with Spring Boot
5. How to use ThymeLeaf with Spring Boot
6. How to use CSS, Javascript and Images
8. Configure Server Port Number and Context Path
9. How to package the application to JAR/WAR
1. Create Spring Boot Project in Eclipse
You need to generate a Spring Boot project using Spring Initializr web tool and then import in Eclipse.Go to https://start.spring.io/. By default, the project type is Maven with Java and Spring Boot stable version (2.0.4). Enter the project metadata (Group and Artifact) and choose the Web dependency as shown in the following screenshot: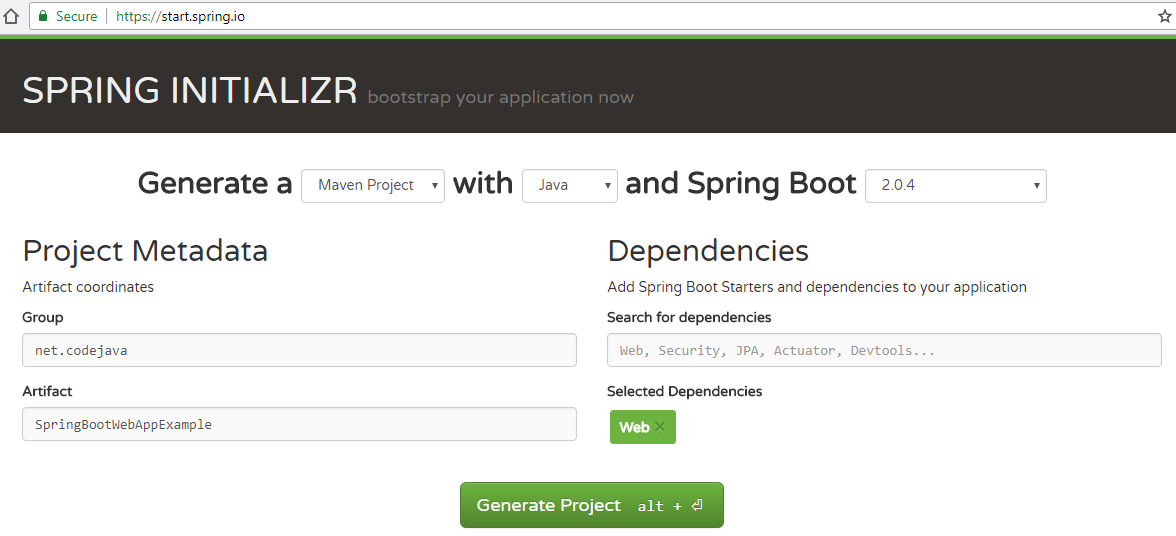 Click Generate Project to download the generated project as a Zip file, say SpringBootWebAppExample.zip. Extract it to your Eclipse’s workspace directory.In Eclipse, click File > Import… In the Import dialog, select General > Projects from Folder or Archive, and click Next. In the next screen, click Directory… to browse the directory you have extracted, and then Eclipse detects the project to be imported as Maven:
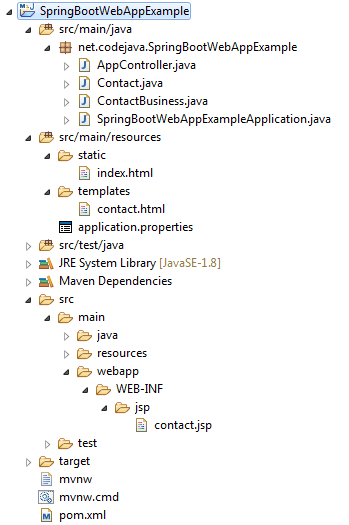
 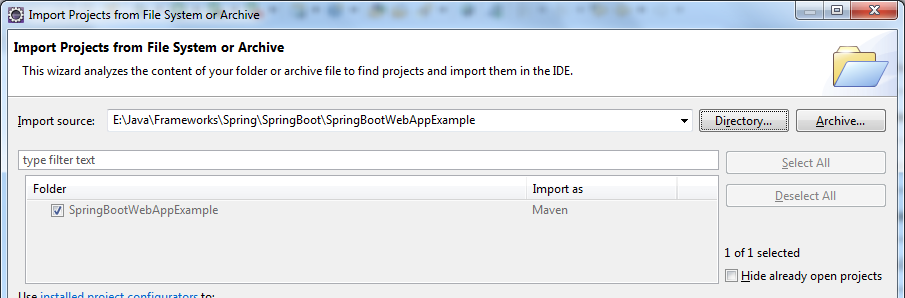 Click Finish and you may have to wait for a while, when Eclipse is updating the Maven project, i.e. downloading JAR files of the dependencies. Then you can see the project has the following initial structure:
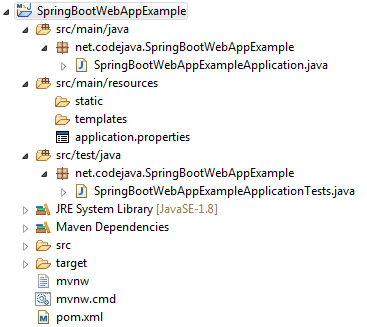 Open the pom.xml file to see Maven dependencies. You see it’s very simple, there are only two dependencies declared:
<dependencies>
	<dependency>
		<groupId>org.springframework.boot</groupId>
		<artifactId>spring-boot-starter-web</artifactId>
	</dependency>

	<dependency>
		<groupId>org.springframework.boot</groupId>
		<artifactId>spring-boot-starter-test</artifactId>
		<scope>test</scope>
	</dependency>
</dependencies>
The dependency spring-boot-starter-web enables web development with Spring MVC and embedded Tomcat server. It requires all common dependencies (Spring framework, logging, validation, JSON, …) with proper versions so you don’t have to struggle with a lot of dependencies and their versions like normal Spring MVC application development.You can remove the dependency spring-boot-starter-test if you don’t use tests. When doing so, also delete the test class Spring-Boot-Web-App-Example-Application-Tests.java (no hyphens) under src/test/java directory.Expand the Maven Dependencies folder to see various JAR files required by the project, and the good thing is you don’t have to do anything to configure this. Spring Boot includes all these defaults.Spring-Boot-Web-App-Example-Application.java (no hyphens) :this is the entry point class to run the application. It has the following code:
package net.codejava.SpringBootWebAppExample;

import org.springframework.boot.SpringApplication;
import org.springframework.boot.autoconfigure.SpringBootApplication;

@SpringBootApplication
public class SpringBootWebAppExampleApplication {

	public static void main(String[] args) {
		SpringApplication.run(SpringBootWebAppExampleApplication.class, args);
	}
}
The @SpringBootApplicationannotation does the magic work to start the embedded Tomcat server, configure Spring Dispatcher Servlet, etc.And there are two default directories and one properties file in the src/main/resources folder.- static: put your static files here, e.g. HTML files.
- templates: put your template files here, e.g. ThymeLeaf files.
- application.properties: specify additional configurations here, e.g. logging, Spring MVC view resolver, server port number, etc.
2. Code default welcome page
If you have the static welcome page (index.html) for the application, put in under the src/main/resources/static directory. For example, create the index.html file with the following content:<!DOCTYPE html> <html> <head> <meta charset="ISO-8859-1"> <title>My Contacts - Spring Boot Web Application Example</title> </head> <body> <h1>My Contacts</h1> <a href="/list_contact">Click here to list all contacts</a> </body> </html>Now, let’s run the application by right-clicking in the code editor of the SpringBootWebAppExampleApplicationclass, click Run As > Java Application. You can see the application is started with Spring Boot logo and logging messages from Tomcat and Spring framework:
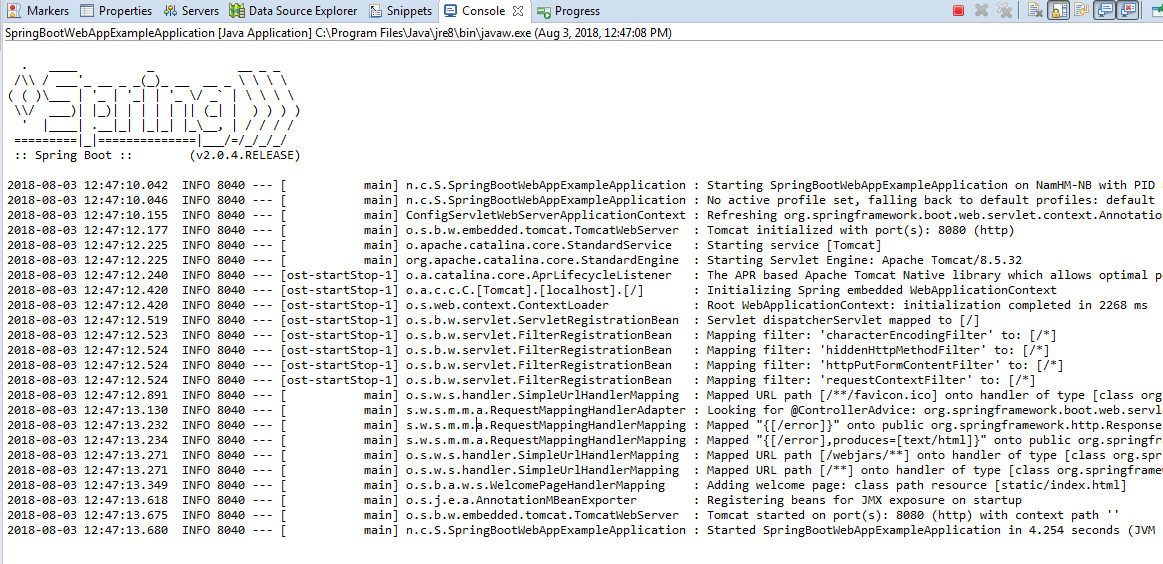 Notice the last two lines in the Console view:
Tomcat started on port(s): 8080 (http) with context path ''
Started SpringBootWebAppExampleApplication in 4.254 seconds (JVM running for 4.79)
By default, the server is listening on port number 8080 with empty context path, so type the following URL in your web browser:
http://localhost:8080/Then you can see the welcome page gets displayed:
 You can override the default welcome page by creating a handler method in a Spring controller class like this:
@RequestMapping("/")
public String welcome() {

	return "index";
}
As you can see, this method handles requests with the URL pattern “/” which is the context root (home page) of the application, and it returns a view named “index” which is resolved to actual view page by Spring view resolver.TIP: To increase productivity for Spring Boot project development, I recommend you to use Spring Boot DevTools for automatic restart. 3. Code Model, Business and Controller Classes
Suppose that when the user clicks the hyperlink Click here to list all contacts, the web application displays a list of contacts. Create the model class Contact as follows:package net.codejava.SpringBootWebAppExample;
public class Contact {
private String name;
private String email;
private String country;
public Contact() {
super();
}
public Contact(String name, String email, String country) {
super();
this.name = name;
this.email = email;
this.country = country;
}
// getters and setters are excluded for brevity
}Next, create a business class that implements a method to return a hard-coded List of Contact objects like this:package net.codejava.SpringBootWebAppExample;
import java.util.ArrayList;
import java.util.List;
public class ContactBusiness {
public List<Contact> getContactList() {
List<Contact> listContact = new ArrayList<>();
listContact.add(new Contact("Marry John", "marry.john@gmail.com", "USA"));
listContact.add(new Contact("Tom Smith", "tomsmith@outlook.com", "England"));
listContact.add(new Contact("John Purcell", "john123@yahoo.com", "Australia"));
listContact.add(new Contact("Siva Krishna", "sivakrishna@gmail.com", "India"));
return listContact;
}
}Next, create a Spring controller class to handle requests coming from the hyperlink in the welcome page above:<a href="/list_contact">Click here to list all contacts</a>Name this class as AppController with the following code:
package net.codejava.SpringBootWebAppExample;

import java.util.List;

import org.springframework.stereotype.Controller;
import org.springframework.ui.Model;
import org.springframework.web.bind.annotation.RequestMapping;

@Controller
public class AppController {

	@RequestMapping("/list_contact")
	public String listContact(Model model) {

		ContactBusiness business = new ContactBusiness();
		List<Contact> contactList = business.getContactList();

		model.addAttribute("contacts", contactList);

		return "contact";
	}
}
As you can see, this is standard Spring web controller class annotated with the @Controller annotation. The @RequestMapping("/list_contact") annotation specifies that the listContact() method is responsible to handle requests coming from the /list_contact URL.This method uses the ContactBusinessclass to get a List of Contact objects and puts this collection to a Model object, which will be then used by the view. Finally it returns the view name “contact”, which can be resolved to a JSP page or a ThymeLeaf template, depending on our configuration. 4. How to use JSP with Spring Boot
We will create JSP page with JSTL to display the contact list, so add the following two dependencies in the pom.xml file:<dependency>
<groupId>org.apache.tomcat.embed</groupId>
<artifactId>tomcat-embed-jasper</artifactId>
<scope>provided</scope>
</dependency>
<dependency>
<groupId>javax.servlet</groupId>
<artifactId>jstl</artifactId>
</dependency>The dependency tomcat-embed-jasper is JSP Engine for Tomcat. It is required to enable JSP with Spring Boot.By default, JSP pages are looked up inside /webapp directory. So under the src/main directory, create a new directory named webapp. If no view resolvers are configured, a handler method should return the actual view file name, for example:@RequestMapping("/test")
public String test() {
return "test.jsp";
}To follow common convention and to protect JSP pages, create directories WEB-INF/jsp inside webapp. And create contact.jsp file under src/main/webapp/WEB-INF/jsp as shown in the following screenshot: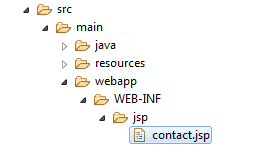 To configure Spring MVC view resolver, open the application.properties file and put the following properties:
spring.mvc.view.prefix=/WEB-INF/jsp/
spring.mvc.view.suffix=.jsp
Now, let’s update code for the contact.jsp file as follows:
<%@ page language="java" contentType="text/html; charset=ISO-8859-1"
    pageEncoding="ISO-8859-1"%>
<%@ taglib uri="http://java.sun.com/jsp/jstl/core" prefix="c" %>
<!DOCTYPE html PUBLIC "-//W3C//DTD HTML 4.01 Transitional//EN"
	"http://www.w3.org/TR/html4/loose.dtd">
<html>
<head>
<meta http-equiv="Content-Type" content="text/html; charset=ISO-8859-1">
<title>Contact List - Spring Boot Web Application Example</title>
</head>
<body>
	<h1 align="center">My Contact List</h1>
	<br/>
	<table border="1" cellpadding="10">
		<tr>
			<th>Name</th><th>Email</th><th>Country</th>
		</tr>
		<c:forEach var="contact" items="${contacts}">
		<tr>
			<td>${contact.name}</td>
			<td>${contact.email}</td>
			<td>${contact.country}</td>
		</tr>
		</c:forEach>
	</table>
</body>
</html>
As you can see, this JSP page uses JSTL’s forEach tag to iterate over Contact objects in the collection named contacts in the model, and generate HTML code to display the contact list.Stop and re-run the SpringBootWebAppExampleApplication program. Click the hyperlink in the welcome page and the contact list appears, as shown in the following screenshot: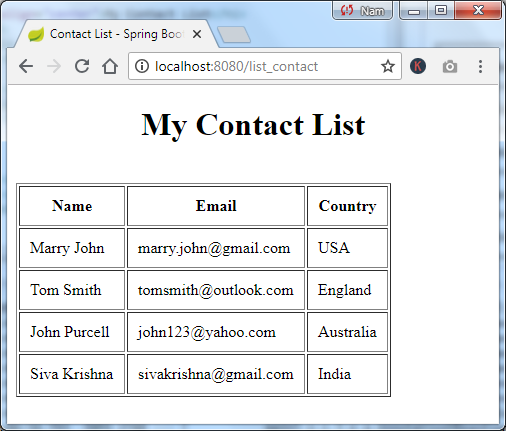 Voila, it works as expected!
5. How to use ThymeLeaf with Spring Boot
To use ThymeLeaf as the view technology instead of JSP, add the following dependency in the pom.xml file:<dependency>
<groupId>org.springframework.boot</groupId>
<artifactId>spring-boot-starter-thymeleaf</artifactId>
</dependency>Of course you should remove the dependencies tomcat-embed-jasper and jstl as we can’t use both JSP and ThymeLeaf.By default, Spring Boot looks for ThymeLeaf template files under src/main/resources/templates directory. So create the contact.html file under this directory with the following code:<!DOCTYPE html>
<html xmlns="http://www.w3.org/1999/xhtml"
xmlns:th="http://www.thymeleaf.org">
<head>
<meta charset="utf-8"/>
<title>Contact List - Spring Boot Web Application Example</title>
</head>
<body>
<h1 align="center">My Contact List</h1>
<br/>
<table border="1" cellpadding="10">
<thead>
<tr>
<th>Name</th>
<th>Email</th>
<th>Country</th>
</tr>
</thead>
<tbody>
<tr th:each="contact : ${contacts}">
<td th:text="${contact.name}">Name</td>
<td th:text="${contact.email}">Email</td>
<td th:text="${contact.country}">Country</td>
</tr>
</tbody>
</table>
</body>
</html>Run the program again and you will see the same result as using JSP. 6. How to use CSS, Javascript and Images
You can use these types of web files as normal, just make sure to put them under src/main/resources/templates if you use ThymeLeaf and under src/main/webapp/WEB-INF in case you use JSP.7. Configure Logging
Spring Boot uses various logging libraries: Commons Logging for its core and Java Util Logging, Log4J2 and Logback for the dependencies which use different logging libraries. The default log format is pretty fine and the default log level is INFO.If you want to change the log level for all libraries, specify the following entry in the application.properties file:logging.level.root=<LEVEL>The log level can be one of FATAL, ERROR, WARN, INFO, DEBUG, TRACE or OFF. For example:
logging.level.root=WARNThis changes the log level to WARN (show only warning and error messages) for all loggers.For fine tuning, you can change log level for a specific Java package by specifying the following entry:
logging.level.<package_name>=<LEVEL>For example:
logging.level.net.codejava=ERRORThis changes log level for all classes in the net.codejava package to ERROR.To enable debug mode for the application, specify debug=true in your application.properties file or specify the --debugflag as an argument when running the program, for example:
java -jar yourappname.jar --debugBe patient when running the application in debug mode because it prints a huge amount of information, which slows down the application significantly.
8. Configure Server Port Number and Context Path
The default port number of embedded Tomcat server is 8080. You can override this default by specifying the server.port property in the application.properties file like this:server.port=80And the default context path is empty (‘’) so you can access the web application via http://localhost. To override this default, specifying the server.servlet.context-path in the application.properties file, for example:
server.servlet.context-path=/ContactAppWith two changes above, you now see the contact list via this URL:
http://localhost/ContactApp/list_contact
9. How to package Spring Boot web application to JAR/WAR
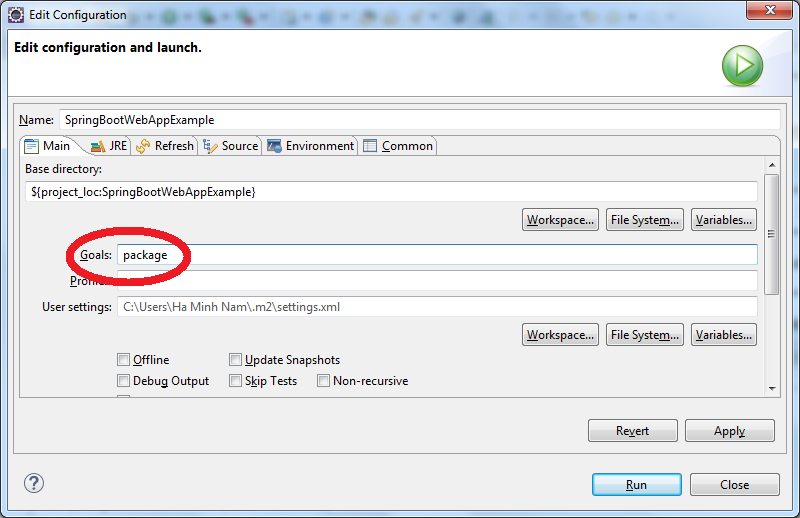
A major advantage of Spring Boot is that it packages your web application and embedded Tomcat server into a single executable JAR file, which is very convenient. However, JSP doesn’t work with JAR packaging (although it works in Eclipse!). So if you use JSP, you must change the packaging type to WAR in your pom.xml as follows:<packaging>war</packaging>And Thymeleaf works with either jar or war packaging type. With war packaging, Maven will generate an executable WAR file.To package your Spring Boot web application to a JAR or WAR file in Eclipse, right-click on the project name, click Run As > Maven build… In the Edit Configuration dialog, type package as the goal and click Run:
 If using command line, change the current directory is your project directory, and simply type:
mvn packageThen check the target folder in your project directory, a JAR/WAR file is generated depending on the packaging type you use. And run the application:
java -jar SpringBootWebAppExample.jarNote: Use the same command to run a WAR file because it is executable. You can also watch the following videos for more visual steps:
- [Video] How to package Spring Boot application to JAR file
- [Video] How to package Spring Boot application to WAR file
 That’s how to develop a Spring MVC web application with Spring Boot in Eclipse IDE. Almost the configuration is done by Spring Boot so you can quickly start coding your business logic, following the sensible defaults. And keep in mind that you have to use war packaging with JSP.
 References:
Other Spring Boot Tutorials:
- Spring Boot Hello World Example
- Spring Boot automatic restart using Spring Boot DevTools
- Spring Boot Form Handling Tutorial with Spring Form Tags and JSP
- Spring Boot - Spring Data JPA - MySQL Example
- Spring Boot CRUD Example with Spring MVC – Spring Data JPA – ThymeLeaf - Hibernate - MySQL
- Spring Boot Hello World RESTful Web Services Tutorial
- How to use JDBC with Spring Boot
- Spring Boot CRUD Web Application with JDBC - Thymeleaf - Oracle
- Spring Boot RESTful CRUD API Examples with MySQL database
- How to package Spring Boot application to JAR and WAR
About the Author:
 Nam Ha Minh is certified Java programmer (SCJP and SCWCD). He started programming with Java in the time of Java 1.4 and has been falling in love with Java since then. Make friend with him on Facebook and watch his Java videos you YouTube.
| [Spring Boot Web Application Project Source Code] | 56 kB |