In this Spring Boot tutorial, I’m going to share with you how to write code that accesses relational database in a Spring Boot application using JDBC instead of an ORM framework like Hibernate. For simple database operations, using JDBC is easier and more efficiently than using Hibernate.Spring framework provides the JdbcTemplate class that simplifies coding with JDBC. The code examples in this tutorial are tested with Spring Boot 2.1.8 and MySQL database.
1. Create Database
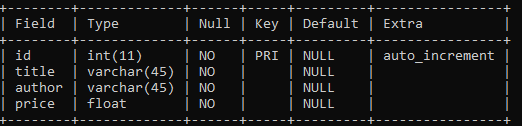
Suppose that we have a table named books in a schema named bookshop. The table has the following structure:You can execute the following SQL script to create this table:
CREATE TABLE `books` (
  `id` int(11) NOT NULL AUTO_INCREMENT,
  `title` varchar(45) NOT NULL,
  `author` varchar(45) NOT NULL,
  `price` float NOT NULL,
  PRIMARY KEY (`id`)
);
Then we’ll develop a Spring Boot application (console) to perform CRUD operations on this table.
2. Create Spring Boot Project
I use Eclipse IDE. Create a Maven project and update the pom.xmlfile to have this XML code:
As you can see, we use Java 1.8, Spring Boot 2.1.8.RELEASE. To use JDBC with Spring Boot, we need to specify the spring-boot-starter-jdbcdependency. And the mysql-connector-java dependency is required to work with MySQL database.
3. Configure Database Connection Properties
Create the application.properties file under the src/main/resources directory with the following content:
Here, we specify database connection information and logging level.
4. Code Java Model class
Create the Book class as follows:
package net.codejava;

public class Book {
	private int id;
	private String title;
	private String author;
	private float price;

	protected Book(String title, String author, float price) {
		this.title = title;
		this.author = author;
		this.price = price;
	}

	protected Book() {
	}


	@Override
	public String toString() {
		return "Book [" + title + ", " + author + ", $" + price + "]";
	}

	// getters and setters...
}
Note that this model class has field names exactly match the column names in the corresponding table. And the getters and setters are not shown, for brevity.
5. Code Spring Boot JDBC Application
Now, write code for our main program – a Spring Boot console application – as follows:
package net.codejava;

import org.springframework.beans.factory.annotation.Autowired;
import org.springframework.boot.CommandLineRunner;
import org.springframework.boot.SpringApplication;
import org.springframework.boot.autoconfigure.SpringBootApplication;
import org.springframework.jdbc.core.JdbcTemplate;

@SpringBootApplication
public class SpringBootJdbcExample implements CommandLineRunner {

	@Autowired
	JdbcTemplate jdbcTemplate;

	public static void main(String[] args) {
		SpringApplication.run(SpringBootJdbcExample.class, args);
	}

	@Override
	public void run(String... args) throws Exception {

		String sql = "INSERT INTO books (title, author, price) VALUES (?, ?, ?)";
		int result = jdbcTemplate.update(sql, "Head First Java", "Kathy Sierra", 18.55f);

		if (result > 0) {
			System.out.println("Insert successfully.");
		}
	}
}
As you can see, we specify that an instance of the JdbcTemplate class will be automatically injected by the framework:
@Autowired
JdbcTemplate jdbcTemplate;
This is the key point to use JDBC with Spring Boot. And in the run() method, we use the jdbcTemplate object to insert a new row into the database. Simple, right? You can also use SimpleJdbcInsert class for SQL Insert statement like this:
SimpleJdbcInsert insertActor = new SimpleJdbcInsert(jdbcTemplate);
insertActor.withTableName("books");

Book book = new Book("Effective Java", "Joshua Bloch", 29.99f);
BeanPropertySqlParameterSource paramSource = new BeanPropertySqlParameterSource(book);

int result = insertActor.execute(paramSource);

if (result > 0) {
	System.out.println("Insert successfully.");
}
As you can see, you don’t have to write SQL statement! Learn more about how to use the SimpleJdbcInsert class here: Spring SimpleJdbcInsert Examples. And here’s the sample code for executing Update operation:
void testUpdate() {
	String sql = "UPDATE books SET price=? WHERE title=?";
	Object[] params = {9.99f, "Effective Java"};
	int result = jdbcTemplate.update(sql, params);

	if (result > 0) {
		System.out.println("Update successfully.");
	}
}
Code example for Delete operation:
String sql = "DELETE FROM books WHERE title=?";
Object[] params = {"Effective Java"};
int result = jdbcTemplate.update(sql, params);

if (result > 0) {
	System.out.println("Delete successfully.");
}
Code example for Retrieve operation (list all):
void testListAll() {
	String sql = "SELECT * FROM books";

	List<Book> listBooks = jdbcTemplate.query(sql,
				BeanPropertyRowMapper.newInstance(Book.class));

	for (Book book : listBooks) {
		System.out.println(book);
	}
}
Code example for Retrieve operation (find):
void testFind() {
	String sql = "SELECT * FROM books WHERE id = 1";
	Book book = jdbcTemplate.queryForObject(sql,
		BeanPropertyRowMapper.newInstance(Book.class));

	System.out.println(book);
}
Summary:
So far you have learned how to code a Spring Boot application that accesses relational database via JDBC. As you can see, Spring Boot greatly reduces the boilerplate to let us focus on providing SQL statements and reading the data. Check the following tutorials to learn more about using JDBC with Spring:
Nam Ha Minh is certified Java programmer (SCJP and SCWCD). He began programming with Java back in the days of Java 1.4 and has been passionate about it ever since. You can connect with him on Facebook and watch his Java videos on YouTube.
 You can execute the following SQL script to create this table:
 Nam Ha Minh is certified Java programmer (SCJP and SCWCD). He began programming with Java back in the days of Java 1.4 and has been passionate about it ever since. You can connect with him on Facebook and watch his Java videos on YouTube.
Comments