Spring Boot Hello World Example
- Details
- Written by Nam Ha Minh
- Last Updated on 11 March 2020 | Print Email
- Spring Boot Beginner Tutorial with Spring Tool Suite 4
- Spring Boot Hello World for Beginner with IntelliJ IDEA
- Spring Boot Tutorial for Beginners with NetBeans IDE
1. Create Maven’s pom.xml file
Create Maven’s project file called pom.xml under the project’s root directory with the following XML code:<?xml version="1.0" encoding="UTF-8"?> <project xmlns="http://maven.apache.org/POM/4.0.0" xmlns:xsi="http://www.w3.org/2001/XMLSchema-instance" xsi:schemaLocation="http://maven.apache.org/POM/4.0.0 http://maven.apache.org/xsd/maven-4.0.0.xsd"> <modelVersion>4.0.0</modelVersion> <groupId>net.codejava</groupId> <artifactId>spring-boot-hello-world</artifactId> <version>1.0.0</version> <parent> <groupId>org.springframework.boot</groupId> <artifactId>spring-boot-starter-parent</artifactId> <version>2.0.3.RELEASE</version> </parent> <dependencies> <dependency> <groupId>org.springframework.boot</groupId> <artifactId>spring-boot-starter-web</artifactId> </dependency> </dependencies> <build> <plugins> <plugin> <groupId>org.springframework.boot</groupId> <artifactId>spring-boot-maven-plugin</artifactId> </plugin> </plugins> </build> </project>Here, you can see the parent of this POM is spring-boot-starter-parent which defines common defaults such as Java version (1.8), UTF-8 source encoding, various Maven plug-in configurations for Java Spring framework development, resource filtering… It also inherits dependency management from spring-boot-dependencies which defines dependency information for Spring Boot, Spring framework and common libraries.The dependency spring-boot-starter-web is a Spring Boot Starter that specifies a group of dependencies for developing Java web applications such as Spring Web MVC, and Embed Tomcat server.And the plug-in spring-boot-maven-plugin enables automatic creation of an executable JAR file for a stand-alone Java web application with embedded Tomcat server, thanks to its nested jars support.You can see the dependency information of the project by typing the following Maven’s command:
mvn -dependency:tree
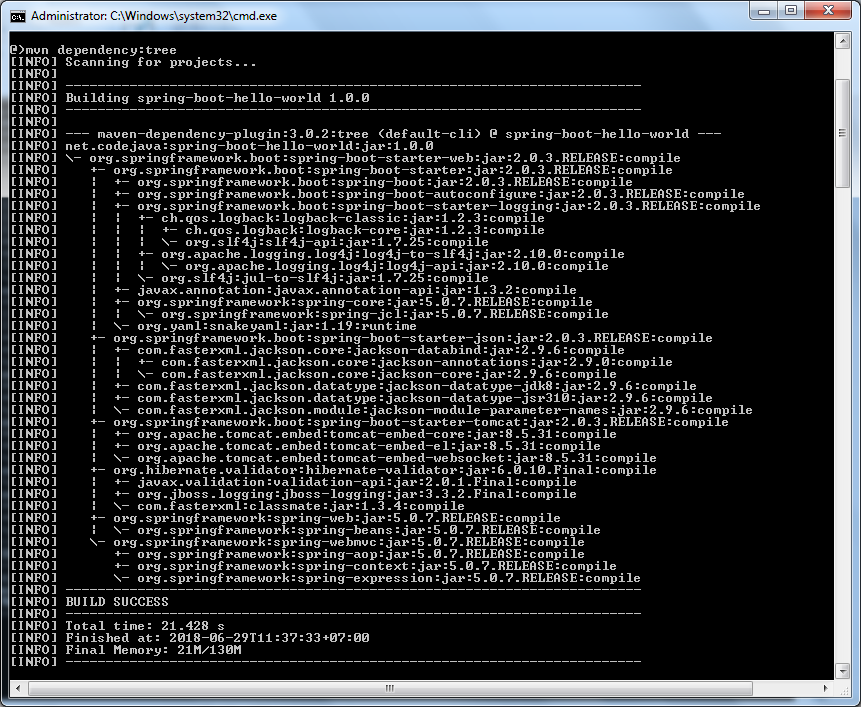 You can spot spring-web, spring-webmvc, tomcat-embed-core,… here.
 2. Create a simple web application with Spring Boot
In the project’s directory, create a directory tree src\main\java\net\codejava in which src\main\java is the standard Java source folder and net\codejava is for package net.codejava.Create a class named SpringBootHelloWorld with the following code:package net.codejava;
import org.springframework.boot.*;
import org.springframework.boot.autoconfigure.*;
import org.springframework.web.bind.annotation.*;
@RestController
@EnableAutoConfiguration
public class SpringBootHelloWorld {
@RequestMapping("/")
String home() {
return "Hello World Spring Boot!";
}
public static void main(String[] args) throws Exception {
SpringApplication.run(SpringBootHelloWorld.class, args);
}
}Here, the @RestController annotation tells Spring that this class is a web controller and the controller methods should return the resulting string directly back to the client in REST style.The @EnableAutoConfiguration annotation tells Spring Boot to automatically configure the application based on the specified dependencies. In this simple web application, Spring Boot configures Spring MVC and embedded Tomcat.And perhaps you are very familiar with the @RequestMapping annotation, which provides routing information for Spring Dispatcher Servlet. In our application, it specifies any HTTP requests with the/path should be handled by the home() method.In the home() method, it simply returns a string to the client.In the main() method, we call SpringApplication.run() to bootstrap our web application running in the embedded Tomcat web server. Spring framework configures the specified class (SpringBootHelloWorld) as a web component. The String array args is passed through the run() method to support configuration via application’s command-line arguments when needed. 3. Compile and Run the simple Spring Boot application with Maven
Type the following Maven’s command:mvn spring-boot:run
The goal spring-boot:run tells Maven to compile the project and launch Spring Boot. If the compilation is successful, you can see the logo of Spring Boot appears like this: Spot the logging information, you can see the embedded Tomcat server is started to listen on port 8080 and our web application is deployed - ready to accept client’s requests:
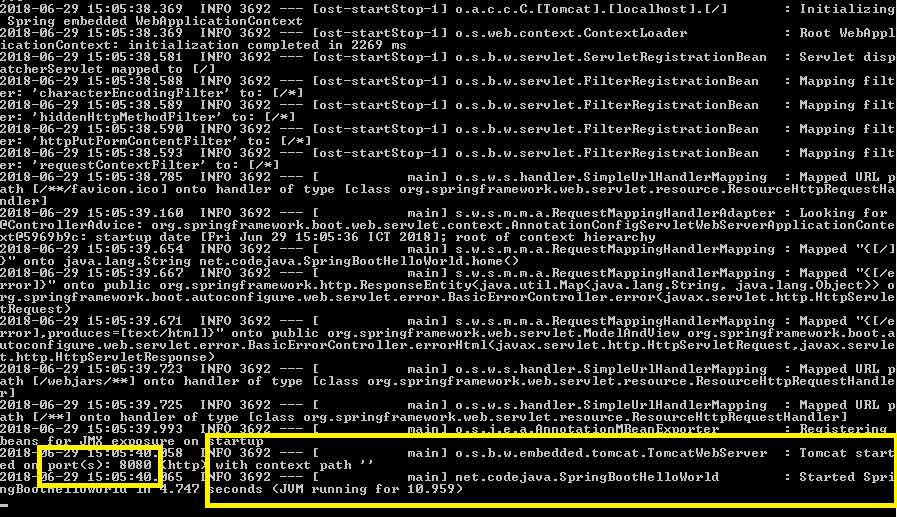 Now you can type the following URL in your web browser to access the web application:
http://localhost:8080/
And the result looks like this: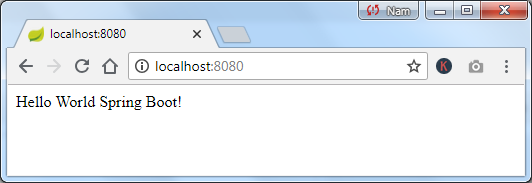 You see, the browser displays “Hello World Spring Boot!” which is exactly what returned from the home() method.Press Ctrl + C to stop the server and exit Spring Boot application.
 4. Package the Spring Boot application
To package our web application as a stand-alone Java application, type the following Maven’s command:mvn package
Then you can see the maven-jar-plugin creates the executable JAR file in the target directory: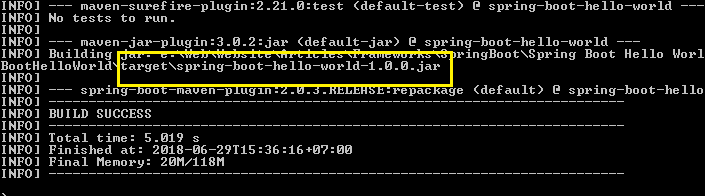 Check the target directory, and you can see the spring-boot-hello-world-1.0.0.jar - this is our web application with an embedded Tomcat server - everything is packed in a single executable JAR file (around 16 MB).Related videos:
- How to package Spring Boot application to JAR file
- How to package Spring Boot application to WAR file
5. Run the stand-alone Spring Boot web application
Now you can use the javacommand with -jar option to execute our web application like this:java -jar target\spring-boot-hello-world-1.0.0.jar
Then you see Spring Boot logo appears: This Spring Boot application is actually a web server.
 6. Create Spring Boot Project in Eclipse
Of course Eclipse makes it easy to develop Spring Boot applications as Maven is integrated tightly with the IDE. What you do is just creating a Maven project, the pom.xml file and the hello world class. And you don’t have to type any Maven’s commands, just run the hello world class as a normal Java application. The following screenshot shows how it looks like: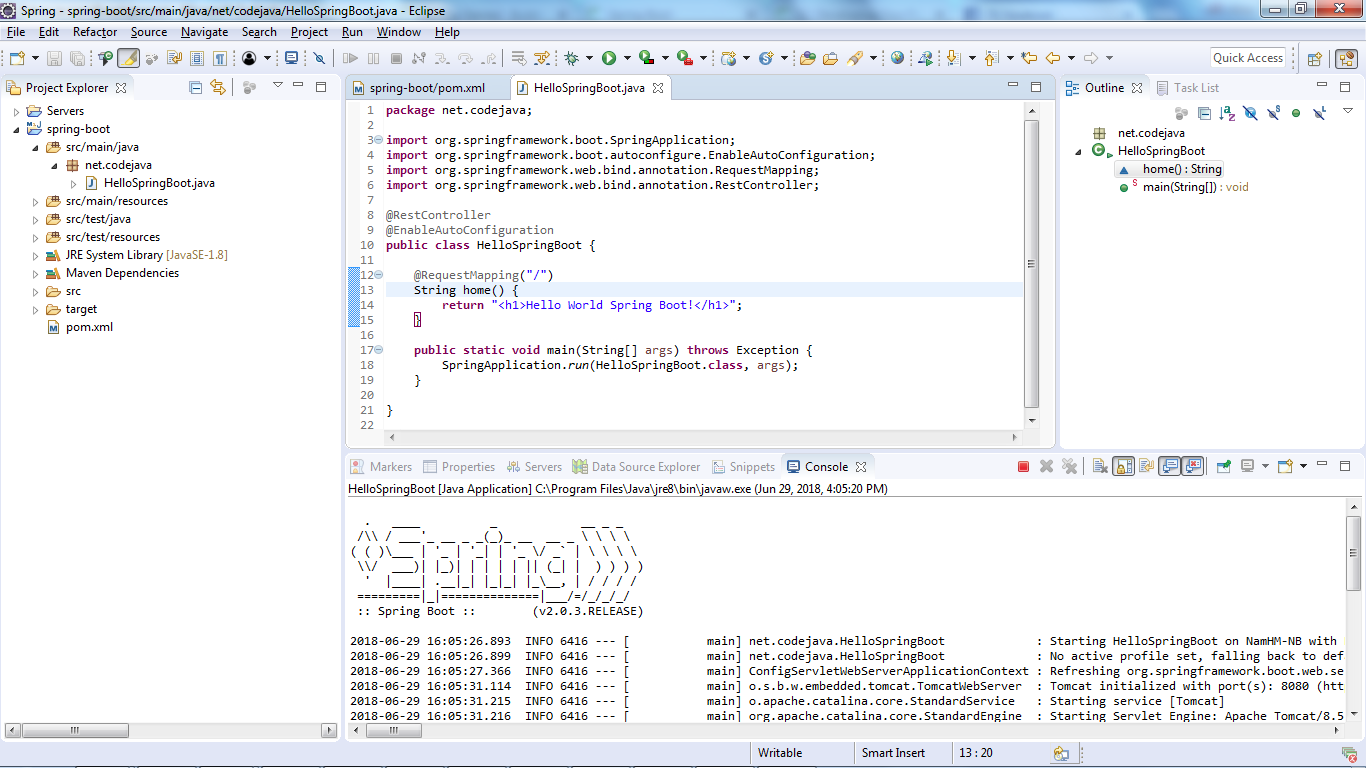
7. Using Spring Initializr tool
Developers at spring.io developed a web tool called Spring Initializr that can generate a Spring Boot project based on a number of dependencies chosen by programmers. This tool helps you start developing a Spring Boot application within a minute. Access Spring Initializr at:Here how it looks like: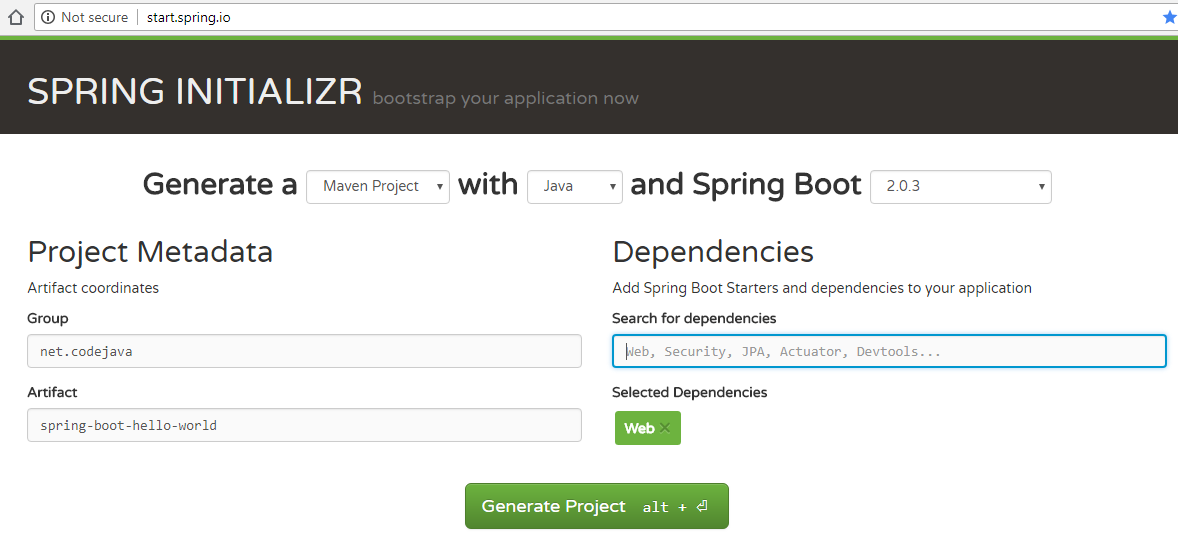 Fill in the details (group and artifact). Type the kind of projects you want to create in the Dependencies (Web, Security, JPA, etc) and click Generate Project. Download the project as a ZIP file. Extract it and start coding. Watch the video version "Spring Boot Hello World Tutorial" here:
 References:
Other Spring Boot Tutorials:
- Spring Boot automatic restart using Spring Boot DevTools
- Spring Boot Form Handling Tutorial with Spring Form Tags and JSP
- How to create a Spring Boot Web Application (Spring MVC with JSP/ThymeLeaf)
- Spring Boot - Spring Data JPA - MySQL Example
- Spring Boot CRUD Example with Spring MVC – Spring Data JPA – ThymeLeaf - Hibernate - MySQL
- Spring Boot Hello World RESTful Web Services Tutorial
- How to use JDBC with Spring Boot
- Spring Boot CRUD Web Application with JDBC - Thymeleaf - Oracle
- Spring Boot RESTful CRUD API Examples with MySQL database
- How to package Spring Boot application to JAR and WAR
About the Author:
 Nam Ha Minh is certified Java programmer (SCJP and SCWCD). He began programming with Java back in the days of Java 1.4 and has been passionate about it ever since. You can connect with him on Facebook and watch his Java videos on YouTube.
Comments
The '-' shouldn't be there
If u have please share with us.
I will be greatful to u.
[FATAL] Non-resolvable parent POM for net.codejava:spring-boot-hellow-world:0.0.1-SNAPSHOT: Could not transfer artifact org.springframework.boot:spring-boot-starter-parent:pom:2.2.0.BUILD-SNAPSHOT from/to spring-milestones (repo.spring.io/milestone): repo.spring.io and 'parent.relativePath' points at no local POM @ line 5, column 10