Spring Boot - Spring Data JPA - MySQL Example
- Details
- Written by Nam Ha Minh
- Last Updated on 24 February 2020 | Print Email
1. Create Maven Project in Eclipse
3. Configure Database Connection Properties
6. Code Spring Boot Application Class
7. Test Spring Boot - Spring Data JPA Application
1. Create a Spring Boot Maven Project in Eclipse
In Eclipse IDE, create a simple Maven project: File > New > Maven Project, check the option Create a simple project (skip archetype selection). Specify the Group Id as net.codejava and Artificat Id as ExpenseApp.Open the pom.xml file and write the following XML code:<project xmlns="http://maven.apache.org/POM/4.0.0" xmlns:xsi="http://www.w3.org/2001/XMLSchema-instance" xsi:schemaLocation="http://maven.apache.org/POM/4.0.0 http://maven.apache.org/xsd/maven-4.0.0.xsd"> <modelVersion>4.0.0</modelVersion> <groupId>net.codejava</groupId> <artifactId>ExpenseApp</artifactId> <version>0.0.1-SNAPSHOT</version> <parent> <groupId>org.springframework.boot</groupId> <artifactId>spring-boot-starter-parent</artifactId> <version>2.1.3.RELEASE</version> </parent> <dependencies> <dependency> <groupId>org.springframework.boot</groupId> <artifactId>spring-boot-starter-data-jpa</artifactId> </dependency> <dependency> <groupId>mysql</groupId> <artifactId>mysql-connector-java</artifactId> <scope>runtime</scope> </dependency> </dependencies> <build> <plugins> <plugin> <groupId>org.springframework.boot</groupId> <artifactId>spring-boot-maven-plugin</artifactId> </plugin> </plugins> </build> </project>You see, the parent POM (spring-boot-starter-parent) is required for any Spring Boot application. And we just need to specify 2 dependencies spring-boot-starter-data-jpa for Spring Boot - Spring Data JPA, and mysql-connector-java for MySQL JDBC driver. All the concrete dependencies like Spring core, Spring ORM, Hibernate core... are configured by default so we don't have to explicitly specify them.
2. Create MySQL Database
Create a database named as testdb with one table expense like this: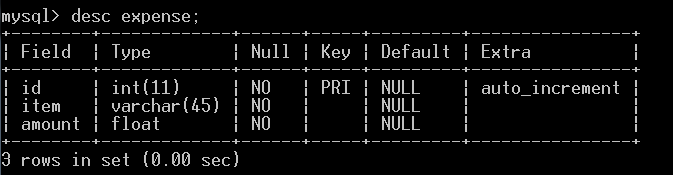 You can execute the following MySQL script to create this table:
CREATE TABLE `expense` (
  `id` int(11) NOT NULL AUTO_INCREMENT,
  `item` varchar(45) NOT NULL,
  `amount` float NOT NULL,
  PRIMARY KEY (`id`)
) ENGINE=InnoDB AUTO_INCREMENT=6 DEFAULT CHARSET=utf8;
So our sample Spring Boot - Spring Data JPA project will manage expense information in this table.
3. Configure Database Connection Properties
Create the application.properties file under the src/main/resources directory with the following content:spring.jpa.hibernate.ddl-auto=none spring.datasource.url=jdbc:mysql://localhost:3306/testdb spring.datasource.username=root spring.datasource.password=password logging.level.root=WARNAs you can see, the first line tells Hibernate not to make changes to the database structure:
spring.jpa.hibernate.ddl-auto=noneThe next 3 lines specify the database connection properties - so changes the value according to your MySQL server.And in the last line, we set logging level to WARN to avoid verbose output.
4. Code Domain Model Class
In the src/main/java directory, create the Expense class under the package net.codejava with the following code:package net.codejava;
import javax.persistence.Entity;
import javax.persistence.GeneratedValue;
import javax.persistence.GenerationType;
import javax.persistence.Id;
@Entity
public class Expense {
@Id
@GeneratedValue(strategy = GenerationType.IDENTITY)
private Long id;
private String item;
private float amount;
protected Expense() {
}
protected Expense(String item, float amount) {
this.item = item;
this.amount = amount;
}
// getters and setters are hidden for brevity
@Override
public String toString() {
return id + ". " + item + " - " + amount + " USD";
}
}As you can see, this is a very simple domain model class to map with the table expense in the database. The class name and its attribute names are identical to table name and field names makes the mapping simple. 5. Code Repository Interface
Create the interface ExpenseRespository with the following code:package net.codejava;
import java.util.List;
import org.springframework.data.jpa.repository.Query;
import org.springframework.data.repository.CrudRepository;
import org.springframework.data.repository.query.Param;
public interface ExpenseRepository extends CrudRepository<Expense, Long> {
public List<Expense> findByItem(String item);
@Query("SELECT e FROM Expense e WHERE e.amount >= :amount")
public List<Expense> listItemsWithPriceOver(@Param("amount") float amount);
}As you can see, this interface extends the CrudRepository interface which defines standard CRUD operations. In the generic parameters, we specify the domain type to work with is Expense and the type of domain's ID is Long.In the body of the interface, we define two custom methods. The first one is:public List<Expense> findByItem(String item);This method signature follows convention for a finder method findByXXX()where XXX is the property name in the model class - it finds the exact match of the method's argument. Spring Data JPA will generate implementation code at runtime.And we use a custom query in the second method:
@Query("SELECT e FROM Expense e WHERE e.amount >= :amount")
public List<Expense> listItemsWithPriceOver(@Param("amount") float amount);This method will return expense items whose amount greater than a specified value.Note that we just declare the method signatures, no actual code. And the great thing is Spring Data JPA automatically create implementation code (via proxy instances) at runtime. 6. Code Spring Boot Application Class
And write code for the demo program like this:package net.codejava;
import java.util.List;
import org.springframework.beans.factory.annotation.Autowired;
import org.springframework.boot.CommandLineRunner;
import org.springframework.boot.SpringApplication;
import org.springframework.boot.autoconfigure.SpringBootApplication;
@SpringBootApplication
public class ExpenseApp implements CommandLineRunner {
@Autowired
ExpenseRepository repository;
public static void main(String[] args) {
SpringApplication.run(ExpenseApp.class, args);
}
@Override
public void run(String... args) throws Exception {
repository.save(new Expense("breakfast", 5));
repository.save(new Expense("coffee", 2));
repository.save(new Expense("New SSD drive", 200));
repository.save(new Expense("Tution for baby", 350));
repository.save(new Expense("Some apples", 5));
Iterable<Expense> iterator = repository.findAll();
System.out.println("All expense items: ");
iterator.forEach(item -> System.out.println(item));
List<Expense> breakfast = repository.findByItem("breakfast");
System.out.println("\nHow does my breakfast cost?: ");
breakfast.forEach(item -> System.out.println(item));
List<Expense> expensiveItems = repository.listItemsWithPriceOver(200);
System.out.println("\nExpensive Items: ");
expensiveItems.forEach(item -> System.out.println(item));
}
}You see, an instance of ExpenseRespository will be injected to an instance of the ExpenseApp class at runtime:@Autowired ExpenseRepository repository;Then in the run() method we can use the repository to list all expenses, get the breakfast item and find items with amount greater than 200 USD.
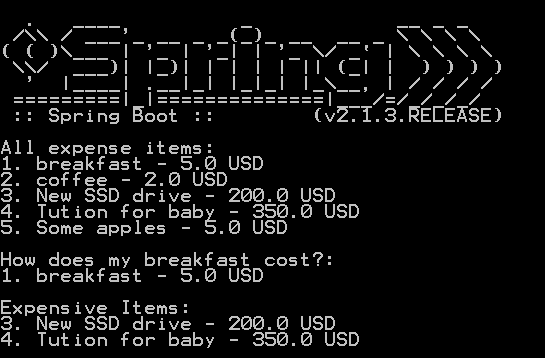
7. Test Spring Boot - Spring Data JPA Application
Run the ExpenseApp class in Eclipse, you should see the following output: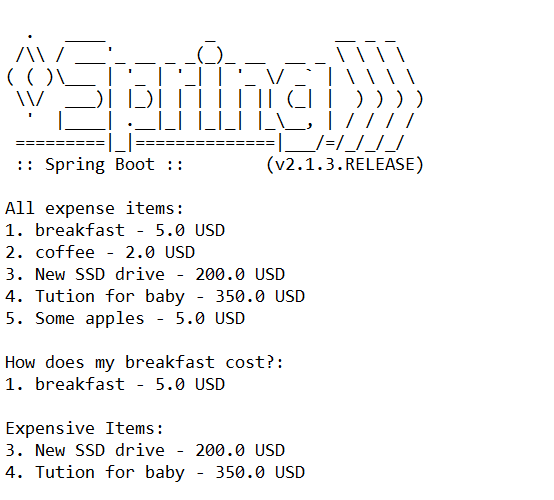 Check the database, you should see 5 rows were inserted to the table expense:
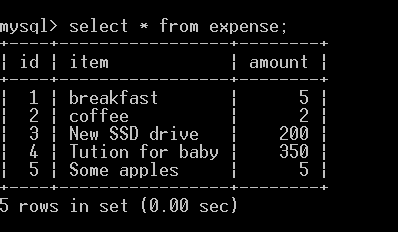 You can package the application to an executable JAR file, either by:- In Eclipse IDE: right-click on the project and select Run As > Maven build... Then enter the goal name as package and hit Run button.- Use Maven from command line: change the current working directory to the project directory and type:
mvn packageYou should see the build result that looks like this:
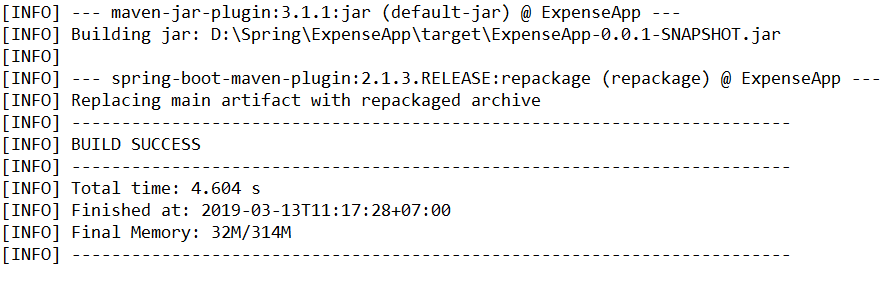 Now type the following command to run the Spring Boot application:
java -jar target\ExpenseApp-0.0.1-SNAPSHOT.jarAnd you should see the following output:
 Congratulations! You have done your first Spring Boot - Spring Data JPA application with Hibernate and MySQL. You've seen how Spring Boot greatly simplifes configuration to use Spring Data JPA which significantly reduces the amount of code we need to write for the data access layer.
 References:
- Spring Boot project
- Spring Data JPA project
- Understand Spring Data JPA with Simple Example
- Spring Boot Hello World Example
Other Spring Boot Tutorials:
- Spring Boot Hello World Example
- Spring Boot automatic restart using Spring Boot DevTools
- Spring Boot Form Handling Tutorial with Spring Form Tags and JSP
- How to create a Spring Boot Web Application (Spring MVC with JSP/ThymeLeaf)
- Spring Boot CRUD Example with Spring MVC – Spring Data JPA – ThymeLeaf - Hibernate - MySQL
- Spring Boot Hello World RESTful Web Services Tutorial
- How to use JDBC with Spring Boot
- Spring Boot CRUD Web Application with JDBC - Thymeleaf - Oracle
- Spring Boot RESTful CRUD API Examples with MySQL database
- How to package Spring Boot application to JAR and WAR
About the Author:
 Nam Ha Minh is certified Java programmer (SCJP and SCWCD). He began programming with Java back in the days of Java 1.4 and has been passionate about it ever since. You can connect with him on Facebook and watch his Java videos on YouTube.
| [Sample Spring Boot - Spring Data JPA project] | 7 kB |
Comments
Check my tutorial here: Spring Boot CRUD Example with Spring MVC – Spring Data JPA – ThymeLeaf - Hibernate - MySQL. Link: codejava.net/.../...