Spring Boot CRUD Example with Spring MVC – Spring Data JPA – ThymeLeaf - Hibernate - MySQL
- Details
- Written by Nam Ha Minh
- Last Updated on 04 November 2023 | Print Email
- Spring Boot: enables rapid application development with sensible defaults to reduce boilerplate code. Spring Boot also helps us create a standalone, executable Java web application with ease.
- Spring MVC: simplifies coding the controller layer. No more boilerplate code of Java Servlet classes.
- Spring Data JPA: simplifies coding the data access layer. No more boilerplate code of DAO classes.
- Hibernate: is used as an ORM framework – implementation of JPA. No more boilerplate JDBC code.
- ThymeLeaf: simplifies coding the view layer. No more cluttered JSP and JSTL tags.
- And MySQL as the database.
2. Create Maven Project in Eclipse
3. Configure Data Source Properties
7. Code Spring MVC Controller Class
8. Code Spring Boot Application Class
9. Implement List Products Feature
10. Implement Create Product Feature
11. Implement Edit Product Feature
12. Implement Delete Product Feature
13. Test and package the Spring Boot CRUD Web Application
1. Create MySQL Database
Suppose that our Spring Boot web application will manage product information in this table: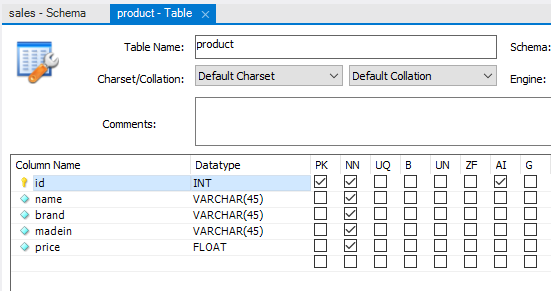 You can execute the following MySQL script to create the product table:
CREATE TABLE `product` (
  `id` int(11) NOT NULL AUTO_INCREMENT,
  `name` varchar(45) NOT NULL,
  `brand` varchar(45) NOT NULL,
  `madein` varchar(45) NOT NULL,
  `price` float NOT NULL,
  PRIMARY KEY (`id`)
) ENGINE=InnoDB DEFAULT CHARSET=utf8;
The name of the database schema is sales.
2. Create Spring Boot Maven Project in Eclipse
<project xmlns="http://maven.apache.org/POM/4.0.0"
	xmlns:xsi="http://www.w3.org/2001/XMLSchema-instance"
	xsi:schemaLocation="http://maven.apache.org/POM/4.0.0
		http://maven.apache.org/xsd/maven-4.0.0.xsd">
	<modelVersion>4.0.0</modelVersion>
	<groupId>net.codejava</groupId>
	<artifactId>ProductManager</artifactId>
	<version>0.0.1-SNAPSHOT</version>
	<packaging>jar</packaging>

	<parent>
		<groupId>org.springframework.boot</groupId>
		<artifactId>spring-boot-starter-parent</artifactId>
		<version>2.1.3.RELEASE</version>
	</parent>

	<dependencies>
		<dependency>
			<groupId>org.springframework.boot</groupId>
			<artifactId>spring-boot-starter-web</artifactId>
		</dependency>
		<dependency>
			<groupId>org.springframework.boot</groupId>
			<artifactId>spring-boot-starter-data-jpa</artifactId>
		</dependency>
		<dependency>
			<groupId>org.springframework.boot</groupId>
			<artifactId>spring-boot-starter-thymeleaf</artifactId>
		</dependency>
		<dependency>
			<groupId>mysql</groupId>
			<artifactId>mysql-connector-java</artifactId>
			<scope>runtime</scope>
		</dependency>
	</dependencies>

	<build>
		<plugins>
			<plugin>
				<groupId>org.springframework.boot</groupId>
				<artifactId>spring-boot-maven-plugin</artifactId>
			</plugin>
		</plugins>
	</build>
</project>
As you can see, with Spring Boot we have to specify only few dependencies: Spring Boot Starter Web, Spring Boot Data JPA, Spring Boot ThymeLeaf and MySQL JDBC driver.TIP: Use Spring Boot DevTools for automatic restart so you don't have to manually restart the application during development.And create the main Java package net.codejava.
3. Configure Data Source Properties
Create the application.properties file under the src/main/resources directory with the following content:spring.jpa.hibernate.ddl-auto=none spring.datasource.url=jdbc:mysql://localhost:3306/sales spring.datasource.username=root spring.datasource.password=password logging.level.root=WARNThe first line tells Hibernate to make no changes to the database. And we specify the database connection properties in the next 3 lines (change the values according to your settings). And the last line we set the logging level to WARN to avoid too verbose output in the console.
4. Code Domain Model Class
Create the domain model class Product to map with the product table in the database as follows:// copyright www.codejava.net
package net.codejava;
import javax.persistence.Entity;
import javax.persistence.GeneratedValue;
import javax.persistence.GenerationType;
import javax.persistence.Id;
@Entity
public class Product {
private Long id;
private String name;
private String brand;
private String madein;
private float price;
protected Product() {
}
@Id
@GeneratedValue(strategy = GenerationType.IDENTITY)
public Long getId() {
return id;
}
// other getters and setters are hidden for brevity
}This is simple JPA entity class with the class name and field names are identical to column names of the table product in the database, to minimize the annotations used. 5. Code Repository Interface
Next, create the ProductRepository interface as simple as follows:package net.codejava;
import org.springframework.data.jpa.repository.JpaRepository;
public interface ProductRepository extends JpaRepository<Product, Long> {
}As you can see, this interface extends the JpaRepository interface from Spring Data JPA. JpaRepository defines standard CRUD methods, plus JPA-specific operations. We don’t have to write implementation code because Spring Data JPA will generate necessary code at runtime, in form of proxy instances.So the purpose of writing the repository interface is to tell Spring Data JPA about the domain type (Product) and ID type (Long) to work with. 6. Code Service Class
Next, we need to code the ProductService class in the service/business layer with the following code:// copyright www.codejava.net
package net.codejava;
import java.util.List;
import org.springframework.beans.factory.annotation.Autowired;
import org.springframework.stereotype.Service;
import org.springframework.transaction.annotation.Transactional;
@Service
@Transactional
public class ProductService {
@Autowired
private ProductRepository repo;
public List<Product> listAll() {
return repo.findAll();
}
public void save(Product product) {
repo.save(product);
}
public Product get(long id) {
return repo.findById(id).get();
}
public void delete(long id) {
repo.deleteById(id);
}
}In this class, we inject an instance of ProductRepository via private field using @Autowired annotation. At runtime, Spring Data JPA will generate a proxy instance of ProductRepository and inject it to the instance of ProductService class.You might see this service class is redundant as it delegates all the calls to ProductRepository. In fact, the business logic would be more complex over time, e.g. calling two or more repository instances.So we create this class for the purpose of extensibility in future. 7. Code Spring MVC Controller Class
Next, create the AppController class acts as a Spring MVC controller to handle requests from the clients – with the initial code as follows:package net.codejava;
import org.springframework.stereotype.Controller;
@Controller
public class AppController {
@Autowired
private ProductService service;
// handler methods...
}As you can see, we inject an instance of the ProductService class to this controller – Spring will automatically create one at runtime. We will write code for the handler methods when implementing each CRUD operation. 
Spring Boot E-Commerce Ultimate Course
Learn to Build a complete shopping website using Java, Spring Boot, Thymeleaf, Bootstrap, jQuery and MySQL database
8. Code Spring Boot Application Class
Next, we create a class with main() method to bootstrap our Spring Boot application:package net.codejava;
import org.springframework.boot.SpringApplication;
import org.springframework.boot.autoconfigure.SpringBootApplication;
@SpringBootApplication
public class AppMain {
public static void main(String[] args) {
SpringApplication.run(AppMain.class, args);
}
}Here, the @SpringBootApplication annotation does all the magic stuffs such as create the web server instance and Spring MVC dispatcher servlet. 9. Implement List Products Feature
The website’s home page displays a list of all products, so add the following handler method into the Spring MVC controller class:@RequestMapping("/")
public String viewHomePage(Model model) {
List<Product> listProducts = service.listAll();
model.addAttribute("listProducts", listProducts);
return "index";
}We use ThymeLeaf instead of JSP, so create the templates directory under src/main/resources to store template files (HTML).Create the index.html file under src/main/resources/templates with the following code:<!DOCTYPE html>
<html xmlns="http://www.w3.org/1999/xhtml"
xmlns:th="http://www.thymeleaf.org">
<head>
<meta charset="utf-8"/>
<title>Product Manager</title>
</head>
<body>
<div align="center">
<h1>Product List</h1>
<a href="/new">Create New Product</a>
<br/><br/>
<table border="1" cellpadding="10">
<thead>
<tr>
<th>Product ID</th>
<th>Name</th>
<th>Brand</th>
<th>Made In</th>
<th>Price</th>
<th>Actions</th>
</tr>
</thead>
<tbody>
<tr th:each="product : ${listProducts}">
<td th:text="${product.id}">Product ID</td>
<td th:text="${product.name}">Name</td>
<td th:text="${product.brand}">Brand</td>
<td th:text="${product.madein}">Made in</td>
<td th:text="${product.price}">Price</td>
<td>
<a th:href="/@{'/edit/' + ${product.id}}">Edit</a>
<a th:href="/@{'/delete/' + ${product.id}}">Delete</a>
</td>
</tr>
</tbody>
</table>
</div>
</body>
</html>Now we can run the AppMain class to test our Spring Boot web application. You should see the Spring Boot logo appears in the Console view of Eclipse: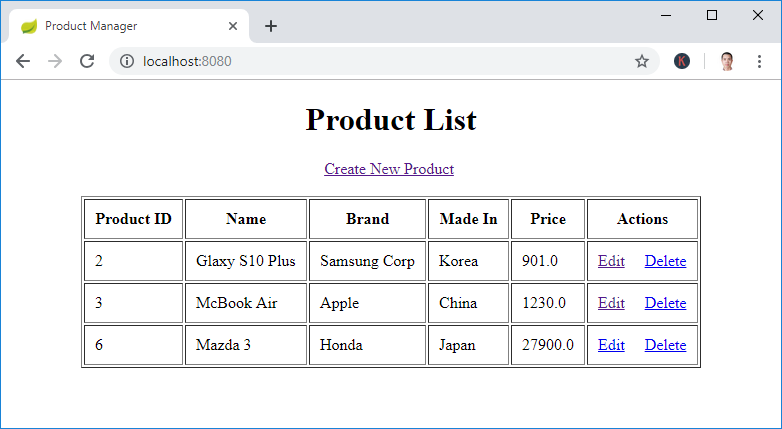 You see, the list of products gets displayed nicely – Suppose that you inserted some rows in the product table before.
 10. Implement Create Product Feature
You can see in the index.html, we have a hyperlink that allows the user to create a new product:<a href="/new">Create New Product</a>The relative URL new is handled by the following method in the AppController class:
@RequestMapping("/new")
public String showNewProductPage(Model model) {
	Product product = new Product();
	model.addAttribute("product", product);

	return "new_product";
}
For the view, create the new_product.html file with the following code:<!DOCTYPE html>
<html xmlns="http://www.w3.org/1999/xhtml"
xmlns:th="http://www.thymeleaf.org">
<head>
<meta charset="utf-8" />
<title>Create New Product</title>
</head>
<body>
<div align="center">
<h1>Create New Product</h1>
<br />
<form action="#" th:action="@{/save}" th:object="${product}"
method="post">
<table border="0" cellpadding="10">
<tr>
<td>Product Name:</td>
<td><input type="text" th:field="*{name}" /></td>
</tr>
<tr>
<td>Brand:</td>
<td><input type="text" th:field="*{brand}" /></td>
</tr>
<tr>
<td>Made In:</td>
<td><input type="text" th:field="*{madein}" /></td>
</tr>
<tr>
<td>Price:</td>
<td><input type="text" th:field="*{price}" /></td>
</tr>
<tr>
<td colspan="2"><button type="submit">Save</button> </td>
</tr>
</table>
</form>
</div>
</body>
</html>As you can see, here we use ThymeLeaf syntax for the form instead of Spring form tags. The Create New Product page looks like this: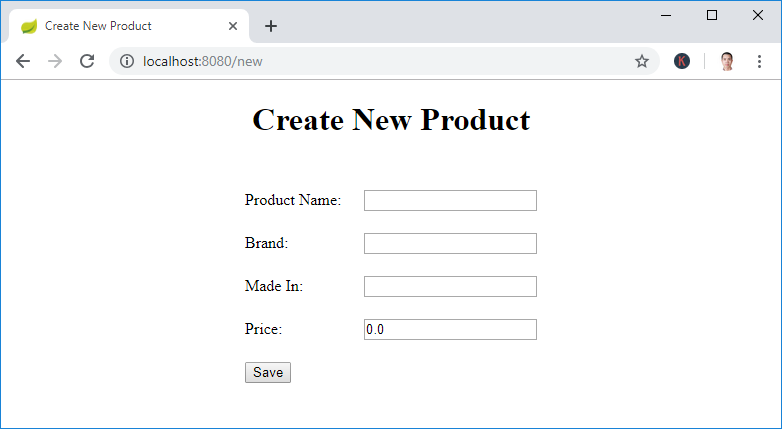 And we need to code another handler method to save the product information into the database:
@RequestMapping(value = "/save", method = RequestMethod.POST)
public String saveProduct(@ModelAttribute("product") Product product) {
	service.save(product);

	return "redirect:/";
}
After the product is inserted into the database, it redirects to the homepage to refresh the product list. 11. Implement Edit Product Feature
In the home page, you can see there’s a hyperlink that allows the users to edit a product:<a th:href="/@{'/edit/' + ${product.id}}">Edit</a>Code the handler method in the controller class as follows:@RequestMapping("/edit/{id}")
public ModelAndView showEditProductPage(@PathVariable(name = "id") int id) {
ModelAndView mav = new ModelAndView("edit_product");
Product product = service.get(id);
mav.addObject("product", product);
return mav;
}And code the view page edit_product.html with the following code:<!DOCTYPE html>
<html xmlns="http://www.w3.org/1999/xhtml"
xmlns:th="http://www.thymeleaf.org">
<head>
<meta charset="utf-8" />
<title>Edit Product</title>
</head>
<body>
<div align="center">
<h1>Edit Product</h1>
<br />
<form action="#" th:action="@{/save}" th:object="${product}"
method="post">
<table border="0" cellpadding="10">
<tr>
<td>Product ID:</td>
<td>
<input type="text" th:field="*{id}" readonly="readonly" />
</td>
</tr>
<tr>
<td>Product Name:</td>
<td>
<input type="text" th:field="*{name}" />
</td>
</tr>
<tr>
<td>Brand:</td>
<td><input type="text" th:field="*{brand}" /></td>
</tr>
<tr>
<td>Made In:</td>
<td><input type="text" th:field="*{madein}" /></td>
</tr>
<tr>
<td>Price:</td>
<td><input type="text" th:field="*{price}" /></td>
</tr>
<tr>
<td colspan="2"><button type="submit">Save</button> </td>
</tr>
</table>
</form>
</div>
</body>
</html>The edit product page should look like this: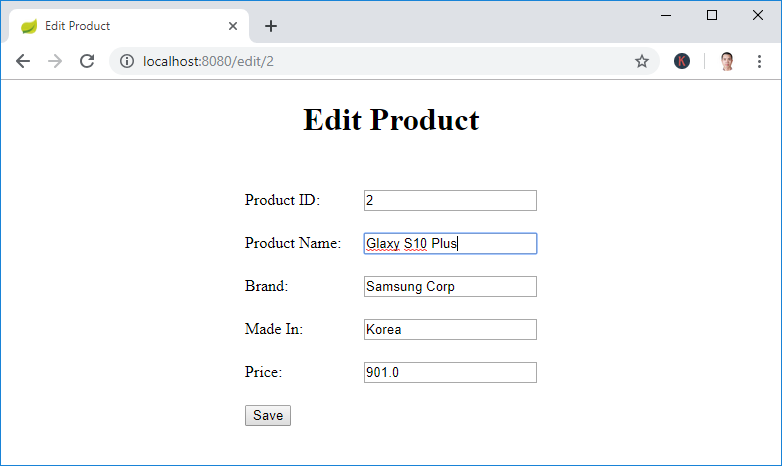 Click the Save button will update the product information into the database. The handler method saveProduct() is reused in this case.
 12. Implement Delete Product Feature
You can see the hyperlink to delete a product in the home page:<a th:href="/@{'/delete/' + ${product.id}}">Delete</a>So code the handler method in the controller class as follows:@RequestMapping("/delete/{id}")
public String deleteProduct(@PathVariable(name = "id") int id) {
service.delete(id);
return "redirect:/";
}When the user clicks the Delete hyperlink, the corresponding product information is removed from the database, and the home page gets refreshed. 13. Test and package the Spring Boot CRUD Web Application
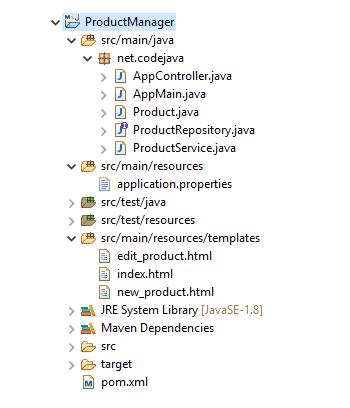
To test the Spring Boot web application we have developed in Eclipse, run the AppMain class as Java Application.To package the web application as an execute JAR file in Eclipse, right-click on the project, and select Run As > Maven build… then enter package as the goal name, and click Run. If the build succeeded, you will see a JAR file is generated under the project’s target directory, with the name like ProductManager-0.0.1-SNAPSHOT.jar.Now you can use the java command to run this JAR file:java -jar ProductManager-0.0.1-SNAPSHOT.jarFor your reference, here’s the screenshot of the project structure:
 That’s how to develop a Spring Boot CRUD application with Spring MVC, Spring Data JPA, ThymeLeaf, Hibernate and MySQL. You can download the sample project in the attachment section below.
 Other Spring Boot Tutorials:
- Spring Boot Hello World Example
- Spring Boot automatic restart using Spring Boot DevTools
- Spring Boot Form Handling Tutorial with Spring Form Tags and JSP
- How to create a Spring Boot Web Application (Spring MVC with JSP/ThymeLeaf)
- Spring Boot - Spring Data JPA - MySQL Example
- Spring Boot Hello World RESTful Web Services Tutorial
- How to use JDBC with Spring Boot
- Spring Boot CRUD Web Application with JDBC - Thymeleaf - Oracle
- Spring Boot RESTful CRUD API Examples with MySQL database
- How to package Spring Boot application to JAR and WAR
About the Author:
 Nam Ha Minh is certified Java programmer (SCJP and SCWCD). He started programming with Java in the time of Java 1.4 and has been falling in love with Java since then. Make friend with him on Facebook and watch his Java videos you YouTube.
| [ ] | 24 kB |