Spring Boot Form Handling Tutorial with Spring Form Tags and JSP
- Details
- Written by Nam Ha Minh
- Last Updated on 23 July 2022 | Print Email
In this tutorial, you will learn how to write code to display a form that captures information from user and write code to get form data when the user submits the form. I will walk you to develop a Spring Boot application that presents the following form to the user:
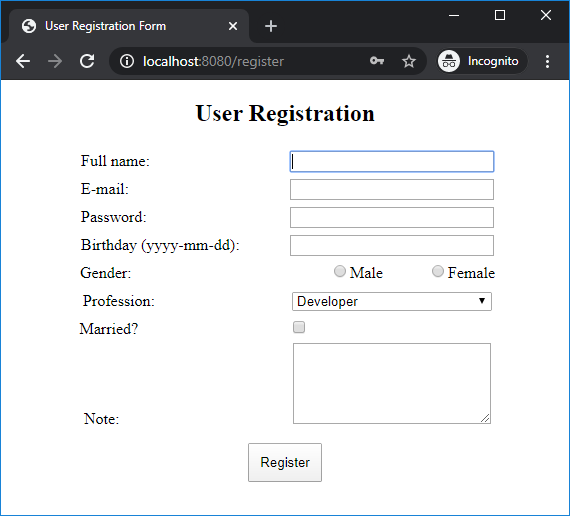
As you can see, this form contains almost standard HTML input fields like textbox, radiobutton, select box (dropdown list), checkbox and text area – along with labels and submit button.
We will be using Spring Boot with Spring MVC, Spring Form tags and JSP. You can use any Java IDE like Eclipse or Spring Tool Suite.
If you are new to Spring Boot, I recommend you to follow this tutorial first. Then come back to this one.
1. Create Spring Boot project
You can create a Spring Boot project using the Spring Initializr tool then import the project into Eclipse IDE. If you use Spring Tool Suite, you can create a Spring Boot project right inside the IDE. In any way, the project must have the following dependency information in the pom.xml file:
<?xml version="1.0" encoding="UTF-8"?>
<project ...>
	<modelVersion>4.0.0</modelVersion>
	<parent>
		<groupId>org.springframework.boot</groupId>
		<artifactId>spring-boot-starter-parent</artifactId>
		<version>2.2.4.RELEASE</version>
		<relativePath />
	</parent>

	<groupId>net.codejava</groupId>
	<artifactId>SpringBootFormHandling</artifactId>
	<version>1.0</version>

	<name>SpringBootFormHandling</name>
	<description>Form handling with Spring Boot</description>

	<properties>
		<java.version>1.8</java.version>
	</properties>

	<dependencies>
		<dependency>
			<groupId>org.springframework.boot</groupId>
			<artifactId>spring-boot-starter-web</artifactId>
		</dependency>
	</dependencies>

	<build>
		<plugins>
			<plugin>
				<groupId>org.springframework.boot</groupId>
				<artifactId>spring-boot-maven-plugin</artifactId>
			</plugin>
		</plugins>
	</build>

</project>
As you can see, here we use Spring Boot 2.2.4 with Java 1.8. The spring-boot-starter-web dependency provides default configuration for a Spring MVC web application running on embedded Tomcat server. The spring-boot-maven-plugin enables packaging our Spring Boot application to a JAR/WAR file.
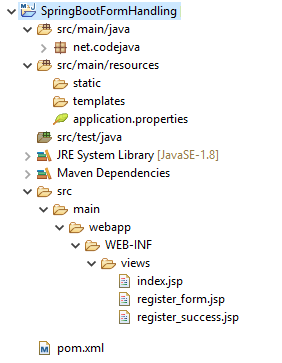
And make sure that the project has the following directory structure:
All the configurations for a Spring MVC application are done by Spring Boot under the hood.
TIP: Use Spring Boot DevTools for automatic restart so you don't have to manually restart the application during development.
2. Enable JSP with Spring Boot
To use JSP (JavaServer Pages) with Spring Boot, you must add the following dependency in the pom.xml file:
<dependency>
	<groupId>org.apache.tomcat.embed</groupId>
	<artifactId>tomcat-embed-jasper</artifactId>
	<scope>provided</scope>
</dependency>
And configure Spring MVC resolver in the application.properties file as follows:
spring.mvc.view.prefix=/WEB-INF/views/
spring.mvc.view.suffix=.jsp
This means you must put JSP files under this directory in the project:
src/main/webapp/WEB-INF/views
3. Create Spring MVC Controller Class
Create a Spring MVC controller class named MvcController with the following initial code:
package net.codejava;

import org.springframework.stereotype.Controller;
import org.springframework.web.bind.annotation.RequestMapping;

@Controller
public class MvcController {

	@RequestMapping("/")
	public String home() {
		System.out.println("Going home...");
		return "index";
	}
}
You can see the handler method home() will serve requests to the application’s homepage (context root /). It returns the view named index which will be resolved to a JSP file under /WEB-INF/views/index.jsp.
4. Update Homepage
Next, create the homepage index.jsp under the src/main/webapp/WEB-INF/views directory with the following HTML code:
<!DOCTYPE html>
<html>
<head>
<meta charset="ISO-8859-1">
<title>Spring Boot Form Handling Example</title>
</head>
<body>
	<h1>Spring Boot Form Handling Example</h1>
	<h2>Spring Form Tags with JSP</h2>
	<a href="/register">Click here</a>
</body>
</html>
Run the Spring Boot application, and access the web application at localhost, you will see the homepage like this:
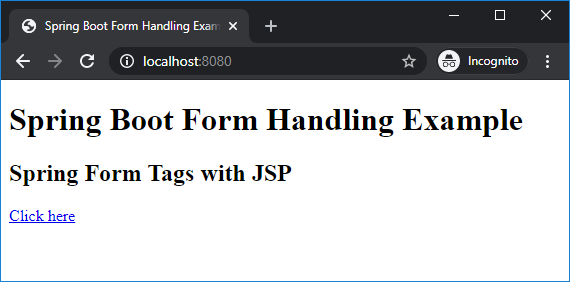
When the user clicks the hyperlink, the user registration form will display.
5. Code Domain Model Class
Create the User class that represents the user’s details in the registration form, as below:
package net.codejava;

import java.sql.Date;

public class User {
	private String name;
	private String email;
	private String gender;
	private String password;
	private String profession;
	private String note;
	private Date birthday;
	private boolean married;

	// getters...
	// setters...

	// override toString()

}
Note that getter and setter methods are not shown for brevity. You should also override the toString() method that returns all the details of the user.
6. Code Show Form Handler Method
To handle request that comes to the application when the user clicks the hyperlink in homepage, add the following method in the controller class:
public String showForm(Model model) {
	User user = new User();
	List<String> professionList = Arrays.asList("Developer", "Designer", "Tester");

	model.addAttribute("user", user);
	model.addAttribute("professionList", professionList);

	return "register_form";
}
With the following import statements:
import java.util.Arrays;
import java.util.List;

import org.springframework.ui.Model;
import org.springframework.web.bind.annotation.GetMapping;
The showForm() handler method will be called when the user clicks the hyperlink /register in the homepage. It creates and adds two objects to the model:
- The User object to capture values of fields on the form.
- The professionList to display values for the dropdown list (select box) on the form.
Then it returns the view name register_form – which will be resolved to a JSP file described next.
7. Code Spring MVC Form Page
To show the user registration form to the user, create the register_form.jsp file under /WEB-INF/views with the following code:
<%@ page language="java" contentType="text/html; charset=ISO-8859-1"
    pageEncoding="ISO-8859-1"%>
<%@ taglib prefix="form" uri="http://www.springframework.org/tags/form" %>
<!DOCTYPE html>
<html>
<head>
<meta charset="ISO-8859-1">
<title>User Registration Form</title>
</head>
<body>
	<div align="center">
		<h2>User Registration</h2>
		<form:form action="register" method="post" modelAttribute="user">
			<form:label path="name">Full name:</form:label>
			<form:input path="name"/><br/>

			<form:label path="email">E-mail:</form:label>
			<form:input path="email"/><br/>

			<form:label path="password">Password:</form:label>
			<form:password path="password"/><br/>

			<form:label path="birthday">Birthday (yyyy-mm-dd):</form:label>
			<form:input path="birthday"/><br/>

			<form:label path="gender">Gender:</form:label>
			<form:radiobutton path="gender" value="Male"/>Male
			<form:radiobutton path="gender" value="Female"/>Female<br/>

			<form:label path="profession">Profession:</form:label>
			<form:select path="profession" items="${professionList}" /><br/>

			<form:label path="married">Married?</form:label>
			<form:checkbox path="married"/><br/>

			<form:label path="note">Note:</form:label>
			<form:textarea path="note" cols="25" rows="5"/><br/>

			<form:button>Register</form:button>
		</form:form>
	</div>
</body>
</html>
We use Spring form tags to map an object in the model with fields in the form, so it is required to declare the following directive at the beginning of the file:
<%@ taglib prefix="form" uri="http://www.springframework.org/tags/form" %>
Then we use the <form:form> tag to create a form:
<form:form action="register" method="post" modelAttribute="user">
Here, pay attention to the modelAttribute attribute that specifies name of an object in the model that maps to this form. Remember the user object in the showForm() method?
Then for each form field, we use Spring form tags for the label and the field:
<form:label path="email">E-mail:</form:label>
<form:input path="email"/>
Note that the value of the path attribute must refer to a field in the model object.
To format the form, add the following CSS style into the page’s head section:
<head>
...
<style type="text/css">
	label {
		display: inline-block;
		width: 200px;
		margin: 5px;
		text-align: left;
	}
	input[type=text], input[type=password], select {
		width: 200px;
	}
	input[type=radio] {
		display: inline-block;
		margin-left: 45px;
	}
	input[type=checkbox] {
		display: inline-block;
		margin-right: 190px;
	}

	button {
		padding: 10px;
		margin: 10px;
	}
</style>
</head>
When running, the form looks like the following screenshot:
8. Code Form Submission Handler Method
To handle the form submission when the user clicks Register button on the form, add the following method to the controller class:
@PostMapping("/register")
public String submitForm(@ModelAttribute("user") User user) {

	System.out.println(user);

	return "register_success";
}
With the following import statements:
import org.springframework.web.bind.annotation.ModelAttribute;
import org.springframework.web.bind.annotation.PostMapping;
As you can see, the method of the form is post so the @PostMapping annotation is used for the handler method to process HTTP POST request.
Note that the @ModelAttribute annotation is used for the method parameter User user – so Spring will know to read values of fields on the form and set them to the model object’s fields. We don’t have to write a single line of code to get form data – just use the model object!
The submitForm() method simply prints the user object’s details to the console, and return the view named register_success which resolves to the JSP page described below.
9. Code Result Page
Finally, create the register_success.jsp file with the following code:
<%@ page language="java" contentType="text/html; charset=ISO-8859-1"
pageEncoding="ISO-8859-1"%>
<!DOCTYPE html>
<html>
<head>
<meta charset="ISO-8859-1">
<title>Registration Success</title>
<style type="text/css">
span {
display: inline-block;
width: 200px;
text-align: left;
}
</style>
</head>
<body>
<div align="center">
<h2>Registration Succeeded!</h2>
<span>Full name:</span><span>${user.name}</span><br/>
<span>E-mail:</span><span>${user.email}</span><br/>
<span>Password:</span><span>${user.password}</span><br/>
<span>Birthday:</span><span>${user.birthday}</span><br/>
<span>Gender:</span><span>${user.gender}</span><br/>
<span>Profession:</span><span>${user.profession}</span><br/>
<span>Married?:</span><span>${user.married}</span><br/>
<span>Note:</span><span>${user.note}</span><br/>
</div>
</body>
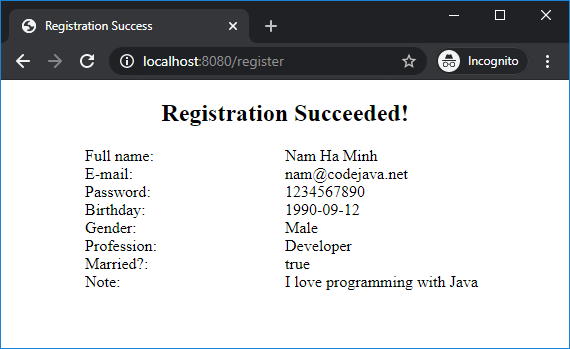
</html>This page simply uses Expression Language (EL) of JSP to display the information of the form submitted the user, as shown in the following screenshot:
That’s the tutorial about handling form in Spring Boot using Spring form tags and JSP. You can download the sample project attached below. Or get code on GitHub.
To validate the user's input for the form, refer to Spring Boot Form Validation Tutorial.
You can also watch the video version of this tutorial here:
Other Spring Boot Tutorials:
- Spring Boot Hello World Example
- Spring Boot automatic restart using Spring Boot DevTools
- Spring Boot Hello World RESTful Web Services Tutorial
- How to create a Spring Boot Web Application (Spring MVC with JSP/ThymeLeaf)
- Spring Boot - Spring Data JPA - MySQL Example
- Spring Boot CRUD Example with Spring MVC – Spring Data JPA – ThymeLeaf - Hibernate - MySQL
- How to use JDBC with Spring Boot
- Spring Boot CRUD Web Application with JDBC - Thymeleaf - Oracle
- Spring Boot RESTful CRUD API Examples with MySQL database
- How to package Spring Boot application to JAR and WAR
About the Author:
 Nam Ha Minh is certified Java programmer (SCJP and SCWCD). He began programming with Java back in the days of Java 1.4 and has been passionate about it ever since. You can connect with him on Facebook and watch his Java videos on YouTube.
| [Spring Boot Form sample project] | 69 kB |