In this Spring Security tutorial, I’d love to share with you guys, about how to implement authorization for REST APIs with JWT (JSON Web Token) in a Spring-based application.You know, role-based authorization is essential part of any applications that are used by different kinds of users such as admin, customer, editor, visitor, etc. Each user is assigned one or more roles (or authorities) that grant the user permission to do certain things.In the context of REST APIs, an access token sent from the client should claim the user’s authorities. That means upon successful authentication (via public login API), the server puts that claim into the generated access token. And for each secure API, the server reads user’s authorities when the token is decoded, then update the security context accordingly.NOTE: This tutorial is extension of the Spring Security JWT Authentication one, which you should follow beforehand or follow along with this article.
1. Role-based Authorization Design for APIs
Previously, we have only public and secure APIs. Now, we want to protect the APIs at more granular level, as shown below:Here, we design that the List products API is accessible to only users having roles Customer or Editor; and the Add product API requires authority Editor; whereas the Login API is accessible to everyone (public).
2. Assign Roles to Users
We need to add a new entity class Role that represents user’s authority and update the User entity class to reflect many-to-many relationship between users and roles:
This means user can be assigned one or more roles, and a role can be assigned to one or more users. For example, user A is assigned roles Customer and Editor, and user B is assigned only role Editor.So write code for the Roleclass as follows:
package net.codejava.user;

import javax.persistence.*;

@Entity
@Table(name = "roles")
public class Role {
	@Id @GeneratedValue(strategy = GenerationType.IDENTITY)
	private Integer id;

	@Column(nullable = false, length = 50, unique = true)
	private String name;

	public Role() { }

	public Role(String name) {
		this.name = name;
	}

	public Role(Integer id) {
		this.id = id;
	}


	@Override
	public String toString() {
		return this.name;
	}

	// getters and setters are not shown for brevity
}
And update the User class like this (the previous code is not shown):
public class User implements UserDetails {

	@ManyToMany
	@JoinTable(
		name = "users_roles",
		joinColumns = @JoinColumn(name = "user_id"),
		inverseJoinColumns = @JoinColumn(name = "role_id")
	)
	private Set<Role> roles = new HashSet<>();


	@Override
	public Collection<? extends GrantedAuthority> getAuthorities() {
		List<SimpleGrantedAuthority> authorities = new ArrayList<>();
		for (Role role : roles) {
			authorities.add(new SimpleGrantedAuthority(role.getName()));
		}
		return authorities;
	}

	public Set<Role> getRoles() {
		return roles;
	}

	public void setRoles(Set<Role> roles) {
		this.roles = roles;
	}

	public void addRole(Role role) {
		this.roles.add(role);
	}

	// previous code is not shown for brevity

}
If you don’t understand how many-to-many mapping using JPA/Hibernate works, refer to this article. Note that we update the getAuthorities() method to return a list of user’s authorities, which will be used in access token generation process.Next, declare the RoleRepository interface as follows:
For the purpose of this tutorial, this repository is used by only in the following test class, for persisting some roles into the database:
package net.codejava.user;

import static org.junit.jupiter.api.Assertions.assertEquals;

import java.util.List;

import org.junit.jupiter.api.Test;
import org.springframework.beans.factory.annotation.Autowired;
import org.springframework.boot.test.autoconfigure.jdbc.AutoConfigureTestDatabase;
import org.springframework.boot.test.autoconfigure.jdbc.AutoConfigureTestDatabase.Replace;
import org.springframework.boot.test.autoconfigure.orm.jpa.DataJpaTest;
import org.springframework.test.annotation.Rollback;

@DataJpaTest
@AutoConfigureTestDatabase(replace = Replace.NONE)
@Rollback(false)
public class RoleRepositoryTests {
	@Autowired private RoleRepository repo;

	@Test
	public void testCreateRoles() {
		Role admin = new Role("ROLE_ADMIN");
		Role editor = new Role("ROLE_EDITOR");
		Role customer = new Role("ROLE_CUSTOMER");

		repo.saveAll(List.of(admin, editor, customer));

		long count = repo.count();
		assertEquals(3, count);
	}
}
Run the testCreateRoles() method as JUnit Test in order to insert 3 roles into the roles table: ROLE_ADMIN, ROLE_EDITOR and ROLE_CUSTOMER.And to assign roles to a specific user, add the following unit test method to the UserRepositoryTests class:
@Test
public void testAssignRoleToUser() {
	Integer userId = 4;
	Integer roleId = 3;
	User user = repo.findById(userId).get();
	user.addRole(new Role(roleId));

	User updatedUser = repo.save(user);
	assertThat(updatedUser.getRoles()).hasSize(1);

}
Run the testAssignRoleToUser() method as JUnit test to assign roles ID 3 to the user ID 4. And the following code assign 2 roles ID 1 and 2 to the user 2:
@Test
public void testAssignRoleToUser() {
	Integer userId = 2;
	User user = repo.findById(userId).get();
	user.addRole(new Role(1));
user.addRole(new Role(2));


	User updatedUser = repo.save(user);
	assertThat(updatedUser.getRoles()).hasSize(2);

}
You should check the database to know the exact IDs of users and roles. The idea is assigning ROLE_EDITOR to one user and ROLE_EDITOR and ROLE_CUSTOMER to another user.
3. Store User’s Authorities in JWT
Next, we need to update the code that generates access token upon successfully authentication, so that the JWT contains the user’s authorities, as depicted in the following diagram:So update the generateAccessToken() method in the JwtTokenUtil class as follows:
Here, we add a claim to the access token with claim name is roles (you can use whatever name you like - so it’s a private claim that is understood by only your own application). And the claim value is the String representation of Set<Role>, which is something like [ROLE_EDITOR] or [ROLE_EDITOR, ROLE_CUSTOMER]. Make sure that you override the toString() method in the Role class like below:
@Override
public String toString() {
	return this.name;
}
NOTE: Don’t worry that the user’s authorities are stored in a JWT because the access token is digitally signed using a private key that is known by only your application. The token cannot be tampered with, such as the user’s authorities get modified by the client.
4. Parse User’s Authorities from JWT
Now, for each API request that includes the access token in the Authorization header, our application should extract the information of user’s authorities from the claim named roles, along with other claims. So update the getUserDetails() method in the JwtTokenFilter class as follows:
To make this works, change the access modifier of the parseClaims() method in the JwtTokenUtil class from private to public.Then update the setAuthenticationContext() method as follows:
This passes the user’s authorities to the security context, which lets Spring Security authorizes requests based on user’s authorities.
5. Implement Authorization for REST APIs
Next, let’s implement authorization for the APIs at method level using the @RolesAllowed annotation which is provided by Spring Security Config. So update the pom.xml file to include the following dependency:
Then update the Spring security configuration class by adding the @EnableGlobalMethodSecurity annotation as follows:
@EnableWebSecurity
@EnableGlobalMethodSecurity(
	prePostEnabled = false, securedEnabled = false, jsr250Enabled = true
)
public class ApplicationSecurity extends WebSecurityConfigurerAdapter {
	...
}
We enable the attribute jsr250Enabled in order to use the @RolesAllowed annotation in our API code for method-level authorization. And update the ProductApi class as follows:
Here, the create() method can be executed by only users whose roles include ROLE_EDITOR; and only users whose roles include either ROLE_CUSTOMER or ROLE_EDITOR have the permission to list products.That also means a user has only ROLE_CUSTOMER cannot add products. And a user with only ROLE_EDITOR can list and add products. Make sense?
6. Test REST API Authorization
You can use cURL or Postman to test authorization for the API end point /products with HTTP GET (list products) and POST (add product). Before that you need to call /auth/login end point to get an access token for 3 cases:- user #1 with only role CUSTOMER- user #2 with only role EDITOR- user #3 with both roles EDITOR and CUSTOMERThe following diagram explains the test case with user #1:And the following diagram explains the test case with user #2 and #3:To see the coding in action and testing using Postman, I recommend you watch the following video:That’s my tutorial about implementing role-based authorization for REST APIs with JWT and Spring Security. I hope you found it helpful and learnt something new. You can download the sample project attached below.You can also get the reference code on GitHub here.
Nam Ha Minh is certified Java programmer (SCJP and SCWCD). He began programming with Java back in the days of Java 1.4 and has been passionate about it ever since. You can connect with him on Facebook and watch his Java videos on YouTube.
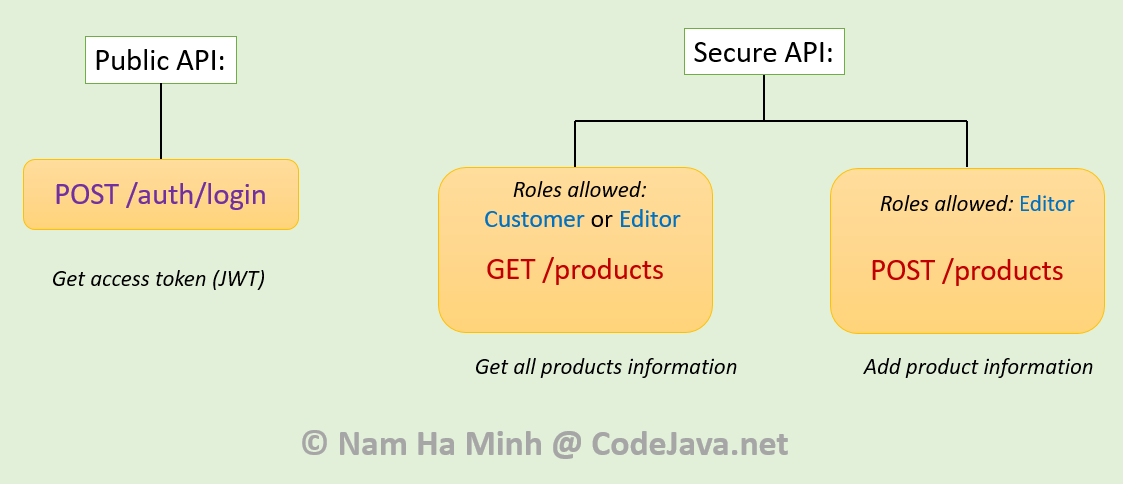 Here, we design that the List products API is accessible to only users having roles Customer or Editor; and the Add product API requires authority Editor; whereas the Login API is accessible to everyone (public).
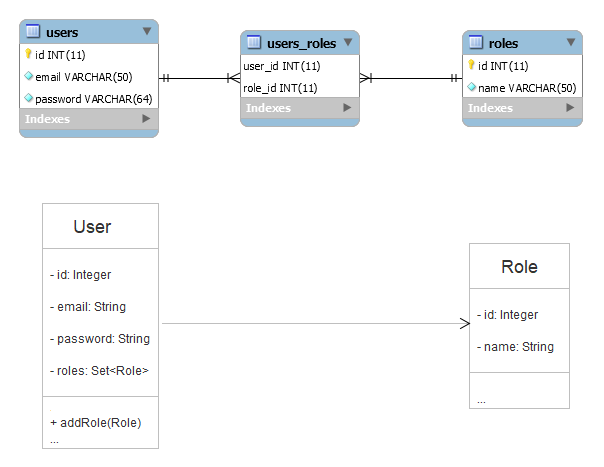 This means user can be assigned one or more roles, and a role can be assigned to one or more users. For example, user A is assigned roles Customer and Editor, and user B is assigned only role Editor.So write code for the Role class as follows:
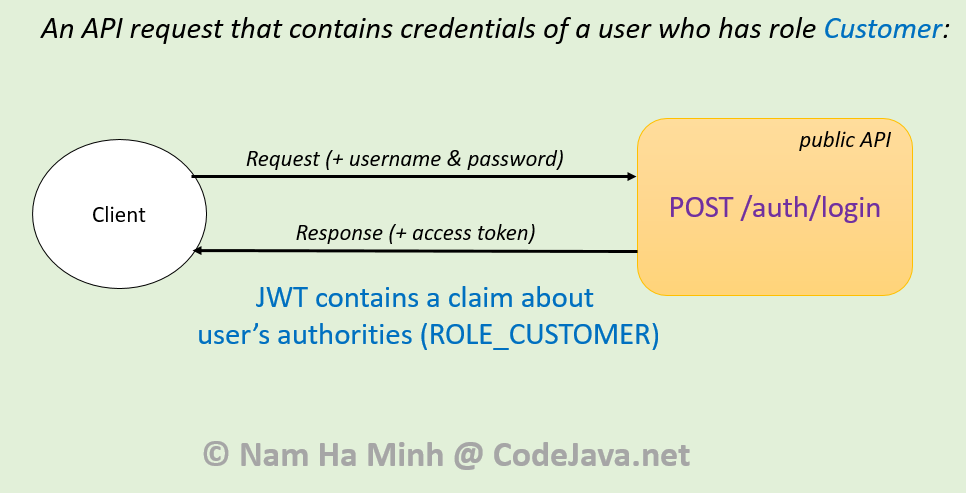 So update the generateAccessToken() method in the JwtTokenUtil class as follows:
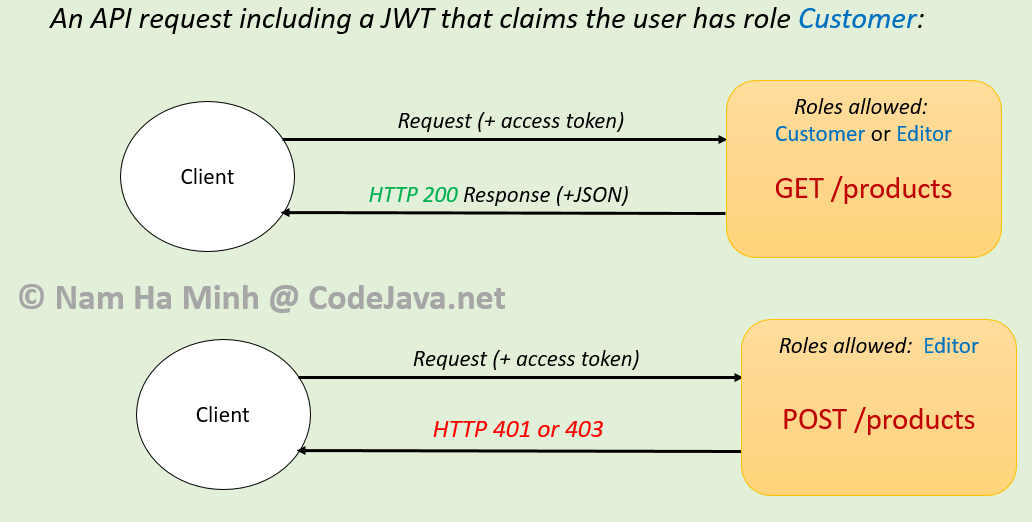 And the following diagram explains the test case with user #2 and #3:
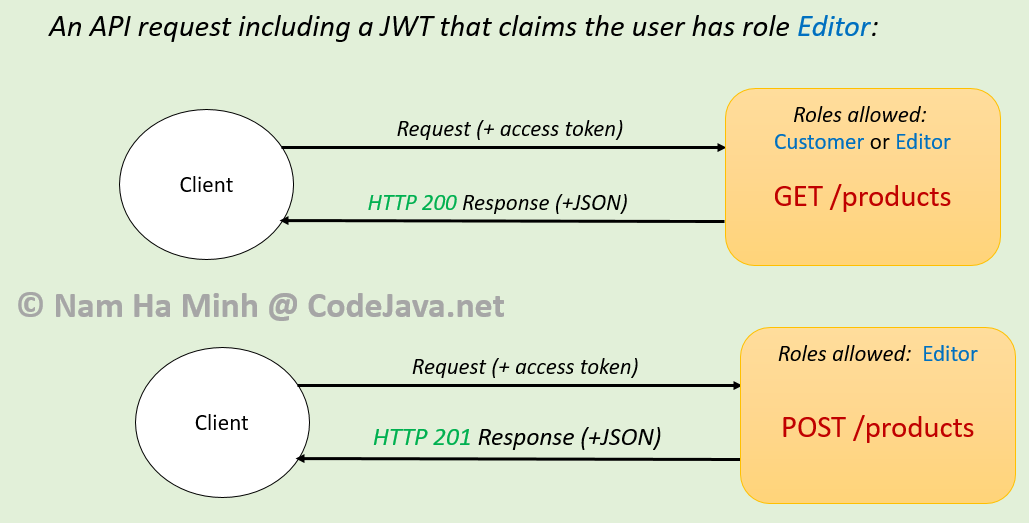 To see the coding in action and testing using Postman, I recommend you watch the following video:That’s my tutorial about implementing role-based authorization for REST APIs with JWT and Spring Security. I hope you found it helpful and learnt something new. You can download the sample project attached below.You can also get the reference code on GitHub here.
  Nam Ha Minh is certified Java programmer (SCJP and SCWCD). He began programming with Java back in the days of Java 1.4 and has been passionate about it ever since. You can connect with him on Facebook and watch his Java videos on YouTube.
Comments
Any idea how can i solve it?:(