Spring Boot Connect to H2 Database Examples
- Details
- Written by Nam Ha Minh
- Last Updated on 31 March 2022 | Print Email
1. Add H2 Dependency
To use H2 database in your Spring Boot project, add the following dependency in the project’s pom.xml file:<dependency> <groupId>com.h2database</groupId> <artifactId>h2</artifactId> <scope>runtime</scope> </dependency>The H2 version is specified by Spring Boot by default. If you want to use a specific version, you can explicitly declare it:
<dependency>
	<groupId>com.h2database</groupId>
	<artifactId>h2</artifactId>
	<version>2.1.210</version>
</dependency>
Visit this page to know the latest version of H2 database.
2. Spring Boot Connect to H2 in In-memory Mode with Spring JDBC
With in-memory mode, the application accesses a H2 database that lives in memory, in the same JVM process that runs the application. The database is removed when all connections are closed (default).By default, with Spring Boot, you don’t have to specify any JDBC URL to use H2 in in-memory mode. You can also specify the JDBC URL or H2 in-memory database in the application.properties file as follows:#unamed private; one connection spring.datasource.url=jdbc:h2:mem:or:
# multiple connections in one process
spring.datasource.url=jdbc:h2:mem:dbname
package net.codejava;

import org.springframework.beans.factory.annotation.Autowired;
import org.springframework.boot.CommandLineRunner;
import org.springframework.context.annotation.Bean;
import org.springframework.context.annotation.Configuration;
import org.springframework.jdbc.core.JdbcTemplate;

@Configuration
public class DatabaseInitializer {

	@Autowired JdbcTemplate jdbcTemplate;

	@Bean
	CommandLineRunner loadDatabase() {
		return new CommandLineRunner() {

			@Override
			public void run(String... args) throws Exception {

				jdbcTemplate.execute("create table employees (id int primary key "
						+ "auto_increment, name varchar(30), email varchar(30))");

				jdbcTemplate.execute("insert into employees (name, email) "
						+ "values ('Will Smith', 'will.smith@holywood.com')");

				jdbcTemplate.execute("insert into employees (name, email) "
						+ "values ('Bill Gates', 'bill.gates@microsoft.com')");

			}
		};
	}
}
You see, you just need to tell Spring autowire an object of type JdbcTemplate and use its methods - very simple! This code will be executed right after the application has started.Note that to use Spring JDBC, the following dependency must be present:<dependency> <groupId>org.springframework.boot</groupId> <artifactId>spring-boot-starter-jdbc</artifactId> </dependency>By default, H2 in-memory database is used in unit testing of repositories with Spring Data JPA. You can also use H2 in-memory database for temporary data that lives only at runtime.
3. Use H2 Console to create a disk-based database
H2 comes with a simple web application called H2 Console which allows you to create and manage H2 persistent databases. If you download the binary distribution of H2, you can starts H2 Console in command line using this command:java -jar h2-version.jar
Then it will open H2 console in browser at localhost as shown below: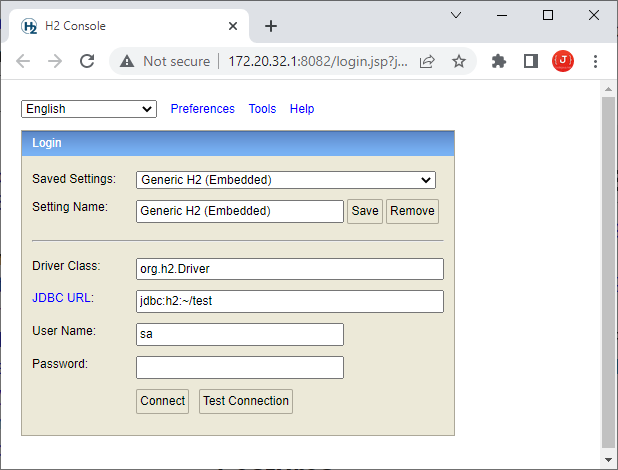 server mode. Now in the Login page, keep the Saved settings field is Generic H2 (Embedded) and type the following JDBC URL:
jdbc:h2:~/employeesdb
Enter any username and password, and click Connect. It will create a database named employeesdb in the user home directory (specified by the ~ character in the URL). Then you can use the H2 Console to run SQL statements for creating table and manipulate data: Run the following SQL statements to create a new table employees and insert two rows:
create table employees (id int primary key auto_increment, name varchar(30), email varchar(30))
insert into employees (name, email) values ('Nam Ha Minh', 'nam@codejava.net')
insert into employees (name, email) values ('Ravi Kumar', 'ravi.kumar@gmail.com')
Press Ctrl + C in command prompt to terminate H2 Console.For your reference, here are some examples of H2 JDBC URL:jdbc:h2:~/test the ‘test’ database in the user home directory
jdbc:h2:./test the ‘test’ database in the current directory
jdbc:h2:/data/test the ‘test’ database in the /data directory (Unix)
jdbc:h2:D:/data/testthe ‘test’ database in the D:/data directory (Windows)
4. Spring Boot Connect to H2 in Embedded Mode with Spring Data JPA
In embedded mode, the H2 database engine runs in the same process of the application and connects to a disk-based database. To have your Spring Boot application connect to an embedded H2 database with Spring Data JPA and Hibernate, you need to specify the following properties in the application.properties file:spring.datasource.url=jdbc:h2:~/employeesdb spring.datasource.username=sa spring.datasource.password=sa1234 spring.jpa.show-sql=true spring.jpa.hibernate.ddl-auto=update spring.jpa.properties.hibernate.format_sql=true spring.jpa.properties.hibernate.dialect=org.hibernate.dialect.H2DialectThis will connect to the H2 database employeesdb in the user home directory created in the previous step.Next, code an entity class that maps with the employees table as follows:
package net.codejava;

import javax.persistence.*;

@Entity
@Table(name = "employees")
public class Employee {
	@Id @GeneratedValue(strategy = GenerationType.IDENTITY)
	private Integer id;

	@Column(nullable = false, length = 30)
	private String name;

	@Column(nullable = false, length = 30)
	private String email;

	// getters and setters are not shown
}
Then code the repository interface:package net.codejava;
import org.springframework.data.jpa.repository.JpaRepository;
public interface EmployeeRepository extends JpaRepository<Employee, Integer> {
}And for demo purpose, code a @RestController class as follows:package net.codejava;
import java.util.List;
import org.springframework.web.bind.annotation.GetMapping;
import org.springframework.web.bind.annotation.RestController;
@RestController
public class EmployeeController {
private final EmployeeRepository repo;
public EmployeeController(EmployeeRepository repo) {
this.repo = repo;
}
@GetMapping("/employees")
public List<Employee> listAll() {
return repo.findAll();
}
}This exposes a REST end point /employees that returns a list of employees. You can use curl tool to test:curl localhost:8080/employees
In addition to use repository interface defined by Spring JPA, you can use EntityManager to perform database operations.
5. Spring Boot Connect to H2 in Server Mode
In server mode, an instance of H2 database engine runs as the server in a separate process, and your Spring Boot application connects as a client via JDBC. You can start the H2 server in command line using the following command:java -cp h2-2.1.210.jar org.h2.tools.Server -tcp
You will see the server running with the following message:TCP server running at tcp://172.20.32.1:9092 (only local connections)
Now, in your Spring project, just update the JDBC URL in the configuration file like this:spring.datasource.url=jdbc:h2:tcp://localhost/~/employeesdb
You can also use H2 API to write a Java program that runs as H2 server. For example:package net.codejava;
import java.sql.SQLException;
import org.h2.tools.Server;
public class H2Server {
public static void main(String[] args) throws SQLException {
Server.createTcpServer(args).start();
}
}To make it works, you need to remove the runtime scope of H2 dependency.
6. Use H2 Console in Spring Boot application
Note that you can use H2 Console right within your Spring Boot application. When you start a Spring application with H2 in classpath, you will see the following message in console:H2 console available at '/h2-console'. Database available at 'jdbc:h2:mem:…'That means you can access the H2 console by opening the address like http://localhost:8080/h2-console, as shown below: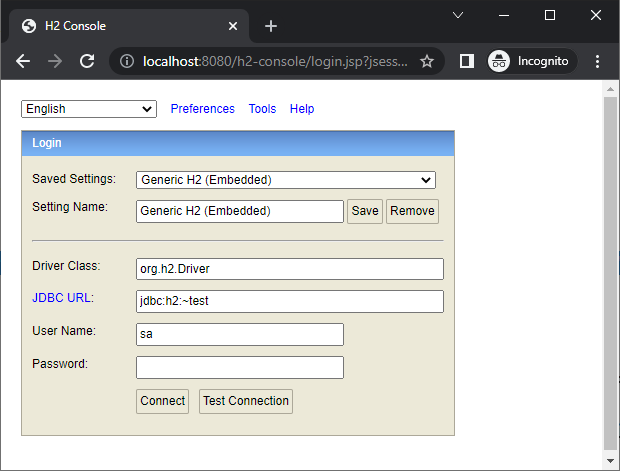 Very convenient, right? As you don’t have to manually download H2 and type a command in the command line.If you don’t want H2 console start with your application, you can disable it in the application.properties file using this property:
spring.h2.console.enabled=false
You can also specify a different path for H2 Console. For example:spring.h2.console.path=/h2
7. Spring H2 Configuration Properties
For your reference, Spring Boot lets you configure H2 with the following properties:spring.h2.console.enabled - whether to enable the H2 console (default is true)
spring.h2.console.path - path at which the console is available (default is /h2-console)
spring.h2.console.settings.trace - whether to enable trace output (default is false)
spring.h2.console.settings.web-admin-password - password to access preferences and tools of H2 console
spring.h2.console.settings.web-allow-others - whether to enable remote access (default is false)
That’s my tutorial about Spring Boot connect to H2 database. To see the coding in action, I recommend you watch the following video:Related Articles:
- Java Connect to H2 Database Examples
- Understand Spring Data JPA with Simple Example
- Spring MVC with JdbcTemplate Example
- Spring Boot - Spring Data JPA - MySQL Example
Other Spring Boot Tutorials:
- How to create a Spring Boot Web Application (Spring MVC with JSP/ThymeLeaf)
- Spring Boot CRUD Example with Spring MVC – Spring Data JPA – ThymeLeaf - Hibernate - MySQL
- Spring Boot Hello World RESTful Web Services Tutorial
- Spring Boot Thymeleaf Form Handling Tutorial
- Spring Data JPA Paging and Sorting Examples
- Spring Boot Error Handling Guide
- Spring Boot Logging Basics
- Spring Security Role-based Authorization Tutorial
- Spring Security Customize Login and Logout
- How to Get Logged-in User's Details with Spring Security
- Spring Security: Prevent User from Going Back to Login Page if Already logged in
About the Author:
 Nam Ha Minh is certified Java programmer (SCJP and SCWCD). He began programming with Java back in the days of Java 1.4 and has been passionate about it ever since. You can connect with him on Facebook and watch his Java videos on YouTube.