Throughout this tutorial, I will guide you to code paging and sorting functionalities for an existing Spring Boot application using Spring Data JPA. As you know, pagination allows the users to see a small portion of data at a time (a page), and sorting allows the users to view the data in a more organized way. Both paging and sorting help the users consume information more easily and conveniently.I will start with the ProductManager project which can be downloaded from this tutorial which is based on Spring Data JPA, Hibernate, Thymeleaf and MySQL database.
1. Understand Spring Data JPA’s Pagination APIs
To use paging and sorting APIs provided by Spring Data JPA, your repository interface must extend the PagingAndSortingRepositoryinterface which defines the following couple of methods (T refers to an entity class):
Note that JpaRepository is a subtype of PagingAndSortingRepositoryso if your repository interface is of type JpaRepository, you don’t have to make change to it.The following code example gets the first page from the database, with 10 items per page:
int pageNumber = 1;
int pageSize = 10;
Pageable pageable = PageRequest.of(pageNumber, pageSize);

Page<Product> page = repository.findAll(pageable);
Then you can get the actual content as follows:
List<Product> listProducts = page.getContent();
With a Page object you can know the total rows in the database and the total pages according to the given page size:
long totalItems = page.getTotalElements();
int totalPages = page.getTotalPages();
This information is useful for implementing pagination in the view with Thymeleaf template.
2. Implement Pagination
Now, let’s update the ProductManger project to add pagination for the products list.
Update Service class for paging
Prior to pagination, the method that lists all products is implemented in the ProductService class is as follows:
@Service
public class ProductService {
	@Autowired
	private ProductRepository repo;

	public List<Product> listAll() {
		return repo.findAll();
	}
}
Now, to implement paging function, update this method as follows:
public Page<Product> listAll(int pageNum) {
	int pageSize = 5;

	Pageable pageable = PageRequest.of(pageNum - 1, pageSize);

	return repo.findAll(pageable);
}
As you can see, we update the listAll() method to takes a parameter for page number which will be passed from the controller. And this method returns a Page<Product> instead of a List<Product>.Note that pagination APIs considers page number is 0-based. In the view, we use 1-based page number for the users, but in the code we need to convert to 0-based page number, hence you see pageNum – 1 as above.
Update Controller class for paging
Add a new method in the Spring MVC controller class to handle requests to see a specific page of products, with the following code:
As you can see, the page number is added to the URL like this: /page/1, page/2, /page/3…Beside a List of Products object, we also store 3 additional attributes in the model to be used for pagination: currentPage, totalPages and totalItems.And modify the handler method for the home page to display the first page as follows:
@RequestMapping("/")
public String viewHomePage(Model model) {
	return viewPage(model, 1);
}
Update Thymeleaf template view for paging
We will be updating the view to show navigation links for pagination like First, Previous, page numbers from 1 to total pages, Next and Last.Now, for the view template (index.html), we show the total number of rows using Thymeleaf expression as follows:
Total Items: [[${totalItems}]]
To display a hyperlink that allows the user to navigate to the first page:
Testing paginationSuppose that we have 15 rows in the products table, then we would see the home page as follows:See the navigation links for pagination at the bottom of the page. You can click the links First, Previous, a specific page number, Next and Last to test the pagination.
3. Understand Spring Data JPA’s Sorting APIs
Next, I will guide you to implement sorting functionality in conjunction with pagination. The users will be able to sort the products list by clicking on column header of the table.First, create a Sortobject like this:
Sort sort = Sort.by(“fieldName”).ascending();
This will sort the result by fieldName in ascending order. fieldName must match a field name declared in the entity class. We can also sort by more than one field, for example:
This will sort the products list by brand column first in ascending order, then by price in descending order.Then we pass the Sort object to create a Pageable as follows:
So as you can see, we can apply sorting alongside with paging neatly.
4. Implement Sorting
Now, let’s update the ProjectManager project to implement sorting, in addition to the pagination we’ve done previously. For simplicity, we allow the users to sort the products list by a single field only.
Update Service class for sorting
Modify the listAll() method in the ProductService class to take sortField and sortDir as additional parameters, as follows:
So the URL for paging and sorting would look like this: /page/1?sortField=name&sortDir=ascWe also store 3 additional attributes in the model to be used in the view for sorting: sortField, sortDir and reverseSortDir. The reverseSortDir attribute is used to toggle sorting order when the users click on a column header.Modify the handler method for the homepage to show the first page of result which is sorted by name in ascending order by default:
Note that the sorting order in the hyperlink is in reverse to the current sorting direction to allow the user to toggle the direction (ascending/descending).Add the following code to show the current field being sorted with which direction:
<div><i>Sorted by [[${sortField}]] in [[${sortDir}]] order</i></div>
For the navigation links for pagination, append the following value to each URL:
This allows the users to navigate to different pages of the result while the sorting is still applied.
Test sorting and paging
Launch the application and refresh the homepage. You see the column headers of the table are now clickable, as shown in the following screenshot:Click each column to test sorting and click navigation links at the bottom to test pagination alongside with sorting.
Conclusion:
So far you have learned to implement paging and sorting functionalities for an existing Spring Boot application using Spring Data JPA, Hibernate, Thymeleaf and MySQL database. You see Spring makes it easy, simple and convenient.For reference, you can download the sample project attached below.
Nam Ha Minh is certified Java programmer (SCJP and SCWCD). He began programming with Java back in the days of Java 1.4 and has been passionate about it ever since. You can connect with him on Facebook and watch his Java videos on YouTube.
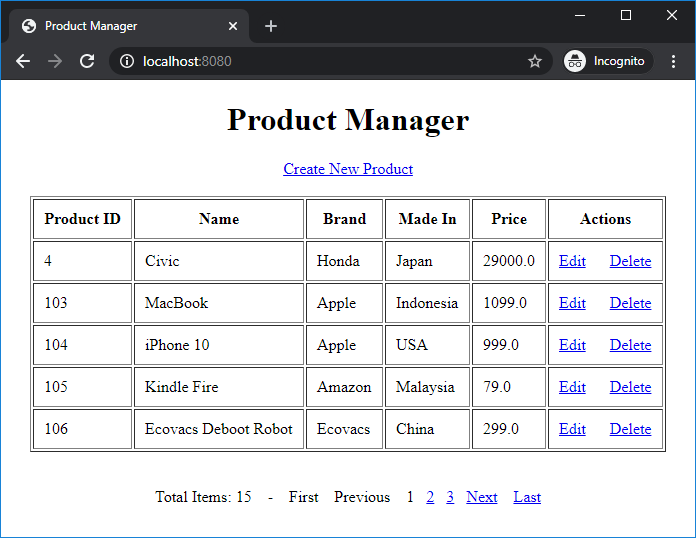 See the navigation links for pagination at the bottom of the page. You can click the links First, Previous, a specific page number, Next and Last to test the pagination.
 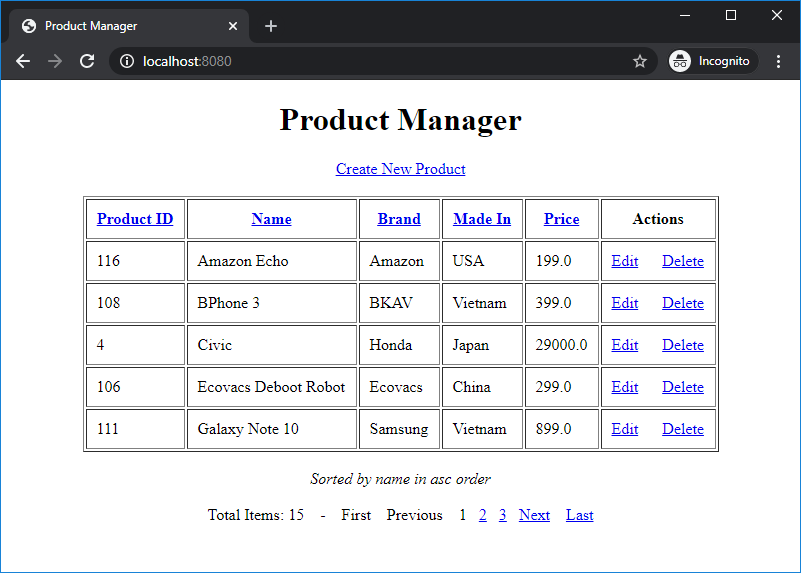 Click each column to test sorting and click navigation links at the bottom to test pagination alongside with sorting.
  Nam Ha Minh is certified Java programmer (SCJP and SCWCD). He began programming with Java back in the days of Java 1.4 and has been passionate about it ever since. You can connect with him on Facebook and watch his Java videos on YouTube.
Comments
You need to declare a method in the repository something like this (include both keyword and Pageable object):
@Query("SELECT p FROM Product...") public Page findAll(String keyword, Pageable pageable);
You can pass Sort and Pagination into to a Pageable object.
Thanks for this and the search tutorial.
Is it possible to combine the two i.e. Searching and Pagination?
Regards
Con
You can also use hidden fields instead of session. That will be easier.