Spring Boot Logging Basics
- Details
- Written by Nam Ha Minh
- Last Updated on 18 July 2020 | Print Email
1. Understand Spring Boot’s Logging Architecture
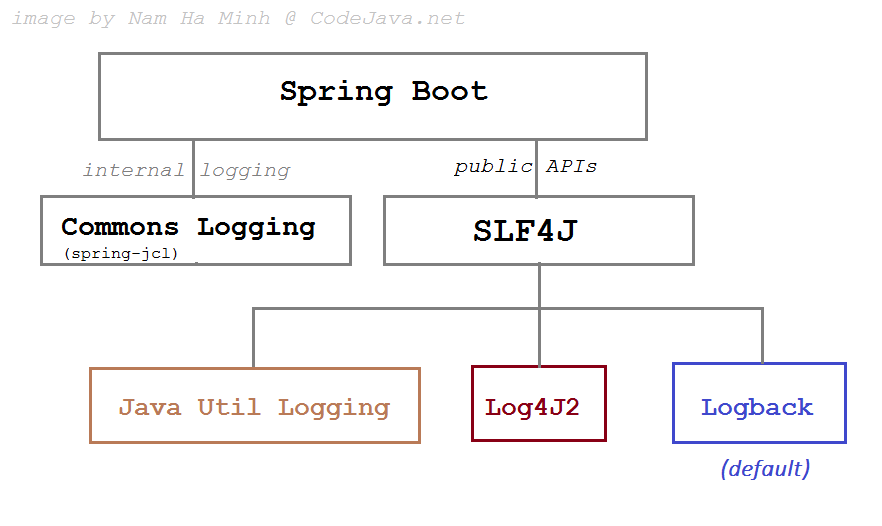
The following picture helps you understand how Spring Boot uses logging frameworks: As you see, for internal APIs Spring Boot uses Java Commons Logging (JCL). For public APIs that are exposed to application programmers, Spring Boot uses SLF4J (Simple Logging Façade for Java) which allows programmers to choose different logging frameworks.Currently, Spring Boot comes with libraries for Java Util Logging (JUL), Log4J2 and Logback. And Logback is used as the default logging framework. That means when using Spring Boot, you don’t have to specify any logging framework dependencies, as they are included by default.
 2. Write Log Messages in Spring Boot
Since Spring Boot uses SLF4J for public APIs, we can declare a logger using SLF4J API. For example:private static final Logger LOGGER = LoggerFactory.getLogger(AppController.class);with the following imports:
import org.slf4j.Logger;
import org.slf4j.LoggerFactory;
LOGGER.trace("for tracing purpose");
LOGGER.debug("for debugging purpose");
LOGGER.info("for informational purpose");
LOGGER.warn("for warning purpose");
LOGGER.error("for logging errors");
That’s it. By using SLF4J APIs, your logging code doesn’t depend on any logging frameworks. And you can choose to use a specific logging framework by providing its configuration file in the classpath. 3. Enable DEBUG and TRACE mode in Spring Boot
The default log level used by Spring Boot is INFO, meaning that only logging messages written in the levels INFO, WARN and ERROR are outputted to the console. So to enable lower log levels i.e. DEBUG or TRACE, you need to specify the following entry in the application.properties file:debug=true
or:trace=true
That’s it. Spring Boot makes it easy to enable debug or trace logging without touching any logging configuration file.4. Configure Log Level in Spring Boot
Spring Boot also allows you to specify a specific log level for a specific logger name in the application.properties file. For example, the following line sets the log level to WARN for all loggers:logging.level.root=WARN
And the following line specifies log level DEBUG for only loggers in the package net.codejava:logging.level.net.codejava=DEBUG
That means you can specify different log levels for different loggers, depending on your need.5. Customize Log Pattern in Spring Boot
If you want to customize/change the default log pattern used by Spring Boot in the console, you can use the following properties:- logging.pattern.console: specifies the log pattern for output to the console.
- logging.pattern.dateformat: specifies the log date format
- logging.pattern.level: specifies the pattern for log level.
logging.pattern.console=%date{dd MMM yyyy;HH:mm:ss.SSS} [%thread] %highlight(%-5level) %cyan(%logger{36}) - %green(%msg%n)
To format only the date time part in the logging line:logging.pattern.dateformat=dd-MM-yyyy - HH:mm:ss
To format only the log level part in the logging line:logging.pattern.level=%highlight(%-5level)
Note that the pattern for console will override the patterns for date and log level. And these properties work with Logback only.6. How to use Log File in Spring Boot
By default, Spring Boot outputs log messages to the console. If you want to write logs to files, you need to specify the following properties in the application.properties file:- logging.file.name: specifies name of the log file. Spring Boot will create the file under the application’s directory.
- logging.file.path: specifies absolute path to the log file (not including file name). Spring Boot will create the log file name is spring.log under this path.
- logging.pattern.file: specifies log pattern used for the log file. If not, the console pattern is used.
logging.file.name=Shopme-backend.log
Specify log file path (file name will be spring.log):logging.file.path=D:/Temp/Logs
Specify log pattern for log file:logging.pattern.file=%date{dd MMM yyyy - HH:mm:ss.SSS} [%thread] %-5level %logger{36} - %msg%n
That’s it, quite simple. You don’t have to touch configuration file of a logging framework.Conclusion
Through this article, you have understood the logging architecture used by Spring Boot. I also shared with you how to write log messages with SLF4J API, how to enable debug/trace, how to set log level for specific loggers, how to change log patterns and how to output logs to files. Spring Boot makes all of these easy so you can focus on developing business logics for the application.You can also watch the video version of this tutorial below:Other Spring Boot Tutorials:
- Spring Boot automatic restart using Spring Boot DevTools
- Spring Boot Form Handling Tutorial with Spring Form Tags and JSP
- How to create a Spring Boot Web Application (Spring MVC with JSP/ThymeLeaf)
- Spring Boot - Spring Data JPA - MySQL Example
- Spring Boot Hello World RESTful Web Services Tutorial
- How to use JDBC with Spring Boot
- Spring Boot CRUD Web Application with JDBC - Thymeleaf - Oracle
- Spring Boot RESTful CRUD API Examples with MySQL database
- How to package Spring Boot application to JAR and WAR
- Spring Boot Security Authentication with JPA, Hibernate and MySQL
- Spring Data JPA Paging and Sorting Examples
- Spring Boot Error Handling Guide
About the Author:
 Nam Ha Minh is certified Java programmer (SCJP and SCWCD). He began programming with Java back in the days of Java 1.4 and has been passionate about it ever since. You can connect with him on Facebook and watch his Java videos on YouTube.
Comments